Tuesday, October 01, 2013

The front continues apace

So after a stint of nights irradiating the fair people of  middle England I got a few rain free days to continue on the anticlockwise (starting rear left corner) direction of the cars bodywork. I'm up to the front of the front wings and valance.
This is how I left it last time after welding in the fillet pieces for indicator holes.


Horror of horrors.........the RH hole is 3/4" inch too far from the centre. At first I tried to make a template modification by adding on some small sections but broke both jigsaw blades extending the pointy end of the hole. So, rarely for me, I removed the patch completely and made another one. This time I popped to my local hardware shop for supplies of jigsaw blades and other stuff. I made the template properly. That is by drilling a 3/8" holes at strategic points to allow the blade to turn 90 degrees. Guess what, Never broke another blade..whoopee ! My welding skills had deteriorated though and ground most of the weld away.

Below is the rather complex template I was going to make before I decided to renew the whole insert.


As you can see I've used the old door skin to make the patch. The skin has come in very handy as I've used it endlessly for the rear inner wheel arch, Rear side window bottom, Inside rear strengthening (where P.O had cut through it to mount a speaker) window winder base bracket and many other things. So, it shows I'm keen on recycling ( not really, just a tightwad).

As a diversion I got from the shed the front chrome bumper, bought years ago from down south when I was travelling as a sales-specialist. I also bought yonks ago some mounting irons (stored in conservatory) and set to to give it a good clean with the sponge pad in the drill.


Armed with an array of cleaning products I thought I'd get it looking like new, well almost.
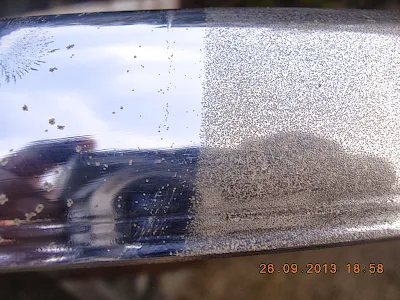
Look at the stuff I used on it. Note that the bumper had an over-rider on but I've decided to go with a sleeker 60's look without so the chrome does have a distinct line where it was covered up. That's the area I started on first to see which product worked best. 

See below


Well, which one did work best ?

Answer.................................................None of them. I had visions of the chrome looking brand new.
Epic fail. To be fair the T-cut, Vinegar and Peek chrome cleaner were all about the same. It'll have to go off for re-chroming at some point in the future, but that's for much later on when finances are in better shape.


Since the welder was out I fashioned two gigantic captive nuts to hold the bumper iron onto the chassis rail. These were made from the old rubber bumper brackets and were being saved by wifey in the conservatory for her arty farty projects. I just reclaimed them, chopped them about and hey presto.


With two rectangular infills added to the front lip the front end was complete. I've discovered high build primer !. Painted that on the welded area, sanded ,filled, sprayed primer ( the cheapo £1 tin stuff) and job done !
Before

After


Next up is rebuilding a wall around the base of (as was) giant fir tree, again. Did it 20 years ago so can't grumble, but wifey can !  


Monday, September 16, 2013

A little bit more progress

So whats been happening then !
I booked 3 days leave from work to ferry the kids back to Uni with a weekend sandwiched in between, so 5 whole days. It transpires as 3 actually as 2 days were for above, one day it p***ed it down, the other day it rained p.m as I was in town in the a.m. So that left One day ! on which to get more progress.
I did though.
Firstly found LH winder mechanism in shed. The LH door glass was next together with mounting screws and winder handle.
Found front LH Indicator lens and frame in shed.
Found front bumper in loft and brackets in conservatory under a pile of wifeys artyfarty stuff.
Found LH quarter light assy in shed.

One thing that did puzzle me was...........I bought a pair of doors ( from you know where) about 4 years ago. Turned out they were crap, rusty, full of filler and poor lock chrome. However the quaterlights were good so I saved them down by the shed wrapped in polythene.
When it came time to find the LH door/window stuff I'm sure I had 3 RH side windows, quarterlights and winders !!
It took forever to figure out what was what and for which side.
Coo....the winder mechanism drove me nuts as I had four of them and trying to decide which way round they went was baffling.
Anyways, I cleaned up said winder mechanism with thinners,wire wool,soapy water and lithium based grease and fitted. Trouble is though the door is now heavier and its a swine to re-align and tighten the 6 door screws sufficiently so it does not drop.
Anyone got any Ideas better than the 6 Phillips screws used ?

Not thwarted I attached the quarterlights roughly. The top edge of the quarterlight seems a long way from the windscreen A pillar...eek.

N
Not quite shown in the picture due to the slight head on angle and I had a little jiggle around with the door.

I must admit that its good to be finally fitting stuff on rather than taking stuff off or even sanding.
I also have 4 window channel runners but think I've found out which way they fit..hopefully. Trouble is though I can't find the base bracket I fabricated a few years ago to hold it in position on the door bottom. I desperately need a selection of UNC/F nuts, bolts, screws/washers. MGB Hive do one for £18 ore so, so next payday will see me purchase one. I also need some to hold the front bumper to its brackets whilst I drill holes in the chassis rail.

That brings me to my next job.
Courtesy of the Canadian MGB register and Moss USA, I found the templates to weld up the indicator holes from the front ( Rubber) bumper position and new hole position to suit the chrome bumper light ( Yes I know its getting boring...another E-bay purchase, albeit 5 years ago).
So set to I did with 2 new in-fill pieces for LH & RH sides. Scrounged B & D jigsaw from Ma-in-law ( only wood blades available but hey ho it worked).

Picture to follow


Monday, September 02, 2013

Sanding and more sanding


After a mammoth wet/dry with 240 grit paper the A post is looking slightly better. All the old scratches from using 80 grit then 120 grit appear to have gone....or have they ?


The simple answer is NO !Shown is the remnants of the painted on "high build primer". Even after another sanding session and light guide coat of grey primer there are still many imperfections from the coarser grit paper used in isolated areas.
Time for more 240 "wet n drying" then. It then resembles much the same as the first picture except I'd spotted more areas along the top of the wing and near the front edge.

Fortunately after a days trolling round town Saturday morning with wifey I spotted more £1 cans of the grey primer. So on it went after a thorough clean and wipe. Look , it gleams !


Unfortunately there are STILL flaws in the paintwork !.
 a /. it was quite windy.
 b/. I'd not cleaned it as well as I though.
 c/. Did not rub it down enough !!!! FFS how much rubbing do you have to do.
Its funny though a few years ago this was the first wing to get a full coat of primer and after we/drying it looked fantastic. Must be the attention to detail I have now, since slight scratches from the original 120 grit paper are faintly visible, nay hit me in the eye..and sting.

Since the storm clouds were gathering and the wind getting up I called it a day.
I've decided to let the paint harden for a week, however I'm applying the acrylic stopper tomorrow hopefully it will harden sufficiently for more localised polishing/wet/drying. I'm getting a bit pissed of with the endless filling, rubbing, more rubbing, cleaning guide coating, repeat ad nausiem.

So as a diversion I'm going to modify the front wings to accept the chrome bumper style indicators and positioning. I may even fit the chrome bumper bracket ( bought from you know where) after some inventive  " modification" of the old rubber bumper mounting legs into captive nuts to fit inside the chassis rails. I have a rather explicit and diagrammatic instructions from the MG club of Toronto ( I think) which has lain sulking in the Lostsock secret repository for a few years ( As has the CB lights, bumper and irons).  I'm loathed to fit the irons with M8 thread and nuts but it looks as if I may have too.

Or I may just fit the door locks and mechanism instead. Oh the joys of MG restoration.

Monday, August 26, 2013

Bodywork..it int arf borin. innit !


The picture shows the LH rear wing inboard of the seam top. Its been a swine to get right. Every time I filled it and sanded then primer ed it a distinct crack appeared. Several attempts have ensued. Each time deeper and deeper I plunged in with the scary grinder and wire brush thingy. Each time the "crack" appeared
looking like an old section of thick paint curling up from the filler. Anyways after umpteen re-do's its fine now, hopefully. If you look closely you,ll see the imperfection. Much worse looking than the photo shows.
Here's the latest attempt below

I've been working diligently if not slowly from LH rear wing clockwise round car attending to all the poor filling/sanding done over the restoration at various times over the years by ME ! I've got as far as the front wing rear edge and top seam/scuttle join. The sill is done also. See below.


As  is the A post. Had to bite the bullet with this one since there was a few large flakes of old paint around the hinges. So I set to with small wire cup in drill and had it done in no time. Same with the door frame sides and bottom. Lots of wet/dry sanding of door skin and that's looking dandy.


I have a funny feeling that I did all this a few years back too. But, and a big but is I have a super heavyweight cover made by yours truly. On a trip to the timber yard I asked if they had any polythene in their skips. And, boy did they have some. There had been a recent delivery of 30ft lengths of 2 x 4 ( about 24 pieces wide x 30 high ) all wrapped in heavy duty Poly. They were huge. I selected best/least shredded one and set to cutting and taping to MG shape one afternoon between heavy showers. Loads better than blue woven sheets which flap and leak.
                                 The only bad news I have to report is the demise of the much heralded "electric" spray gun. It was purchased early in the restoration from a car boot in town ( Circa 2005) for £2. Its skulked somewhere in the loft ever since, but not forgotten. I recently purchased some high build primer from ( you know where by now !) since the bodywork was progressing. Up to now I've been using rattle cans from
Poundland/poundshop. Just when I was ready to spray the whole rear 1/4 + sills the bloody gun just made a lot of noise. loud and pounding. I'd even got paint in the bowl but not a drop would emanate. After an hour of stripping it down ( made in the 70's - but still as new/unused) I admitted defeat and threw the flipping thing away. Trouble was the supply of £1 primer cans was exhausted in both shops with no idea if they would return. N.B  just spotted 5 cans this weekend. Bought em. Hence post now on a sunny Bank Holiday Monday. 

Onwards and upwards.


Saturday, May 11, 2013

Slow, Slow, Stop,Go !

Another confusing title ?
Well what else would you expect from good ole Lostsock.

Very little progress has been made this year. Mostly due to the weather ( winter !!) However now the summers here its time to get a move on.
There are only two things to possibly prevent this :-
                                                                                     a/. The Weather
                                                                                     b/. Money
there is also another possibility, work. Our Rota's been changed to a 38 week cycle with supposedly more weekends off, fewer night shifts and less 7 day continuous shifts. Six weeks in and it feels a lot worse than it looks on paper. Maybe I just chose a crap place to start and I know the two people responsible for the rota worked very hard to make it fair/better or that we are still understaffed by 20%. Rant over, back to things MG.

I left the MG in a bad state engine wise tuther winter which saw last summers engine start up mix oil and water together (again) after head re-skim, pressure test, block head stud hole chamfer  and new Payen gasket. So, I've had all winter to re-think after some considerable considering a new/refurbed/second hand "good"/complete engine out/rebuild thinking it may be that the block is cracked.

After some discussions with knowledgeable people I've come to the following conclusion.
Cast Iron blocks rarely crack hence the design of core plugs. Twas the discovery of two leaking ones that lead me to suspect a cracked block in the first place, the oil/water mix confirmed this after the head skim.
I was wrong.
 It is more likely that the head studs have " bottomed out" or some dirt got between when fitting the head. So, come time off of more than one day that coincides with a dry wind free day and wife has not nagged about some doom laden urgent DIY task to be done, I'll start on the engine.

Firstly is a good tidy up of the driveway then to the cars inside where all my tools and stuff are stored.
What prompted the post is that I've just done a big spurt of DIY garden related stuff viz :- removed front fence to be painted by wifey ( done, waiting purchase of new fence posts and me/son1 to refit) chopped down three large conifers and took to dump-it site (70% wifey 30% me). In a fit and flurry of "got to do it now" from wifey, she's been a blur of activity and arranged a professional tree surgeon to remove the huge Douglas Fir tree in the back garden ( and take it away) and he needs good access along the driveway to his tree munching machine. So since the MG has developed flat tyres at the front and he said it needs to be "repositioned" out of the way of lumberjack type blokes with chainsaws, a local garage put wind in them for me. A very helpful chap he was too and a classic car enthusiast ( He has a 2.8 Capri). The local fillings stations wind machine that just emits continuous burps of 20/30 psi just wouldn't do the job. Helpful chappies machine give 150 psi max,  and he did it for free.

To keep it interesting here's a shot of the "Mix" Opposite # 4 cylinder.


and the new Black Payen gasket before head fitting.


 I hit a crappy section of the Rota now which means lots of 4-12pm shifts with midweek days off. So wish me luck that fate, the weather, Wifey becomes nagless kind/ charming and enthusiasm/wisdom returns. Sounds like the strapline for "The Perfect Storm".......Hahaha......int life great !


Monday, February 25, 2013

Its been how long.............!!

Looking at the date of the last post has made me guilty and a little embarrased that I've ignored all you followers and the MG.

So to keep you all up to date, The life of lostsock is as follows in no specific order of importance or date :-
Got permanent contract at work, following straight on from early Feb 2013 temp contract end.
Son twin 1 off to Stafford Uni Sept 2012
Daughter twin 2 considering other offers from many Uni's after year off.
Spent most of last 6 months with me and/or wifey trolling cities for twin 2's choices of Uni ( Glasgow, Newcastle, Manchester x 2, Sheffield, Bristol, York, Leicester and Nottingham - All Medical stuff)
Spent fortune on my (Wifeys Clio) as it was our (my ) only means of transport to/from work.
Bought new-ish Peugeot 207 for better mpg/commuting/running costs ( Wifey has her Clio back..yay)
Finances take a hit since kids are no longer kids anymore and despite me earning, overall income is lower !!
The weather since Sept 2012 has been crap, finances low and motivation for MG completion low.
Working shifts at a busy NHS trust makes me very tired and weeks without seeing daylight have become normal.
And last but not least..............motivation to finish the MG is back ( as soon as the weather improves, and I get the time off for more than 2 consecutive days)

So a recap MG wise. The engine is maybe no good. Its puzzled me the last 6 months as to why oil/water is mixing. The head  has been off, skimmed and pressure tested and re-fitted with a Payen gasket and torqued down correctly.
Maybe I've not cleaned out all the Mayo from pre head off test run. Maybe there is a crack somewhere in the block........how do I find out though ?

I've decided not to worry about it now since the engine is full of oil and good quality antifreeze. I'll do what I typically always do...ignore it. The worse case scenario is a new engine ( £1200 full recon with warranty or risk buying second hand block to rebuild myself)
However with so much bodywork still to do and the brake/clutch masters not functioning 100% the immediate work will all be bodywork related. Typically fitting windows and winder mechanisms. Aligning doors and bonnet and wings. Repairs to rear window and rear wing underside.

And so it goes. More news as it gets completed............soon with photos hopefully.

Forgot to say also Ive managed to delete the mass ( 95, yes 95)  spambot messages left as comments offering everything from financial advice to sex toys. Unfortunately I may have accidently deleted some of your comments too, so sorry. Please repost as I can't rescue them and I need the encouragement.