So as the title says I'm as committed as ever to get the MG done, its just that I aint had the cash or fortitude to work in wind, snow & Ice out on the drive lately.
The last job I did was to partially remove the rear springs. The Axles free, that was easy peasy. The rear spring mountings were easy too. The front mountings won't budge. Despite several soakings during the Autumn in petetrating fluid the bolt will not knock out. Neither will one drop link too ??.
Fairly easy to solve though......................borrow a bigger hammer ( from B in L )
So thats how the car has stayed for the last couple of months. Under its shiney silver Argos cover. Actuallythe cover is not so good as I first thought. During some very windy days it ripped along its supposedly "welded" seams. Easily cured with a stapler and duck tape. Methinks the recent snow will preclude some more duck tape though.
Work/Placement and Uni has taken most of my time the last couple of months, that and dreaming of money.
I have worked a little, as student ambassador on open days and after christmas as barman in my local Saturday nights.
Uni is getting very intense with the following months requiring three essays and a poster plus another 12 weeks of Placement.
Roll on Summer.........................and I aint even started on the Christmas food and drink yet !

My name is Paul. Recentlv retired Radiographer in the NHS, former toolmaker, draughtsman & Sales engineer. This is a blog of my pastime . I have now have a brand new garage In which to build my dreams, no lights or electrics yet. So follows is my journal of the restoration of a 33 year old MGB-GT .
Monday, December 21, 2009
Sunday, September 27, 2009
What to do next............its not that tricky
 ( Me being attacked by a swarm of angry bee's...... for having dirty hands ?)
 Yes, exactly what to do next ?.
Last post saw me having undone the rear half of the spring, undone the axle "u bolts" and one damper drop link.
Thats exatly how the situation is now, only worse.
So how can it be worse if I've not done anything ?
The situation at Uni is :-
1st week, all week, very fast paced and lots to imbibe and inwardly digest.
2nd week, easier but the real enormity of 1st week hits home with and essay to finish by end of the month.
3/. Knowing this would happen at Uni since the drop of the axle/springs, I looked up the parts and cost involved to get the back end sorted.
It went something like this :-
Plan 1/.
a/. All new bushes at the back, deffo. Poly bushes and Blue "fast road use".
b/. New "lowered" pair of leaf springs. ( to suit chrome bumper model ride height, mine was a rubber bumper model to be lowered )
c/. New Chrome bumper shorter drop link ( pair of )
d/. Spax suspension would be nice ( so would a pair of parabolic springs too) but they are all out of the question, money wise.
e/. new bumpstops top & bottom.
f/. new rebound straps.
g/. Lowering kit from MGOC
Reality after a few searches ont tinterweb..................way too expensive !!!!.
I'm not sure if the spring price was per pair or each, either way £80 is a lot.
It all came to ....................wait for it ............. £ 330 approx.
So plan 2/.
a/. as 1/.
b/. Second hand springs.....................price dunno yet
c/. Second hand drop links.................£ 5.oo each
d/. Forget............too expensive
e/. as 1/.
f/. as 1/.
g/. Is it really needed ?, some stuff can be re-used or I already have it above.
Reality.......................Still too expensive. Its just over budget.
By the way at this point it would be good to mention what my budget is - see below
NOTHING !!!
yes, thats right. I've got bugger all.
So in light of this and my new found wisdom a re-think was done. The reality is this.
a/. Poly bushes @ £ 37.00 set ( rear only) OR Std stock rubber ones ( Noooooooooooo!!)
b/. Refurb the springs ( they have sagged anyway, shorter drop links will tell)
c/. Second hand drop links £ 10.00 total
d/. Second hand rebound strap.........price......dunnoo ( but less than £10.00 total )
e/. - g/. forget.
So I might as well be planning a total new re-shell since thats about as realistic as the above when you aint got no cash.
So thats why the post is called " What to do next ". Its definitely not tricky. The answer is Nothing.
Uni will keep me busy for the next 3 weeks anyway with the dreaded assignment essay. After that the weather will turn and maybe a little too cold but much more likely too wet.
I'm determined though that its not going to be one of the dreaded "Unfinished projects" for sale.
I might have to think of ways to improve the lot of Lostsock and family, after the essy though.
More soon.
Monday, September 21, 2009
Is that an axle in your eye ? No its a leaf spring actually.
What a strange title. Let me explain. You knew I would anyway.
Many years ago, when I had money, time and a restless nature I had a desire to fulfill a long lost dream. That was to restore an old car. So I looked on good old e-bay and bought an old banger from 1977, well in need of renovation and with a good supply of parts suppliers and knowledge base available. So In good old Lostsock fashion I decided to document its renovation.
That's what started me on the blog thing. Rather than take loads of photos, why not make a narrative text as well to assist others and maybe solicit some help for myself.
I did and the oddities of the chosen Blog supplier prevented me from linking both of my blogs each way.
Now the real reason for the post and a little light reflection and observation on our good old health system.
During the last few weeks prior to Uni starting I've done some work on the car. Its sort of well on the way to being finished after years of body work repair. Next job on the list was replace rear springs and bushes, clean up and paint with whatever ( Underseal, Red lead, etc)

This involved me with some time flat on my back......careful.... working spanners and hammers on nuts that have not been touched for 33 years. So, 33 years worth rust fell onto my drive during said operation, only taking a detour into my Right eye. For some months my Left eye has been odd in the morning ( Deduced by wifey to be the same cause). Insomuch as sticky eyelids and a general soreness. So after said weekend and the start of Uni saw Lostsock not his usual chirpy self. Plagued by a dull headache behind the eyes and head.
So, Monday morning saw me attend the Docs at 8 am sharp. Not to see a doctor. Simply to stand in line when the surgery opens so I could book an appointment as soon as.
Its pointless trying to telephone as it rings for ages once you get the answerphone message and options. Then appointments are for in at least 1 months time. Well not really but generally far enough away to stop people with trivial illnesses wanting to attend.
I was 4th in line at the reception desk. The desk is manned by the Practice Manager. Not a woman who would win any charm contests. So I heard all the 3 previous peoples illnesses since the PM had to ascertain to whom to send them ( Nurse, Doctor or Room for arguments) , their age and date of birth and their address.
So What happened to patient confidentiality then ?................
Is the P.M medically trained ?....................methinks not ( Hope the Practice is Insured )
Many years ago, when I had money, time and a restless nature I had a desire to fulfill a long lost dream. That was to restore an old car. So I looked on good old e-bay and bought an old banger from 1977, well in need of renovation and with a good supply of parts suppliers and knowledge base available. So In good old Lostsock fashion I decided to document its renovation.
That's what started me on the blog thing. Rather than take loads of photos, why not make a narrative text as well to assist others and maybe solicit some help for myself.
I did and the oddities of the chosen Blog supplier prevented me from linking both of my blogs each way.
Now the real reason for the post and a little light reflection and observation on our good old health system.
During the last few weeks prior to Uni starting I've done some work on the car. Its sort of well on the way to being finished after years of body work repair. Next job on the list was replace rear springs and bushes, clean up and paint with whatever ( Underseal, Red lead, etc)
This involved me with some time flat on my back......careful.... working spanners and hammers on nuts that have not been touched for 33 years. So, 33 years worth rust fell onto my drive during said operation, only taking a detour into my Right eye. For some months my Left eye has been odd in the morning ( Deduced by wifey to be the same cause). Insomuch as sticky eyelids and a general soreness. So after said weekend and the start of Uni saw Lostsock not his usual chirpy self. Plagued by a dull headache behind the eyes and head.
So, Monday morning saw me attend the Docs at 8 am sharp. Not to see a doctor. Simply to stand in line when the surgery opens so I could book an appointment as soon as.
Its pointless trying to telephone as it rings for ages once you get the answerphone message and options. Then appointments are for in at least 1 months time. Well not really but generally far enough away to stop people with trivial illnesses wanting to attend.
I was 4th in line at the reception desk. The desk is manned by the Practice Manager. Not a woman who would win any charm contests. So I heard all the 3 previous peoples illnesses since the PM had to ascertain to whom to send them ( Nurse, Doctor or Room for arguments) , their age and date of birth and their address.
So What happened to patient confidentiality then ?................
Is the P.M medically trained ?....................methinks not ( Hope the Practice is Insured )
It didn't help when the guy in front of me insisted he needed his blood testing because his wife is Ill ???????????? and they didn't do it at the hospital last night because he'd he fainted. Is this a breach of confidentiality ?. There's been lots posted on various sites regarding this topic and say, Facebook. A certain Government ministers wife revealed some potentially sensitive details... allegedly. Some excellent medical related sites have even closed down voluntarily for fear of the dreaded Confidentiality police. Hope they don't come knocking for me...............errrrrrrrhemmmm.
But seriously, should we have to do this ?. I fully understand why the Practice Manager is a sourpuss ( The general Public...) but it should still not be allowed for the jaded, impatient and almost rude to be people facing. Neither should Non medically trained staff be making clinical decisions. Don't you agree ?. Could we do it as radiographers , i.e I.D patients in the waiting area. No. Tell them they have a nasty break ?. No. I am full of praise for all aspects of our wonderful NHS. It is still the envy of the world, has some great people and services. It is Europe's biggest employer and thereby is its problem. Its very difficult to employ 100% perfect and professional people. Unfortunately its the minority that stick in peoples minds. I for one am determined not to be a whingeing employee. Its depressing anyway listening to some people whingeing to others.
I have Conjunctivitis by the way so my vision today is a little cloudy................heeee heee. That's because there's been most of a 1977 British Leyland axle and leaf spring in it the last few months ( Nay years).
Wednesday, September 09, 2009

Sunday, August 30, 2009
A New Winter Coat
Not much activity MG wise. The weather and wifeys constant nagging re D.I.Y list has taken priority. What days off I had was devoted to either a nice long walk in the fine weather or resting. I must admit I wasted several days doing god knows what. The hours flew by and I can't remember anything. Only being annoyed at wasting time on nothing.
The MG has a new winter coat. £15 from Argos. Its fully waterproof, fits like a dream and has elasticated corners. Ever since I took out the rear window to repair the seams and lip its been kind of vulnerable to water ingress. The Blue poly sheets I've been using had eventually become porous, kept coming loose and generally were a real pain to remove/fasten up. Not helped by the fact the giant ( Not an understatement, its about the size of a tennis court) outer blue cover was ripped to shreds, full of holes and becoming snagged on every corner of the MG. The new under cover over the rear window just sagged into the tailgate space due to the weight of rain water collected so I had to be careful how I dragged the cover off. After several times of complaining about some of the water ingress wifey suggested the Argos catalogue ( She has up to date catalogues of every consumer selection on the planet) Well, we have no money so why not dream and spend the imaginary lottery millions. I don't think I'd shop at Argos if i did though.
It seems strange to be saying "winter coat" since its the last Sunday in August and the weather this month has been rubbish. Not hot and settled at all. Generally sunny with some rain and scudding clouds & wind, changeable and average. Where oh where have the long, hot and lazy summers of my childhood gone ?
Here it is covered, as I've just finished a couple of hours between D.I.Y'ing.
 Below shows the end plates of the Rubber bumper mounting removed. I intend to convert to chrome bumpers so theses must come off. Its not as straight forward as you think to convert a RB car to chrome bumpers. It now leaves the longitudinal chassis end plate open so I can chop off about 2" ( 50mm) back inside the grill opening ( to allow the fitting of a grille) of the top half, the bottom half needs only be cut back to be behind the valence when fitted. A plate is then welded to the top half to re-cover the section and a nut welded somewhere to hold the bumper bracket.
 Then, the lower valence has to have its two square holes ( where the above mounts poked through) welded up.
The wings have to have two square holes filled in and new square hole cut to suit the light fitting with chrome surrounds.
If you can remember the RB cars have the lights( Indicators) integral into the bumper and are larger than chrome bumper cars.
The rear needs the pointy body extensions under the lights ( done when I fitted the rear wings yonks ago). A conversion mount can be bought cheaply to fix the mountings and bumper.
Fortunately I have most of the stuff bought in the mists of time from E-bay and collected
from various parts of the country back when I was travelling this fair isle.
Incidentally, here is a list of places I've travelled to collecting my E-bay purchases :-
Enfield . North London...............................MGB-GT purchase...............................£180
Doncaster ( S.Yorks)........LH & RH sills/castle rail/jacking points and x-member.....£35
Harlow ( Essex)..................................MIG welder.........................£60
Mitcham ( Surrey)..............................Front chrome bumper & lights.............£15
Somewhere north of Wolverhampton miles from anywhere...... rear chrome bumper ....£10
Slough (Berks).........complete roof section......£10............still in storage at former employers ?
Dewsbury ( W Yorks)...........pair doors ....£15 .......Rubbish, never used, in shed I think.
Belper (Derbys).....................doorskin..............................£ 25
Doncaster ( S Yorks ) Head gasket set....................£8
Chesterfield ( Derbys).................Chrome bumper front springs.....................£10
Liverpool (Merseyside ).........Oil cooler & pipes........£15 ( Scouser Jim collected, ex colleague)
And that's not counting the trips to MGOC (many), MGB Hive (three), Mechspec( two) & Watford MG for proper purchases with real money for NEW stuff. Or stuff bought on E-bay that's been posted ( Mostly tools but did include VW golf repair rim for wheel arch) and "other" stuff generally purchased on E-bay.
I might like to add that I am not being paid by E-bay for all this promotion. of their wonderful product. A donation would be appreciated though !
More soon.
The MG has a new winter coat. £15 from Argos. Its fully waterproof, fits like a dream and has elasticated corners. Ever since I took out the rear window to repair the seams and lip its been kind of vulnerable to water ingress. The Blue poly sheets I've been using had eventually become porous, kept coming loose and generally were a real pain to remove/fasten up. Not helped by the fact the giant ( Not an understatement, its about the size of a tennis court) outer blue cover was ripped to shreds, full of holes and becoming snagged on every corner of the MG. The new under cover over the rear window just sagged into the tailgate space due to the weight of rain water collected so I had to be careful how I dragged the cover off. After several times of complaining about some of the water ingress wifey suggested the Argos catalogue ( She has up to date catalogues of every consumer selection on the planet) Well, we have no money so why not dream and spend the imaginary lottery millions. I don't think I'd shop at Argos if i did though.
It seems strange to be saying "winter coat" since its the last Sunday in August and the weather this month has been rubbish. Not hot and settled at all. Generally sunny with some rain and scudding clouds & wind, changeable and average. Where oh where have the long, hot and lazy summers of my childhood gone ?
Here it is covered, as I've just finished a couple of hours between D.I.Y'ing.
 Below shows the end plates of the Rubber bumper mounting removed. I intend to convert to chrome bumpers so theses must come off. Its not as straight forward as you think to convert a RB car to chrome bumpers. It now leaves the longitudinal chassis end plate open so I can chop off about 2" ( 50mm) back inside the grill opening ( to allow the fitting of a grille) of the top half, the bottom half needs only be cut back to be behind the valence when fitted. A plate is then welded to the top half to re-cover the section and a nut welded somewhere to hold the bumper bracket.Then, the lower valence has to have its two square holes ( where the above mounts poked through) welded up.
The wings have to have two square holes filled in and new square hole cut to suit the light fitting with chrome surrounds.
If you can remember the RB cars have the lights( Indicators) integral into the bumper and are larger than chrome bumper cars.
The rear needs the pointy body extensions under the lights ( done when I fitted the rear wings yonks ago). A conversion mount can be bought cheaply to fix the mountings and bumper.
Fortunately I have most of the stuff bought in the mists of time from E-bay and collected
from various parts of the country back when I was travelling this fair isle.
Incidentally, here is a list of places I've travelled to collecting my E-bay purchases :-
Enfield . North London...............................MGB-GT purchase...............................£180
Doncaster ( S.Yorks)........LH & RH sills/castle rail/jacking points and x-member.....£35
Harlow ( Essex)..................................MIG welder.........................£60
Mitcham ( Surrey)..............................Front chrome bumper & lights.............£15
Somewhere north of Wolverhampton miles from anywhere...... rear chrome bumper ....£10
Slough (Berks).........complete roof section......£10............still in storage at former employers ?
Dewsbury ( W Yorks)...........pair doors ....£15 .......Rubbish, never used, in shed I think.
Belper (Derbys).....................doorskin..............................£ 25
Doncaster ( S Yorks ) Head gasket set....................£8
Chesterfield ( Derbys).................Chrome bumper front springs.....................£10
Liverpool (Merseyside ).........Oil cooler & pipes........£15 ( Scouser Jim collected, ex colleague)
And that's not counting the trips to MGOC (many), MGB Hive (three), Mechspec( two) & Watford MG for proper purchases with real money for NEW stuff. Or stuff bought on E-bay that's been posted ( Mostly tools but did include VW golf repair rim for wheel arch) and "other" stuff generally purchased on E-bay.
I might like to add that I am not being paid by E-bay for all this promotion. of their wonderful product. A donation would be appreciated though !
More soon.
Monday, August 10, 2009
Homeward stretch
Well I've almost reached the point where all the bodywork is complete.
As we speak all that is left is :-
1/. Sand down filler in tailgate gutter and prime
2/. Tack weld boot/wheel-arch repairs to strengthen and add some seamsealer
3/. wire brush and paint ( Hammerite- Ku rust, its brill at killing rust) tailgate inner lower lip
4/. fill and sand hole in picture now rear screen is removed.
5/. Drill out snapped bolts in front upper valence mounting captive nuts.
6/. Maybe..............only maybe, re-position front indicator mounting holes in valence,
7/. Chop off old bumper chassis leg plates ( so a chrome bumper mount can be attached)
Not bad eh !! most of the above can be achieved in the next session. if the weather of our glorious summer holds out.
Spent the last two good days helping brother in law lay vast quantities of cement for his new patio. An we aint done yet.
Below are the photos mid repair of the top RH tailgate gutter.
LH side is fine RH side poor with BIG hole


So I set too thinking....................how the hell do I repair that !
I actually spent more time thinking why did it rust there and how ??
BL cars are really amazing, they rust in all the expected places usually, them that don't rust in all the weird places and not symmetrically.
Anyways, decided since this part is not seen i would weld some thin steel over and fill to a smooth finish.
Here are the tools of the trade for weird shapes.

Sorry for the "break" in the post..................Monday above ^ Wednesday below
Its very important to use only "Shredded wheat" cardboard , as this is never missed when you spirit away the box and leave behind the bag since no-one ever bothers eating the healthy stuff.
On a serious note though, label the template front face/rear as its easy to cut a Mirror Image of what you want.
One snag is I forgot to take a photo of the finished article, since its had its plates welded on, ground down, filled and sanded ( Twice)
I have also filled and sanded the tailgate outer edge and Ku-rusted and red leaded inside lower edge + covered in primer.
Below is foot-wells cleaned out, swept and Vac blown.
By Vac Blown I mean I used the trusty B&D leaf blower/sucker. God is it powerful.
Its like a hurricane and blows all debris into the stratosphere.
As we speak all that is left is :-
1/. Sand down filler in tailgate gutter and prime
2/. Tack weld boot/wheel-arch repairs to strengthen and add some seamsealer
3/. wire brush and paint ( Hammerite- Ku rust, its brill at killing rust) tailgate inner lower lip
4/. fill and sand hole in picture now rear screen is removed.
5/. Drill out snapped bolts in front upper valence mounting captive nuts.
6/. Maybe..............only maybe, re-position front indicator mounting holes in valence,
7/. Chop off old bumper chassis leg plates ( so a chrome bumper mount can be attached)
Not bad eh !! most of the above can be achieved in the next session. if the weather of our glorious summer holds out.
Spent the last two good days helping brother in law lay vast quantities of cement for his new patio. An we aint done yet.
Below are the photos mid repair of the top RH tailgate gutter.
LH side is fine RH side poor with BIG hole


So I set too thinking....................how the hell do I repair that !
I actually spent more time thinking why did it rust there and how ??
BL cars are really amazing, they rust in all the expected places usually, them that don't rust in all the weird places and not symmetrically.
Anyways, decided since this part is not seen i would weld some thin steel over and fill to a smooth finish.
Here are the tools of the trade for weird shapes.
Sorry for the "break" in the post..................Monday above ^ Wednesday below
Its very important to use only "Shredded wheat" cardboard , as this is never missed when you spirit away the box and leave behind the bag since no-one ever bothers eating the healthy stuff.
On a serious note though, label the template front face/rear as its easy to cut a Mirror Image of what you want.
One snag is I forgot to take a photo of the finished article, since its had its plates welded on, ground down, filled and sanded ( Twice)
I have also filled and sanded the tailgate outer edge and Ku-rusted and red leaded inside lower edge + covered in primer.
Below is foot-wells cleaned out, swept and Vac blown.
By Vac Blown I mean I used the trusty B&D leaf blower/sucker. God is it powerful.
Its like a hurricane and blows all debris into the stratosphere.
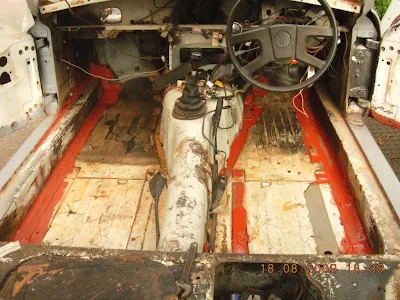 The dreaded rubbery compound sound deadening type stuff on the floor is horrible. Its about 1/4" thick and either comes up in chunks or like soft sticky toffee. So I'm leaving it in where its sound.Besides its too much time, bother and expense to remove. Trouble is what can I replace the removed bits with ? Anyone got a spare bitumen lorry load of it, warm and ready for pouring ? Red leaded the previous welds (Again) after another Ku-rust treatment.
Decided not to weld the rear boot corners/infills. I'm going to fill with copious amounts of seal sealer. I did also drill out the one seat runner bolt head that sheared on removal a few years ago. It took 3x 4mm drills ( Damn, just bought them too), angle grinder + 6mm drill + mole grips+350 squirts of WD40 in the end, but its out clean (ish). My tactic was to file the screw head flat (mistake) it was 5mm tall off the floor. I ground it down lower, flush to floor ( after drill break no 3) then started the hole with the last 3mm drill(till that broke) then all the way down with the 6mm. Underneath I ground 2 flats on the 8mm length poking out and gripped with moles and Presto ( all this took about 40 minutes and a bit of cursing)
So next is removing the Rubber bumper mounting plates at the front and those pesky captive nuts with half a bolt in them on the lower edge of the valence/body join.
I did also start up the car again, using a makeshift fuel directly into the carbs....WD40 !!!
GREAT<<<<<<<<<< It turned over for a few seconds and the oil pressure is good. I did video the occasion but Blogspot prevents me from uploading for some reason. Maybe next time then when I've worked out the fuel pump wiring and actually put real fuel in.
Sunday, August 02, 2009
What Colour ................tell me what you think
Well as the title says I've been giving this some thought, over the last 4 years actually.
The car was originally white ( Old English or Triumph White ) according to the log book and MG archives.
At some stage early on in its life it was given a very thorough respray to black. Even the engine bay ( Including wiring !!) rear tailgate inside and boot, door pillars /windows inside and bonnet underside.
Logic and common sense says make it back to original white. I think maybe so. Wifey saw a brand new re shelled Roadster at the MG hive last year in Old English White and loved it.
I'm not so sure as its a very yellowish white and it will really show up any panel gap errors.
I did see at the weekend a Fiat 500 in brilliant Blueish white. This looked really dazzling and I'm not sure if it was a White or very Pale brilliant light Blue, it still looked good though.
Below is a V8 example in Glacier white
.

I've decided that the car will be converted to chrome bumper and lowered back to standard or a little lower. However what type of grille ?. The above sports the later type ( 1970's).
There is a sixties style which I'm fancying as shown on the Bermuda Blue example car below.

This is how I envisage mine without the wire wheels and front over riders for a cleaner look.
I must admit the blaze red does look good though.

But having said that I do like the dark Midnight Blue below. Mine even has the large Chrome sill protectors and Rostyles too, plus it would hide any poor panel gaps.

Or could it be Black as it is/was now ? Shown is the older style grille and wire wheels.
I hate wire wheels, they always look dirty, must be a pain to clean and constantly need checking for loose spokes.

I suppose to keep the retro 60's look the colour should be pewter-ish ala 007's DB5 or even silver. But No, and here's why.
During my stint as a traffic surveyor recently and during the hours we got to sit down to count traffic i did my own car colour survey, By far the most common color was silver, or a variant of light blue/ green- silver, followed by Red then Black and Blue with Green last but fairly even with White. I did not count the weird colours like the Peugeot 80's Gold ingot type of aberration or the new Ford RS whatever with its bile/vomit green ( and JCB Yellow) aka 1970's glam or the boy racer pearlescent " I did this myself" paint jobs. I did see a rather attractive Brown on a Toyota Avensis ( oh.... how I miss mine) though and thought good, its nice to see one manufacturer breaking the mould a little. But not for my MG.
So What colour then...................It would be nice to hear your thoughts.
Tuesday, July 28, 2009
wheel clean
So another post, in fact two in a week. Must be a record.
Actually wifeys painting kitchen door and I've just cut the grass and done two sets of taxi -ing( Depositing kids where they want to go) so I had an hour or so pottering with the MG.
There were two reasons I tackled the spare wheel.
1/. Each time I venture into the shed at the bottom of the garden ( frequently) I see the forlorn spare wheel resting gently against the fence by the shed door. It sits there gathering leaves and fir debris as well as pine cones and general crud. Its still well inflated after years, and has been subject to a pretty poor refurb some time in its past.
2/. During said taxi-ing I deposited old newspapers in the town centre car park recycling bins. There opposite parked on the road was a lovely Red BGT with black roof, "T reg" and looking splendid with shiny Rostyle wheels.
So despite the plans I had originally made ( Fix hole in tailgate gutter & red lead floors) I set to with the wire brush in angle grinder.
He re are the before pictures.
 re are the before pictures.
Then some time later, after a visit to local motor factors ( I needed more primer and new goggles) a newish looking wheel was beginning to emerge.
Behold,


A little panic set in since no sooner had I finished the outside wheel to nice an almost chrome-ish finish the clouds came over very black and it started spitting with rain. So wifey was pressed into service shaking the can for the regulation 2 minutes ( She's excellent at making a noise) whilst I tidied the tools away and got the car cover/s back on loosely.
Only a few spots fell and I managed to get a good coverage of primer on as you can see.
Its by no means the finished article yet. I just wanted to see how far I could go without removing the tyre. In fact very far. The tyres whilst fully inflated and kept that way for the last three years, need replacing as the sidewalls are all cracked. I did manage to mangle the valve a little
with some not so subtle touches from the grinder/wire brush anyways.
The plan is when new boots all around are required for the m.o.t they will be removed then the wheels can be prepped and spray painted the correct silver and black with a clear lacquer for good measure. I'm not sure yet if i will attach some chrome surrounds for the wheels. I may have to depending how happy I am with my efforts at wheel re-finishing.
I also bought some correct type fuel hose and attached it to the pump & fuel tank unit.
Gosh wash it tough. Its very thick and the hole seemed very small compared to its wall thickness. Even after a good steep in boiling water ( whilst I cleaned kitchen floor, ahemmm
I spilt a whole cup onto the floor attempting to carry the hose in cup + my own coffee)
So. twenty minutes later the hose was on and I,m ready for fuel.
Not yet really, I need to weld the gutter patch directly above filler spout in boot.
But soon............................very soon !
Sunday, July 26, 2009
Admiralty, Enemy, Rival, Fallen & Angel..............
All follow or proceed ARCH(ES) .......................( OK the last one stretched it a bit )
Before we go further........I passed all my exams................Yippee !!
So Arches, or arch to be precise. I've finally finished the patchwork quilt of welding the lip of the arch inner - outer section. It was a swine. The main problem being the wheel hub right in the most awkward place imaginable. Your head needs to be there to see what you are doing and get out of the way of all the falling crud ( and grinding sparks and welding sparks). Its very difficult to get a head covered with welding mask in there and weld. It was managed albeit with some bird poo type welding in parts, lots and lots of stray sparks behind the mask ( it makes you leap around a bit) head wedged and stuck in position, mouths full of 32 year old crud and sparks falling onto your arms and chest. Yes they hurt too.
As proof see the photos below, labelled looking out from the ( left rear) arch.

Bear in mind the camera was easy to position as its small. My head+welding mask is not.
I,m rather proud of this and the composite layout ( done in paint) .
You will see in the centre the view of the tailgate section. Yes it still is a shed/tool storage space since I've long since run out of storage locations.
However, most of it will be spirited away somewhere whilst I work on the floors inside.
Bodywork wise its just about done. There is one 50p piece hole in the top RH corner of the tailgate gutter ??? and a pencil sized hole just under the rear screen rubber at the 5 o'clock position with a little more underlying rust ,so the rear windscreen is coming out soon. The rubber surround is awful anyway, very brittle and scabby. The chrome trim will be cut out, polished up and re-used.
Methinks that with a respray its imperative to have new front/rear rubbers ( fitted after respray, obviously)
AND, to continue the good news a small windfall from the tax man has allowed me some cash for the next stage. What shall be the next stage ?. I guess I must attach the fuel tank, fuel line and work on getting the engine turning over at least. This part worries me as I see it as a potentially frustrating part. Auto electrics, carb balancing, mixture adjustment all will play a part in the life of one happyish student Radiographer over summer.
Since the money is there and not needed for the above work I guess I may buy Poly bushes for the front suspension, and give each side a overhaul and refurb. I have a pair of lower springs bought on e-bay last year (£ 5/pair, if i remember correctly).
So, I must fit for now, the accelerator pedal and cable, but first wire brush the floors and red lead them.
Soon, with a little luck I may be able to drive it under its own power..............oh joy oh joy.
Bad news is wifeys on D.I.Y overdrive with the cash windfall. So far I've painted the bathroom ( twice) and toilet. She's offered to paint the kitchen. This is a sneaky feminine tactic. She's terrible at painting but denies it. However she knows I will offer to do it after making a bo****ks of her first attempt. In fact she visited B&Q.....!! EVERY DAY!! this week for one thing or another ( matchpots x 30,0000, bathmat, wallpaper [ not purchased, painted existing instead, twice] paving [n/p], look at bathroom suites, brushes.........I eventually refused to visit the last time, instead feigning a headache from all the paint fumes........two can play that game !!!!!!!
Before we go further........I passed all my exams................Yippee !!
So Arches, or arch to be precise. I've finally finished the patchwork quilt of welding the lip of the arch inner - outer section. It was a swine. The main problem being the wheel hub right in the most awkward place imaginable. Your head needs to be there to see what you are doing and get out of the way of all the falling crud ( and grinding sparks and welding sparks). Its very difficult to get a head covered with welding mask in there and weld. It was managed albeit with some bird poo type welding in parts, lots and lots of stray sparks behind the mask ( it makes you leap around a bit) head wedged and stuck in position, mouths full of 32 year old crud and sparks falling onto your arms and chest. Yes they hurt too.
As proof see the photos below, labelled looking out from the ( left rear) arch.
Bear in mind the camera was easy to position as its small. My head+welding mask is not.
I,m rather proud of this and the composite layout ( done in paint) .
You will see in the centre the view of the tailgate section. Yes it still is a shed/tool storage space since I've long since run out of storage locations.
However, most of it will be spirited away somewhere whilst I work on the floors inside.
Bodywork wise its just about done. There is one 50p piece hole in the top RH corner of the tailgate gutter ??? and a pencil sized hole just under the rear screen rubber at the 5 o'clock position with a little more underlying rust ,so the rear windscreen is coming out soon. The rubber surround is awful anyway, very brittle and scabby. The chrome trim will be cut out, polished up and re-used.
Methinks that with a respray its imperative to have new front/rear rubbers ( fitted after respray, obviously)
AND, to continue the good news a small windfall from the tax man has allowed me some cash for the next stage. What shall be the next stage ?. I guess I must attach the fuel tank, fuel line and work on getting the engine turning over at least. This part worries me as I see it as a potentially frustrating part. Auto electrics, carb balancing, mixture adjustment all will play a part in the life of one happyish student Radiographer over summer.
Since the money is there and not needed for the above work I guess I may buy Poly bushes for the front suspension, and give each side a overhaul and refurb. I have a pair of lower springs bought on e-bay last year (£ 5/pair, if i remember correctly).
So, I must fit for now, the accelerator pedal and cable, but first wire brush the floors and red lead them.
Soon, with a little luck I may be able to drive it under its own power..............oh joy oh joy.
Bad news is wifeys on D.I.Y overdrive with the cash windfall. So far I've painted the bathroom ( twice) and toilet. She's offered to paint the kitchen. This is a sneaky feminine tactic. She's terrible at painting but denies it. However she knows I will offer to do it after making a bo****ks of her first attempt. In fact she visited B&Q.....!! EVERY DAY!! this week for one thing or another ( matchpots x 30,0000, bathmat, wallpaper [ not purchased, painted existing instead, twice] paving [n/p], look at bathroom suites, brushes.........I eventually refused to visit the last time, instead feigning a headache from all the paint fumes........two can play that game !!!!!!!
Tuesday, July 14, 2009
Hello All
Big delay in posting. Simple reason really. I've been swatting for my exams. What with that and the recent hot/sunny spell my mind has been elsewhere.
The exams are over and boy were they tough. The hardest part though is the waiting for the results. At least another week yet posted on the Uni website.
After a bit of DIY ( Bathroom painting) the wifey decided the colours wrong. Damn.
I spent the whole of one rather hot and sunny day ( yesterday, my first official day off) getting it done for when she returned. Only to find out she now wants the walls painting since they don't quite match the new paint. I might add at this point we BOTH agreed on the colour, even if we did buy it several months ago.
Of course in my life there has to be some engineered Ying & Yang, so I spent today welding on the MG with a sulky face whenever wifey appeared. I tackled the last inner, outer wing part.
I had started to use an new VW repair section cut up into sections. This is working well, however grinding the inner wheelarch with the wheel hub in the way is a real pain. Still most of it is done now. Only one section to fit in and a couple of patches then done.
Soon I will be fitting the remaining fuel line, tank and throttle cable/pedal. Before this though I will give the floors ( drivers and passengers) a good rotary wire brush and coat with red lead.
The rain has been leaking in a bit and left lots of surface rust.
The comes the big fire up...........................yipeeeeee !!
I have a feeling that the electronic ignition and/or the immobiliser fitted will cause me a few headaches though. Wiring and fault finding/understanding is not one of my strong points.
Ohh......I almost forgot. I did three days as a traffic census officer directly after the exams so I have a little extra cash. Not much though as I have spent some on a new pair of walking boots.
Yes I know its a little sad, but walkings free, it get me healthy and why not use the peak district since I'm/we are only 15 minutes away.
I will post pictures when the above stuff is done and I've given it a celebratory drive up/down the culdesac.
Tuesday, June 09, 2009
More progress
Hello folks.
The nice weather and a lull in studying has seen a little progress on the MG.
I deferred getting the engine going till I can afford some special fuel hose and Imperial nuts/bolts for the fuel tank.
The rear LH wheel arch was still needing work (inner wheel arch- outer portion ) .
I had put off attempting this for a long time since, read below.
I did actually buy a repair section from the MG hive last year, £60 , for my birthday, along with several other panels.
However at the time, I'd already cut the rust away and fitted the complete real rear wing over it. But, then I make a complete novice error. I realised I'd bought the WRONG side rear repair section. It was a right outer - inner section, I needed and I had a left. Hay hoe.
So i did use it on the correct arch several months ago, see much earlier post, and remembered it was a swine to do.
Nevertheless, I set to full of determination.
I had no money but some enthusiasm. It was all i could do.
With rear jacked up and head in small confine of wheel arch. I should say that I had to roll the car onto the road, reverse and push back tuther way into drivespace ,so its pointing the other way, again. Thank you Son No 1.
I'll hammer some sections to fit. Three of four pieces curved round, lipped and curved the other way should be simple enough.
I even went green and recycled the old doorskin to use for said patches.
I had a set of the correct hammers and dollies- no guesses where I bought them from !
How hard can it be ?
After at least 2 hours............. simples !.................VERY VERY HARD. I gave up. Almost.
Then I remembered.
In a moment of e-bay purchasing way back when I was employed and in full control of our finances I did buy one VW GOLF ( Rabbit for our colonials ) outer left wheel arch repair,
WHY I hear you ask ?
Well look further down at the lovely Maroon example. It looks fantastic with very subtle flared wheel arches. I contacted the owner and he gave me the details. Mk 3 Golf rear arches are a near perfect fit for all MG arches. So i bought one. £20 from the usual source.
I had a brainwave........not often i get one but a good one at that.
If it is turned arse about face and maybe cut into 3 or 4 sections a new inner arch could be fabricated.
Why not. correct shape with lip. right curve. clean. smooth free and available.
To press I've done two of the four sections and left them there clamped in-situ.
What is horrible is using the wire wheel cup on the grinding machine. Flat on back looking straight up at almost invisible ( since my goggles are rather scratched and contrast of sky and dark wheel arch make it impossible) edge with a fine mist of 33 year old underseal coating my mouth, hair, eyes, nose and teeth. It was about 10 inches from my forehead, so a slip would have really spoilt my day. I'm scared enough of the grinder as it it anyway.
I looked like I'd been down a mine for months, ergghhhh. And there's still more to do, then weld.
Next post will be photo of job done, hopefully.
Once my exams are over I'll crack on and do as much as possible to get the rolling restoration underway. I reckon I need :-
6 rattlecans of primer
Fuel line - tank to sender
Fuel tank nuts/bolts
RH wing bolts
Rear springs - Lowered type
Small drop arms- rear
Complete Poly bush set
Front Brake discs and pads
Rear brake pads
Front chrome windscreen surround
Front windscreen rubber
Rear screen rubber
Door rubbers
Tailgate rubber surrounds.
Seam sealer
The rest I can live without for the now rolling resto. I hate the seventies Orange/brown/white stripes of the seats though.
That all as far as I know........................................!!!
Yes it is quite a lengthy list. But this time 3 years ago it was unthinkable i could even make a list.
So just a small problem of 3 exams to pass, summer job to find and I'll be making real progress.
Saturday, May 16, 2009
It makes you think..............really !!
I came across this whilst surfing tuther day and it impressed, scared & inspired me all at the same time.
Watch it and see what you think.......its regarding technology and the pace of life.
http://www.youtube.com/watch?v=cL9Wu2kWwSY&feature=player_embedded
Watch it and see what you think.......its regarding technology and the pace of life.
http://www.youtube.com/watch?v=cL9Wu2kWwSY&feature=player_embedded
Thursday, May 07, 2009
A dull spark can have its moments
Well well people, after lots of hurried excitement and climax/anti-climax the MG has turned its crankshaft in anger and fired up all four cylinders, albeit momentarily.
I paint a serene and planned scenario.......................................................................not.
I planned to get the water hoses and fuel hoses on last bank holiday week, plus the oil connection pipe/union to the oil pressure gauge. This did not go well. I had to wait for the latter to be posted, it arrived well after the bank holiday. Even worse, when fitting the fuel hose ( Pump unit to manifold ) i found the hose 2" ( 50mm) too short !!
Not to worry, whilst all this was resolved by some telephone calls and waiting I set too ordering a battery ( Wifeys birthday prezzie to me). Gawd almighty It arrived the next day, it cost £33 + £9.99 delivery, it was the correct spec, and a single bank holiday was approaching to co-incide with said birthday.
What a let down. The battery was flat as a fart. Nil pwa. zero volts. even less amps.
Even tried connecting brother in laws battery charger and waiting 10 hours..............nothing
It just had to wait till my exams were over the following week and I could call the vendor.
I had a shock somewhat when I looked up the vendors seller rating ( yes it was E-bay again,and i know I should have done this BEFORE purchasing) but it was pants. Nevertheless, when contacted they sent a replacement and it was received today ( the very next day ).
Connected up and bingo.................no not firing but engine turning and willingly turning.
After a couple of hours convinced there was no spark then the coil was faulty then the silicone leads not showing continuity I eventually summoned assistance. Son No 1 came to help ( yes and without being bribed) I had some unleaded in a plastic container down the shed ( been there for about 2 years ). So pouring some fuel into the plastic see through filter and into the carbs it looked more of a possibility. But still no fire or spark.
Then I thought back to the great Mark Evans, or more precisely the bloke from stoke who sprayed something highly flammable into the carbs. I did the same whilst son turned the key.
Bingo................ firing, smoke, oil pressure, water pumping( somewhere) , alternater turning, son terrified, dad beaming and running round drive giggling & crying.
It died after a few seconds due to the solvent being used up, however it goes to show the fuel was at fault all the time.......not the lack of spark, timing, incorrect assembly of anything, stupid owner or shagged out coil.
So the crappy fuel was poured into the daily driver and the MG tank will be assembled and filled sort of at the weekend for a more measured attempt. I need to buy a proper fuel line though as I ain't replaced the short one yet ( Man a MechSpec did say at the time it might not be long enough)
So things are moving forward at a pace now..................except the cash.
Saturday, April 25, 2009
An update....... and real progress
Its been so long that I have forgot where I left off last time.
Anyways, the thermostat sent back to the MGOC ( and oil gauge pipe) that got lost in the post is now resolved.
After a little windfall from the good old NHS Bursary dept I purchased from MechSpec
:- thermostat housing ( £ 5.50 and second hand, new from MGOC is £16.00)
brass plug to suit, I think I must have thrown the "saved" one away or can't find it.
Top and bottom water hoses,
braided oil gauge pipe with unions,
braided fuel pipe ( pump to tank ).
Unfortunately fuel pipe and brass plug for thermostat was not in stock so I had to wait a few days for them to be posted. This gave me a few days of good weather during the recent Easter break to crack on since Uni had 2 weeks off.......yipee.
During this period I managed to sand down the front RH lower wing where I welded on a large repair panel. I even added more filler and sanded down again to get a reasonable finish. I really hate filling and sanding. There is still a little more work to do on the wing but this requires its removal so I left it to get on with the fuel tank, hoses and heater.
The heater required a brackett at the base welding. It opens/closes a flap to direct the hot air ( Do MG's have hot air ???) It also needed the foam insulation for the mini radiator in the heater body and specially shaped foam to insulate the two pipe exits from the heater.
The welding part was easy, the foam bits not so. I had run out of money to buy these from Mechspec or elsewhere and was thinking of visiting my lovely towns Fri morning market. I know there is a " Foam Stall" frequented I guess by budding upholsterers and bedmakers, but he was not there. recession and all that. So in a dutiful fit of Saturday morning shopping in town I did my usual wander around Wilko's.
Below is a view of the unmolested heater.

Where the cable disappears to is the brackett that needed welding. The cable goes into a hard ( but very perished ) shaped foam seal. The rest of the foam seals were on the base and around the inside body to insulate the mini radiator. After lots of cleaning and ages of rooting around the shed, swearing and a pop to ma in laws for wifey's soldering iron ( Don't ask )
So, a fantastic piece of inspiration saw me buy 3 x cleaning sponges for 32p each , one "tuff" sponge for £1.35 and 4 x jubilee clips for 64p total . Grand Total = £ 2.95. Some careful cutting with a very sharp craft knife and the heater was almost sorted. A coat of gloss black on the front face ( used wifey's Black gloss Acrylic spray from one of her thousands of arty stores, .i.e plastic carrier bags, secreted in hiding places around the house)
See the finished attempt below.

This pleased me enormously as I must have saved a fortune in overpriced foam seals from the MGOC. And And. I remember the heater was very very difficult to remove due to the "toughness" of the two pipe special sponge, so it should all go back together much more easily.
Another good piece of progress was the fuel tank. It had been sort of covered up by the side of the shed for a few years and I expected it to be beyond repair and full of pinholes.
No way............It had been undercoated from new and after a good clean up with the electric wire brush it looked almost new. Only one tiny pinhole on the top surface near the filler spout. I remedied this with a good spot of Araldite and a complete coating of red lead plus the remainder of the Black acrylic spray liberated from wifey's store.
Now its stopped raining I'm hoping to fit all this lot in readiness for buying a battery next week. Fill up with the correct oil, add water, connect fuel line and bingo...fun time starts.
Yipee, its my Birthday treat so then I may actually get to fire her up. I think that is where the title of the blog comes from since this part may be the most frustrating.
More soon.
p.s forgot to add I cleaned up bonnet ( top and bottom) and sprayed it and RH doorskin + RH wing ( again) with grey primer
Much to tell.................but later today !! Watch these first whilst I'm busy
Meanwhile............................here's the sexiest thing to have ever been invented.............!!!
http://www.youtube.com/watch?v=4Vk4RiEMLY8
.............................................................And the funniest
http://www.youtube.com/watch?v=8dpZ4BPsLZI
More very soon
http://www.youtube.com/watch?v=4Vk4RiEMLY8
.............................................................And the funniest
http://www.youtube.com/watch?v=8dpZ4BPsLZI
More very soon
Sunday, January 25, 2009
Hello Strangers
Again not much has happened MG wise as I've been very busy and ill again over the festive period.
I did manage to send the thermostat housing and other bits back to the MGOC with covering letter for replacement. However, being so busy I've not had time to phone and place my order/pay. Its almost the end of jan and I hope they have not thrown it away.
As soon as the weather improves my intention is to refurb the heater and get it in place, fit aforementioned housing and hoses, fill with oil and water then fire it up. Ohh errr it sounds easy to say, but bet the reality takes a few more months and lots of cursing.
I am looking forward to the break from placement come easter and hopefully I will not be ill this time. Since we are well and truly skint I can put lots of time into the MG doing things I've put off last summer.
Next week is the households official payday ( happens every two months/ don't ask, its to do with bursary payments and child benefit) so i may visit the pub for the first time this year and see feckless mate Chris for a laugh and giggle and swap rude jokes.
Subscribe to:
Posts (Atom)