Sunday, December 30, 2007

Its over.............here comes summer !


Hello peeps


Many apologies for not posting for so long but its taken a good few weeks to overcome the lethargy, depression and general goings on. Still thats what holidays are for, and guess what. Its done the trick. So to prove it here I am smiling the Sunday before new years eve ( the day after the wedding anniversary also)


Yes I know its all Bluey tinted, but daughter number one took it, and was cold standing in bare feet, so rushed it meI thinks. Still it was very cold and getting rather dark though.


Had a very good Holiday so far, with no family Illnesses or other disasters. Had lots of prezzies and booze and snoozes by the fireside. The new additions to the fold Ralph and Ruby ( 5 month old stripey Tiger type cats) are sending us nuts with their antics and ruining the house. In fact we've given up replacing the baubles on the tree after Ralph decided to launch himself from the sofa to the tree innards. Well, actually as punishment to the kids ( They always deserve SOME punishment - almost 14 year old twins, boy- girl, lots of time in the house/bed/bedroom/internet/i-pod/x-box) we decided it was their chore, or no free time.


Clever little dicks, they just banned Ralph & Ruby from the room.


Back to the resto. Finally motivated myself to get stuck in and welded the floorpan strip in.


I did think I would have to spend hours making the strip a perfect fit, but, as in new year resolution, JUST GET ON WITH IT. So I did. No fussing and worrying. No over thinking the Issue.


Here it it tack welded in position...........Note the Hi-Tech clamp of hammer and wood offcut.


And finally welded. Can you see the join yet ?


Its the longest weld I've done so far. Only tricky for half its length because my head, the welding helmet, right or left arm and Steering wheel all wanted to be in the same place.Its dark in there too. And smelly with thick black smoke from the underseal underneath. Counted seven little welding fires which all needed me to extract myself from my semi prone hernia inducing welding position and flap wildly with gloved hand to extinguish them. The photos look nice and clear because of the flash, but in reality it was difficult to see, hard to reach , cold, damp and uncomfortable. But i did it. And without complaining.


Next on the list is this little hole near left foot position and small hole near rear spring hanger. Soon though. Fufferfour's back on a roll and he's got money for new panels !!!!!!!!!!!


See you all soon folks..............................+++++.Rick thanks for the e-mail re moments ect++++

Saturday, November 10, 2007

An indifference to life in general

Well readers, as you may guess by the title I've been a little preoccupied of late with life in general.
Work is as tough as ever, my health has been suffering a bit of late and family issues seen to be getting more complex and frustrating. Not to mention college which has moved up a gear and left me feeling vulnerable and a little stupid.
The MG has been left well and truly bottom of my priorities, occasionally flapping and waving its errant blue poly cover whenever rain and wind appears.
The weather since my last post has been very good, however my drive and enthusiasm has not, so several weeks have been wasted. I feel I'm going to regret this when winter finally arrives together with enthusiasm, cash and happiness.
However I'm determined not to let the car be one of the many abandoned projects for sale on E-bay. I must say my doppelganger Rick has given me the impetus not to fail as he is restoring a real basket case and is making a good job of it in similar circumstances, if not with a little more cash and garage.
So why the depression Fufferfour ? you ask.
Well I don't know really.
A level physics at college did not help. Full of young kids all able to grasp thirty five ways of transposing formulae, knowing the answer is in Nm, m/s ( -2) Kj or wotsits.
The other evenings are not the same as I feel its a waste of time as they are catering for the newbies ( combined class from the two last year) who are a year behind a small minority in class.
Still Biology continues to be good and I'm beginning to understand how all the body parts work together.
Work wise has not see an influx of machine orders, the ones won have took ages to build and the other side of the biz has seen a few small victories over the competition. Still its a hard and lonely life on the road with such a large area to cover.
Seven days in Dusseldorf working the "k" show proved to be very tiring and not as exciting as previous. Staying with an old couple in the suburbs was really nice but our new French owner had decided to gatecrash over the weekend so all my French colleagues were very tense and very well behaved, almost boring, for my liking. It still took me at least five days to physically and mentally recover. I think this was the start of the great depression.
That and the lack of activity from British industry on the stand.
The wife and kids continue to argue, bicker, winge, demand and generally frustrate any attempts I have of a happy life.
One event of note in our household is the arrival of Ralph and Ruby. Two tiny kittens that look like darkly striped Tigers. How we love the way they frolic with their tiny skinny legs and button noses.
How I hate the smell emanating from the Poo tray in the dining room.
Still, that was a few months ago and now they are turning into whirling dervishes of mass destruction. It's still funny to see their antics though. Unfortunately their poo still stinks the house out. Roll on Feb when they can leave the house for the big bad world outside.
The MG was left with a long strip of about 1" wide cut from the floorpan where it meets the outer sill, and the last 3" of the outrigger cut away. I've since bought a new outrigger and jacking point during a brief diversion to the MGOC last month. Whats difficult is welding the repair panel ( Cut from the opposite sides unused repair panel) in. The steering wheel is in the way. I tried for about 2 hours to bash it upwards from its splines without damaging the soft plastic base. It transpires one of the famous BL service tools ref BL-vb10073 part 6a is required. I say famous because no one has ever seen any of the recommended service tools. There is also two further small holes in the drivers side floor. One near the rear spring hanger, which has for some reason been repaired previously without trimming the excess steel away, and another at the base of the transmission tunnel/floorpan, near where your left foot would rest. I don't think these will present too much difficulty though. ...........................famous last words !
I have a inner rear arch panel to fit ( Birthday present in May) together with a new rear wing and maybe rear sill repair section and complete outer sill ( yet to be purchased). I also need to fabricate a section of about 10" long with two 90 degree bends to repair the window frame base where the wing is welded to.
Then the major bodywork is almost complete....................hehe.....easy word almost !

Thursday, September 20, 2007

Getting there

The last few weeks ain't seen much activity.

However, the A post nightmare has ended. Yes I bit the bullet and welded, cut, ground, templated, cut, ground & welded ad infinitum. + not a lot of body filler.

I must say sanding filler is not my favourite pastime. God is it boring. Unfortunately its necessary and vital to get a good look to the finished car.


So, the A post then......................see the finished result below !


This is the finished result after lots and lots of very fiddly welding in of small curved pieces of steel. Its integrity is good and the filler only hides the welds too inaccessible for the grinder.

However, its the wing join that I'm most proud of. This took some welding in of curved steel and was much easier than I first thought. In fact I pondered hours and hours on how to repair it and kept putting it off till the last moment. The filler sanded a treat and lots of offering up the wing made the join perfect.


What was a constant source of frustration is the front RH wing. The LH wing had lots of welding done on the captive nuts and a new bottom rear edge.

So I was prepared for the worse.


After venturing to the bottom of the garden and behind the shed to unearth the wing I had a pleasant surprise. The captive nuts were fine...............yipeee.....some luck at last.


Booo.................................................................. remembered the wing also had some accident damage to the front around the grill aperture.

But, thought this would be easey peasey to repair, a few whacks and job done.


Wrong, wrong and wrong again.


The area affected is in a sort of zig-zag shape, so I thought a few whacks would sent it nicely back from where it came.

Well about 2 weeks later, several bleeding knuckles, C1 compressions of the spine and picking up a fallen wing from the trusty workmate I'm somewhere near.

Panel beating complex shapes is definitely NOT easy. This was made worse by the fact that whichever way I positioned the wing it needed to be nose down ( on the floor) and tilted up about 70 degrees whilst simultaneously beating it with the precision hammer, which in turn caused the wing to fall over and/or slip sideways. I think I moved 15 yards down the drive whilst beating, and suffered at least four good bongs on the head from the wing falling.

Its back to almost as new now.

The Ironic thing is that since I'm converting to chrome bumper, this area has to be cut away and smooth pieces welded in.

The wing then has been rubbed all over, inside and out, sprayed in grey primer several times between applications of small amounts of filler.

Still, at least all the captive nuts are all ok.


Next job on the list is fitting a repair panel to the RH footwell where it joins the inner sill.

Andy from Doncaster donated this part when I bought the LH sills from him on good ol E-bay.

Even though the panel is for the wrong side I'm only using the inner 1" so it will match perfectly.

See the devil wing below, and I promise to post more often.


More soon avid readers

Wednesday, August 15, 2007

Rust........in all the wrong places !


Well..........removed the RH outer sill rather easily. Six spot welds and a few easy whacks with the multi-tool ( scraper/chisel/upholstery/screwdriver thingy) and off it came.


The good news is the inner membrane is in near perfect condition, as is the castle rail.


So I've decided not to replace these. The inner sill is also good too !!!


Its not all good news though.


The front bulkhead, where the sill front meets is well.....as mess !


Its really weird that the car has rusted in all unexpected places, as well as expected places on different sides.


I decided to chop off all the rust with the newly refurbished grinder ( having replaced the carbon brushes with the proper items)


So look see.............


The upturned flap on the castle rail is going to be tricky to repair. Its in good condition.


However, its the top most part of three layers of steel. The next layer is the front bulkhead ( rusty where cut away) and behind that is the upturned flap on the end of the inner sill.


Also another tricky part is the end of the membrane. I cut it away a bit and bent it out to investigate the inside.


I think I may replace the first two or three inches of this and it will allow prior access to the end flappy area.


In a fit and flurry of DIY we have re-painted the whole of the dining room.


Well, wifey started it.......all ar*e about face and in a terrible mess. Still credit to her she stuck in there and cried HELP when it got tough.


So, early last Saturday I got stuck in, moved shelves and heavy objects etc, and completed it by Sunday late lunchtime


Trouble is now though she's already planned another two rooms for the next few days, for the same treatment. Cunning devil has been saving it for my Hols without letting on. I'm sure it was all a scheme to keep me away from the MG. I think she knows how to make motor brushes wear and welding gas to evaporate ( witchcraft ?..... feminine intuition or just plain bad luck ?)


Considering I'm on holiday now for two weeks and spending them at home I can't see where the rest/relaxation is going to come................................Ha!! Wifey says...........spend a day in my shoes anyday you like Mr " I've had a long busy day at work, too tired to do DIY but enough energy to fiddle with your hobby" ( No....."hobby" is not a euphemism for that precious and rewarding universal boys toy we discovered in early teens)


Once that round of DIY is now complete I removed some more engine ancillaries and even had the foresight to "borrow" a large plastic storage box from work ( we specialise in machinery to print them so we have lots skulking around the factory)


It looks rather empty in there.


Whilst Wifey is still to the forefront this holiday I used some female logic on her !!

And guess what................................................................It worked.

As I explained how much the three part LH sills cost and my joy at not having to buy all three , hence SAVING on this part of the project, I can now go and buy another RH rear wing complete like last time, you remember dear, back in May, my birthday, when we had a fun day out together and visited the MG hive............

Yes dear, what fun that was............we'll go again soon. But not until you've finished all the decorating, spent time away in Chester next week on a shortened holiday, been to see your beloved team play with No 1 son, and with whats left you can buy all the panels you want.

Well it sort of worked. Lets get in the good books first then apply more tactics.

More soon.........Thanks for the link Rick

Friday, August 03, 2007

If only I'd waited........or been a little less impatient

I've done a stupid and silly thing.
Annoyed at the the yet again death( well soldiering on bravely but intermittently) of my trusty angle grinder I decided to remove the exhaust.
Rear end not too bad.
Middle section easy.
Front end.......so far so good, five of the six nuts undone.
The last one..............Impossible.
I'm under the car looking up at the manifold join. Yes the first five were a little tricky and awkward. I can only just see the sixth, let alone get the socket and extension onto it.
The trouble is the sump edge is in the way. It won't allow the socket to sit square on.
After several attempts, bruised knuckles, rust flakes in both eyes and oil/grunge in back of head I called it a day.
Well almost.
In a fit of pique I whacked the grinder one more time and it sprang into life.
So under the car I crawled and cut the exhaust in two just after where two pipes become one at a thick flange.
I thought it the only way to remove the damn thing. The last bolt was rounded off, and too inaccessible to get so much as a finger there, let alone a grinder or wrench.
So in I went with the grinder. Grinder protested loudly but after 5 mins there it was.
In two more manageable halves........................but see later.......................

Oh I forgot, to celebrate finishing one side the whole clan helped me move the car the other way round in the drive.
This involved moving both normal cars to way up the other end of the Cul-de-sac.
Pushing a very heavy car (including tool contents inside) onto the road at 45 degrees.
Pushing a little further down road. Son armed with patented vehicle halting device ( half housebrick) There's no brakes on the car cause I've removed them and the steering is very very heavy.
Then push back into drive.
At this point I'd like to thank the newish and so far never speaking, neighbour opposite and Dutch relative/friend.
..............................................................................................For watching............................................... while this old fart, his unfit wife with a bad back and two skinny thirteen year old twins ( one of each) struggle somewhat.
They ( two males 35-45 years of age) spent the whole afternoon looking at the engine of their car and then looking at the toolbox.
I hope they enjoyed watching us from 15 feet away across the road.
Its the other way round !!

The following day I decided to remove some engine ancillaries.
Carbs came away nicely after locating the bolts.

Since the under bonnet was covered in a poor excuse for sound proofing that hanging off in most places the whole engine bay is covered in "FLUFF".
"Yes, fluff"
Well more like horeshair, but its everywhere. And mixed up with loads of rust and lots of oil.

So cleaning the carbs will be interesting. So will the whole engine bay actually.
Removed centre inlet manifold, easy.
Even the dead rusty and often snapping exhaust studs came undone.

Its then that the manifold fell down and to one side.
Yes the difficult to get at nut was now easily accessible from underneath.

WHAT A PRATT.............I cut the exhaust in two for nothing !!!
If I'd removed said items before attempting the manifold studs underneath i would never have rounded off the last nut...........doh !!!.

So, lifted it clear and deposited both halves at back of shed out of sight.

Following day removed alternator, coil and dizzy lid + oil filter. Yes. I did remember to label all the wires up................sometimes I function almost normally.
Here's a few shots of my rust investigations of the the as yet untouched RH side.


This is a view looking forward at the A Post top. Worrying and scary.
This is after my head exploded after finding more rust.
Have no clue how I'm gonna repair these little beauties.( books and toilet springs to mind)
Suppose it explains me turning my attention to the engine.
Footnote.
The grinders died well and truly. No amount of whacking makes it start. Ordered new bushes from Screwfix ( £ 6.50, robbing dogs...........the whole grinder was only £17.00)
CO/Argon bottle on MIG welder also empty.
Spotweld drill bit blunt as hell.
Time for some time off or DIY......................yipee says Wifey. Personally I want a holiday.
More soon hopefully.

Thursday, August 02, 2007

Go here, It's the funniest thing I've read in a long time

Just a quickie post to share with you all, but very very funny.

Its right up my street as its toilet humour( Laxatives actually) at its best.

Stick with it and read all the posts by Blu-Tone.

Its actually from a Mountain Bike message board.

One day 'Ill tell my funny story of a hospital visit. I'd have to embellish it somewhat but it would not be a patch on how Blu-Tone tells his !!!!

Link = http://www.singletrackworld.com/forum/read.php?f=2&i=3145351&t=3141618#reply_3145351

Sunday, July 29, 2007

Tool trouble then rapid progress

Here's the part I'm damn proud of.

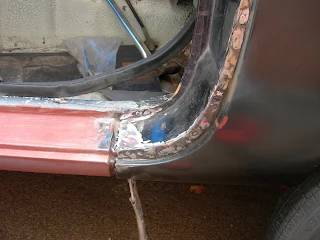
It involved bending a section of the curved rear valance ( above the square hole) then welding in place and having a 5/10mm lip to place the flat plate onto.

The large vertical weld is where the rear valance and wing end did not meet exactly.

I placed a strip of steel approx 1" wide to the rear, bent to fit the curve and welded inplace.

I managed to fill most of the non meeting edges with weld.

The flat plate that rests in the base of the pointy thing and upto/on the rear boot corner was quite tricky. I got through lots of cardboard making the right shape template.

Still, it all went very well with no probs...............the secret to welding is grind all the things nearby shiny, get a good earth and listen to the weld..............like rapidly cooking bacon.


The only Blot on the landscape was the angle grinder dying.

Ma in Law bought it for me last x-mas from screwfix. Not a top make ( NOTE..always buy Bosch if your serious) but its been the most used tool and definitely a requirement.

However, one day it just did not switch on.

Checked the fuse....ok

Checked the kitchen socket....ok

Unpluged and removed the disc and guard...........scary stuff as this tool scares the life out of me.

Then I noticed two protrusions each side of the main body with a large screwdriver slot in the end. Removed these and the commutators sprang forth with a tiny blob of an excuse for a carbon block.......................Disaster, should I persue the probably frustrating and longwinded course of new parts through Screwfix, or should I source locally.

Anyway, since the rains was still with us I decided on local. B&Q ect, shed no light or idea on tool spares.

In fact I dont think any of the staff even knew what a motor commutator was.

Now, may I get on my high horse here. B&Q ect may be cheap, convenient and always open but there not a patch on" proper" hardware places. We have two in my town.

One just like"open all hours" for hardware only. Its amazing. Ask one of the elderly staff for a lock and they will have it all, and explain about 2,3 and 5 lever mortices, ease of installation and price and insurance complications and reliability. Same goes for aluminium ladders, parrafin,

Chicken wire, hinges, wheelbarrows, hammers, bolts and screws + trillions of other stuff.

All served by people friendly and happy and willing to talk and dressed in regulation stores issue Brown smock. Thats just one place.

The other place is for things electrical/electronic.These guys know it all, have it all, but are on a slightly different planet. It scares me a little.

So in I waltz with one mangled commutator. Have you got one of these ?

No, but we have on similar that you can "modify"

Well, for £2.30 why not.

Thats when the probs started. The carbon block was too large so I filed it with my swiss file, on the worktop in the kitchen.......................Big mistake, the dust is immoveable and gets everywhere. Wifey not happy.

Moved outside to workmate and rushing due to fact that imminent heavy storm due.

Still difficult to insert and remove carbon block. Then cover screw would not screw in totally.

Snipped spring shorter. Still no joy. Bent copper ends from carbon block/copper wire in several shapes, still no joy. However, shaking said grinder did momentarily show some life.

Anyways, to cut a long story short I buggered one and re-used the old one which was OK and fiddled the other eventually after lots of shaking and "gentle taps on the plastic retaining screw".

It now works...................thank **ck for that. It was almost touch and go between throwing it away and being electricuted in the rain outside.


Now we've had some respite in the rain the progress above has been made and not a small amount of filling and sanding.

Look......................................rapid progress.


Hours of sanding the rear lower valance applied by the previous owner left no nasty horror sories. Only a 50p sized hole in the very centre of the R/H crossmember end. Easily remedied by some fancy shaping of a 1mm thick steel and good welding/ filling skills.

Even after a good coat of primer some low spots were evident, so another round of filling and sanding. I must say this is very ffffrustrating. The different grades a sandpaper, sanding block, dust, mess, armache and annoyance that a pristine shape don't emerge.

So I moved onto removing the complete exhaust. Easy enough on the length of the car.

Easy enough on five of the six nuts under the manifold although three were a bit fiddly.

The six'th (NOT SIKTH, which is how annoying people pronounce it) however seems impossible to get to. The shaft of the ratchet extension is too thick, the engine base/sump flange won't allow the the socket to sit on fully since the extension is not perfectly vertical.

So a point to ponder on whilst the wifey tries to fill my head with DIY projects and things to do of a summer day in the garden.

More soon folks......................oh by the way visit Ricks site.........He's got more money and tools than me and is making a real good job of it.

http://rick-mgbgt.blogspot.com/

Tuesday, July 17, 2007

A different corner

So I'm moving onto the rear corner now. Most of the LH side body is DONE !!!


The wing fits as well as its ever going to fit, and is covered in primer and red oxide. The doors in the correct place ( not quite but the Phillips screws in the hinge need drilling out and I ain't got any replacements, so its near enough for me at this stage, it closes and looks neat all round)


The all shiny new wing attaching bolts fitted.


Rear wing welded in position. ( almost. Need new inner outer section, see earlier re incorrect item purchased.)


I'm ignoring the 50p sized hole in the rear window edge. It looks fiddly to repair and is covered by chrome trim eventually.


That means a quick fix for me then.........maybe, and some time next summer.


Oh by the way have we had this summer yet ?????


Here's a view of what I've been up to.


Since the car is being converted to chrome bumpers I have to add the RH side pointy thing at the base of the lights. This is another item I purchased NEW from MGB Hive a few months ago on a rare spending spree. I actually comes complete, so I just chopped off half.


I have to add a couple of patches to base of rear valance where its welded to inner boot tray .


The fiddly bit is the horizontal section inside the pointy thing and up to the valance.


Mine has completely rusted away under the gauze and deep body filler that was there.


Still, I'm becoming quite accomplished at cutting cardboard templates, jigsawing sheet steel, grinding and welding. Thats for the coming weekend if we have no rain or something that resembles summer.


Must stop complaining though,as last year when it was red hot ( ah.. a distant memory) I couldn't be bothered to make a start on cutting, welding and grinding.


Just to keep it interesting here's another photo of the rear end. Note the lower valance, completely covered in filler by the previous owner. Had a little poke around and spotted rust at the bumper mounting holes. So, maybe I need to sand all this off before starting the above. If its bad news though that means a complete rear lower valance at £80 quid, ouch !


That reminds me. Since I,m over 18 months into the project I decided to have a review of the most useful tools to date. This is prompted by the fact that when I started I had absolutely no tools. In fact it never occurred to me that I would need Imperial sockets and spanners

Well it did really occur, since I'd worn out at least one toilet seat reading all things MG.

So here's the list, in order of usefulness for restoring old BL cars on a budget :-

1/. Trim tool remover.

Its a cross between a narrow paint scraper and a wide screwdriver. I got it for free as a print sample during a customer visit. I use it all the time for a/. Poking rusty holes, b/. separating spot welds, c/. smoothing bubbly paintwork, d/. removing underseal and rubberised gooey stuff, e/. prising panels and stuck down trim bits, f/. Phillips and standard screw removal. g/.wrapping J cloth round to clean inside light lenses and various parts.

2/. Penetrating Oil

As a matter of habit and long standing ritual I spray every nut and bolt I can see regardless of when I'm working on them or not. This is done at least every 2 weeks.

3/. Trolley jack

The cars been up/down so many times in so many places this has proven invaluable together with the axle stands. Remember I have no garage to work in so positioning the car for long periods is important.

4/. Electric 4-1/2" Hand Grinder

Scary tool to use. Very noisy. Needs love and attention and several types of discs. The Flappey layered one has been good but also the thin slicing disc is just as valuable. Good for heavy steel removal, light polishing of steel, de-rusting and shaping steel.

5/. Hammerite Ku-Rust

When panels are inaccessible and too awkward to remove/replace or just covered in surface rust, just paint it on and it does its stuff. I use it loads.

6/. Heavy Aluminium faced hammer. Nuff said.

7/. Quality Imperial socket set.

See earlier posts for my folly at cheap and cheerful

8/. The wonderful Mr Porter and his MG restoration guide, closely followed by the DVD of the wonderful Mr Mark Evans "Is born" series of MG restoration.

9/. E-bay My main source of tools and parts, especially the MIG welder.

10/. Time and money.....................unfortunately I have very little of either.

More next week folks,

Sunday, July 08, 2007

As you can see, or maybe not some things have been achieved.


I have spent lots of time getting the wing ready and prepared, mostly on the inside and adding filler to the sill/B-post join.
Why is it that things that seem to worry you most and up being the easiest to fix.


The wing mounting holes for one.


The beading and wing fit for another.


The fitting of the of the wing for yet another.


Anyways, back to the order of things since the last post.


I had applied lots of filler to the B-post/sill join and to the scuttle where it meets the wing top.


I must say that I ended up sanding most of it off.


Then the rain came....................and boy did it, in bucket loads.


So not much happened for the last two weeks, except for the rain.


Sunday evening saw a veritable monsoon, from 8pm onwards till about 10.30 next day.


During the brief interlude I noticed..........Horror of horrors that the blue cover over the MG had blown off some time Sunday evening/Mon morning and left the car open to the elements.


Well, elements is a pretty light word so I'll say pissing heavy torrential rain.


Luckily, only the outer edges of the inner car were damp with light rusting on the floor & sill areas. And for some strange reason one bucket in the back containing all my precision hammers 3 inches deep in water !!.


The blue Poly cover is pretty porous though, particularly where its been dragged over the roof on the ariel base. I did have a tennis ball over the protrusion but that's long gone into the void of disappearing restoration parts.


So Monday lunchtime off to good old B&Q during a firm but constant drizzle.


£3.99 for same Blue poly cover, 3 mtrs x 4 mtrs with fastening holes, what a bargain.


Gawd.......................what a size !!! You could cover half of Derbyshire with it.


Try fitting it in a drizzle and breeze enough to get you out of the harbour.


It was everywhere on the drive, Still its not porous (yet) and the biggest ball of wifey string helped to keep it in place, with the old ( porous yet much more manageable) cover over the top.It did its job for at least 2 weeks. Yes, that's how much rain we've had.


The work done to the inside of the wing worried me lots before I started.

It wasn't until a work related detour via Cambridge that I actually bought some more new stuff from the MGOC. A wing fitting kit to be precise, a 5/16 UNF nut, a 1/4 UNF nut and a headlight inner re-enforcing ring.

Spent all Saturday welding the 5/15 UNF nut under the wing top inner edge, making a cage for a strange British Leyland round 5/15UNF nut and welding up in same top inner edge, welding the 1/4 UNF nut to the inner wing mountings ( having first spent ages drilling out broken bolt and grinding away old nut ).

All just so the wing can go back on and be bolted in all its places.

Sunday saw me paint good old Hammerite Red lead all the inner wing rust prone areas, sand the sill B-post area, try again( 38th attempt) to remove the door hinges from the A post.

This but was aborted yet again.........which is a pity because the great big f**k off screwdriver I have has a hexagon on the shaft where it enters the handle so a ring spanner fits great and offers fantastic leverage. The phillips head is buggered though, thus it stays put....maybe !!

Ran a 5/16 UNF tap down the wing edge holes then undid the wing fitting kit.

Yipeeeeeee...........loads of new shiney screws, washers and spring washers + 3 nuts too !.

Fitted wing in a trice.......could even do the nuts up with fingers mostly.

Only had to use jack to press up bottom of wing so I could drill 3 holes to accept 3/16 screws with nut to attach to castle rail and jobs done!!!!!!!!!!!!!!!!!!!!! yes it fits and looks good!!!!

To think I started this blog and spent ages in deep mid winter removing the wing, and now here I am still in July deep mid winter fitting the wing.

Removed it though and sanded and cleaned everything down one side.

Sprayed lovely clean Grey primer on door, wing rear wing, B-post and sill area, A post and finally inner front wing area.

Here have a look..............................................


How good it is to see it looking like a car again........Its given me a real sense of achievement.

Next session should see the door hung, sort of, maybe finally or time to reconsider the phillips screws again, maybe leave them.

Wing fixed with all new shiney screws and bolts.

Sill finished ( still some slight filler spots to add to get nice even gaps) and to wing too, suffering collateral damage from being removed and trial fitted too may times.

Then weld rear wing and turn attention to rear of car..........Yes a new chapter, hopefully.

Friday, July 06, 2007

Its a little damp outside dear

What can I say other than the title. Since last applying filler to the B post/sill join and filler to the wing/scuttle join its been........................well I'll say .................... wet!

The last two weekends, nay weeks, has seen torrents of rain fall, all day,all night and in between. During last Mondays deluge a quick glance at the MG and its forlorn flapping blue poly cover saw lots of rain get inside. Mid-day off to B&Q to get a new Poly cover( in the pouring rain) .

My present cover has a hole where the roof section has an ariel base protuding.

Despite having the clever idea of wedging an old tennis ball on it, the constant removing and tie-ing down has made it as firm as a vicars handshake. Not to mention the elastic bungee cords frayed to within an inch of their life. In fact on Sunday the poor old MG spent the evening till Mon Morn with the cover hiding between the fence and the driveway gate.

Fortunately I got the last blue Poly sheet at B&Q and cheap it was too (£ 3.99) .

The trouble was thought.................................Its Huge !!!!

3 metres x 4 metres. Seemed OK when I bought it. But try covering a car with it in the pouring rain, using frayed and limp bungee cords and a howling wind.

I ended up using about 70 metres of string, over, under, around, between, up and round the MG. It looked like a drunkard had tried to wrap up a Holly bush there was so much Blue poly cover. However, it made it water proof ready for the onslaught or rain we had, er........still having actually.

Prior to thison Saturday, I did remove the front wing several times to try and get a good fit between the curvy scuttle base and wing top edge............ Impossible............!!!!

In desperation I fixed the front wing with the 5/16th UNF bolt nearest the said position.

Then added filler to the join and bead ( I previously welded the bead to the wing)

So my thinking was if the join was rubbish( uneven with gaps) bolt them together, add filler, let dry, remove wing , sand to perfection and re-fit wing nicely.

WRONG

On removing wing all the filler broke off, some filler stuck to inside of wing beading and some filler was well just ..........crap.

ABANDONED...................................time for a re-think.

It needs all its bolts and holes in wing ready and clean so it can be clamped tightly, then re assess.

So, on a trip to the far SE corner of our wind and rain swept counrty I diverted via Cambridgeshire to the MGOC.

I actually bought some new ( YES NEW ) stuff, a wing fitting kit containing all the correct screws , washers and bolts. Nice and shiney.............Lovely, and only £ 6.25 !

Also got the 5/15th UNF Nut which I had to gring off the wing when refurbing it and another nut 1/4 UNF which has a sheared bolt in it on the wing.

Whilst there I also bought the headlight re-enforcing panel. This part took the best part of a whole day to remove from the wing as it was rusty and deep inside the wing.

So...............................My plan is simple.

Fit both new nuts by mig welding them in place.

How to remove the existing nuts with broken bolts in is another story.

Then fit the wing with all the bolts and nuts. To assist matters I even bought a 5/16 UNF tap.

Please dont faint, its not new. It was £1.99 + 99p p&P on..........yes you've guessed good old E-bay.

So when the rain and wind stops I'll get busy. Oh and do the sanding of the B post too.

Sunday, June 10, 2007

A little more of all life's joys and irritations

Not much has happened so far. MG wise I've pratted around doing nothing spectacular.

Well that's not exactly true.

I did set to to fit the inner wheelarch a few weeks ago. If you remember it was a panel I needed and was one of several bought as a birthday prezzie from MGB hive.

Anyways, I did all the correct things and lined it up, marked it + 1/2 inch and cut to the desired shape. Cut away the rusty wheelarch inboard of the 1/2 line.

I then set to attaching the wing, all well and good.

I spent the next few days(nay weeks) trying to get the inner wheelarch to fit the shape of the wheel arch and align front and back.

Impossible, so I left it for a further few days.

Then one bright and sunny Saturday I attacked it with renewed vigour and enthusiasm.

Gawd............................I know why it don't fit......................its the wrong side!!!!!!!!!!!

Yes, I had actually been given a RH side when I needed a left. No wonder in didn't fit.

I've not told wifey yet........No need really since I can use the panel for the RH side , but all in good time.

What I have done is welded the wing around the B post seam/door and sill area.

See Below..............................

I know the gap between the sill and b post base is a little large, but, well there really is no answer. When taking off the old sill the gap was even larger, I remember distinctly seeing all the lead loading ( Yes Lead Loading) running away as I ground through it. So It must have been made that way at good old Abingdon ( Swindon actually is where the bodies were assembled)

The front wing gap at the same spot is also same size.............WE really did know how to build cars, eh !

The gap is now full of the dreaded filler ( No I,m not going to spend several months learning how to lead load) and its waiting to dry as I write this.

I did go a bit mad with the filler and covered several spot weld and the rear wing top beading seam. So next post will be all about sanding filler........maybe.

Monday, May 21, 2007

One job leads to........fivethousand others !

So, the wing fits great with a regular gap around the door.
How to weld it on though.
This I must admit had scared me for months and months, In fact since I bought the car.
According to all the readings I've done it is really tricky with access very restricted or nigh on impossible. Even the wonder kid Mark Evans resorted to "Glueing" his on.
But since I now have the wing, its easy. Access is good to the door surround, the top front edge can be welded on the outside as a whacking great chrome strip covers it.
Access to the rear top edge ( Which is supposed to be Impossible) is easy.
Easy for a midget with nine foot arms. Not exactly.
By looking down the hole for the rear light all the internal seam is there to be seen and a welding torch fits in nicely. Will I still be saying that when I've actually welded it !
Spent most of the last few weekends offering up the rear wing, grinding shiney mating edges,
offering up and pondering, even more pondering and offering up.
Especially last weekend when it was all systems go for wing welding.
Bloody weather............wind, wet, dark........and that's only me.
Rain on and off every 5 minutes and gusts of wind between. So frustrating. Hence the offering up bit and pondering.
The rear inner outer wing (wheel arch) needs repair so I cut away the rust, and more rust and even more.
The boot corner where it fits to the inner and outer wheel arch has gone at its fitting point.
I'll need to fabricate a repair panel for this and rely on the wonderful Hammerite rust killer at the very rear behind the rear valance/wing join.

Look...........No rust its all gone
Next post should see the wing welded on and maybe the inner outer wing edge welded on.
The title e.g five thousand other jobs refers to the chopping down of the whole inner outer wheel arch panel purchased. The cutting/ shaping of above wheel arch edge, removing boot tray rust and having to remove a small portion of the inner wheel arch. All this means extra work fabricating, cutting, bending, shaping, clamping and welding. The remnants of the new outer wheel arch ( about 70%) will do for the inner arch repair ( I hope)

Not much fun and frolics away from the MG. Works been very busy with me visiting strange places like Hampshire, Kent and Guildford as well as Teeside, Borders Reigon and Hull.
France and Switzerland are also in there too, as well as too many nights away from loved ones.
Maybe next post will be on the problems of having teenage twins, since they, but one in particular is morphing into Harry Enfields "Kevin" before my very eyes. Cheeky bugger even says I'm turning into Harry Enfields dad !
An neither will help with the car !!...........................Wifey's up to her armpits in Plaster for her final Piece for Arts College......I've been plastered about four times, Ma in law at least three, sister in law twice........all in a good cause.
I must explain. She's taking moulds of our hands and arms. I've also had my face done and it has to be done again this weekend...It cracked, how funny ...............Hope it rains !!

Monday, May 07, 2007

It's not so bad after all


Another fruitful session on the MG after a rather frustrating 3 weeks of staring, pondering and musing. The weather has been great but alas not the finances or work. I've been travelling the length and breadth of our fair Isle with a very busy and demanding work schedule plus no cash to impart onto the project. Added to which the demands of family life and their finances have taken priority, all on Ideal sunny days on which to work on said project, but c'est la vie, as the French say.

Happy birthday Fufferfour...............I'm now 50...yes five ohhh. Still feel like a 29 year old though perhaps with 21 years of experience. Some would argue with that and I'm not one to cause an argument........least yet whilst I know where my bread is buttered !!


The MG has had some giant strides of late ( only the last two days actually)
On my birthday I took the day off and sallied forth with wifey to the MGB Hive to buy new panels...................Oh joy of joys. A proper garage/business who it is apparent are very dedicated to ensuring your pride and joy is catered for. All with a free cuppa and friendly service too. Even rounded down the sum total of new rear wing, new inner outer wing, 1 mtr of wing beading, front wing repair section and rear light bump Plus a free beaker !!!! Fitted repair section to front wing easy peasy. The MGB Hive even let me "joggle" the panel whilst waiting so that made it much easier.
Depression only set in when I came to cut the rusty section from my front wing with the scary grinder with cutting disc inserted. All went well for two thirds of the way from front to near the back, then clouds of white dust billowed forth .

Yes you've guessed it, the rear portion of the wing was full of filler. How much filler though ?
Bloody lots........and lots ...........and lots. There must have been one eight of an inch covering up one hell of a depression. Funny that it was not visible from the inside though.
So welded on new bottom half repair panel leaving only slight kink in shape of curve of wing near door gap. Remedied this with expertly applied filler.
God................aint sandin filler borin ( best Yorkshire dialect.....I am from Sheffield !!)
Anyways, after what seemed like an eternity it looked good and fitted a treat with good gaps etc. Even ventured into bowels of shed to find wing retaining bolts.......this took approx 70 mins as most of the contents had to be removed then replaced to much sweat and cursing.
The net result is the wing fits almost perfect, the door has the quarter light fixed, sort off to aid alignment and some gentle persuasion of the bolts for the wing should see it all tickety boo.
Here it is in all its glory. The rear wing has been added for show as a giant ego boost fro me.

The car was bought with it missing so to see one propped up there is a major boost, even though its only duck tape keeping it attached . It looks wonderful and a real sign of progress.
I'm really looking forward to attaching the rear wing and inner /outer wing.
Please take note though...........when welding be sure that the panels are perfectly aligned.
Otherwise adding and sanding filler is messy, dirty and very very boring.

More soon............!!!

Friday, April 20, 2007

I've got a Fan

Yes folks, hard to believe but I got it myself after a lot of hard work.


The fan is actually the heater fan removed from the MG with no little effort, lots of sweat and pondering and probably even more swearing.


For once I didn't read the the MG bible by Mr Porter. I read another publication I bought on E-Bay for a fiver. It's very good, don't get me wrong. But removing the heater is a dirty job so I popped indoors and got said book because its a little grimy ( For our colonial cousins read dirty)


Read instructions and away I went. Some inventive blows with the hammer onto the large screwdriver in turn resting on Phillips screws very rusty, managed to free them without loss or damage. Removed two hoses connected to front of heater, easy peasy.


Should be free to be lifted up and forward, perhaps with some gentle persuasion.


Grrr......


puff.......


pant......


ouch !..( screwdriver slipped)


wrestle...


rock........


Time for a re-think. The bloody little thing would not budge.


Looked under dashboard to see if any pipes are connected......No, not much is actually connected dash-wise anyway after its removal and a few heater pipes last year.


Pokes around into where base of heater feeds to....nothing.


Back to wrestling then, but re-positioned to LH side of car.


Slowly some movement but then static and unmovable.


Grrrrr


Reads book again


Wrestles again.............more Grrr


Looks at mess under dashboard again.


Re-reads book......................................Ooooops "REMEMBER TO DISCONNECT THE HEATER CONTROL WIRE AT THE DASHBOARD CONTROL LEVER"


Yes it said it there right in the first paragraph. How can you not understand that !!! doh!!


So here is a picture to prove it.


There on the transmission top was a rather rusty and forlorn device dangling like an ignored heater control lever. Two small nuts undone and away it came from the brake cable type wire and sheath. Round to the heater box, a few wiggles and plop. Out it came.


Well bugger me, it was the wire holding it in all the time. Don't let that fool you though.


Apparently they are quite difficult to remove, and even harder to put back with nice new fat and not very spongy foam seals. The heater don't look too bad. It would never have worked though. The large flap at the base of the fan, which directs air down to the four internal pipes/vents was rusted shut and stuck with manky foam. The bracket that the wire attaches to on the flap had also parted company with the flap so not all was in vain. The rest of the heater looks in good nick. It just needs a good clean and new seals/foams. The wonderful MGOC offers uprated heater matrix and larger fan as the heater on the MG is not the best. In fact our American friends think its the heater from hell. Hey-ho, you have global warming now.


I'm tough though and can stand a little cool air in winter. ...................Ha. Not true. I cant afford or won't spend the money, on what I see as a pretty pointless mod.


Here is a view of the base of the heater box.


Great Innit !

Next few week should see some major strides in bodywork additions. Wifeys allowing me loadsOmoney to spend as a birthday prezzie. New L front wing base repair section, new L rear wing complete, repair panels for inner outer wing. Hope it don't rain then as we've not seen any for a few weeks..yippeeeee.

Sods law though. I've got no money so not much work has been done.

I'll be 50 next post.................almost one of Wogans T.O.G's

see you all soon


Sunday, April 08, 2007

things went to plan......about bloody time !


Well look left, some progress to show and it ain't half bad.


The doorskin bought on E-bay looks great and was fitted by me, myself all alone and with no help, no disasters or dodgy happenings. Twin No 1 did hold the door whilst I hammered down the curvy bits near the top, however he got bored after approx 15 seconds so spent at least 3 minutes arguing with recalcitrant teenager on father/son bonding issues.


However, back to the progress, this is how it happened.......all according to plan, almost.


Once said doorskin had been purchased I set to work removing old doorskin by grinding the edges on three sides ( Most of the top is open to accommodate the window)


I had done this before last summer remember when practicing on a scrap door ( again bought on E-bay, this time I was conned somewhat as it was beyond repair, under the filler was new panels welded directly on top of the old rusty ones)


The old skin came away fairly easily since there was rust around all three sides. The front corner was probably the worse with nothing their at all.


So, some skill, logic and experience came to the fore. Most of the lips of the door, but not all, were rusty so needed replacing. Thus at strategic points I left parts of the lip in tact and welded on new lips. This was tricky in itself as I kept blowing holes when welding next to the remaining lips as it was so rusty. But with time and patience I managed to get a full ( almost) lip with only about 3 cm total ( 1" for non metricated) missing in two places. Used a excellent product called "Kurust" from Hammerite on the remainder of the lip and inside door bottom.


This stuff looks like milk but dries quickly to a dark Blue/Black and stops rust dead.


I think I'll need a lot of this. I literally poured it into the windscreen pillar base and on the rear window surrounds till I get chance to repair them.
Anyway, after it has dried a liberal coat of red-lead ( another Hammerite product) all over lips, inside door frame, outside door frame and inside of doorskin, we were ready to fit the skin.

So, a few days later ( actually Easter Saturday 2007) I set to fitting the skin.

I must admit this worried me as I did not want to make a balls of it as a new door would be over £100 quid. After reading the fantastic Mr Porters book on how to, I did as he said.

Tapped the edge all way round a few degrees in, taking it slowly and steady. After about eight circuits of the door it was ready for the edges to be bashed down firmly using a short block of wood and keeping the doorskin side supported underneath.
Hey presto here's the result..............................
My biggest concern was how the door bottom would line up with the sill I fitted. I expected to have the same gap as the old door which was around 10mm ( 3/8")

But NO it looks good. with some taps and bangs on the hinges I'm sure Ill get a good fit.

The waist swage line is a little high according to the wing but what the hell. The wing needs extensive repair and won't fit or go back on as it came off for some reason.
Below is a shot of the wing I've moved on to repairing. The bottom half will be replaced with a new panel but the inside double wall strengtheners and mounting nuts need attention.
Also the front headlight orifice needs a new inner piece ( available for £4.40)
The rusty double wall panels have been treated with kurust already.
More soon folks ! I'm off to scoff the kids easter eggs.


Wednesday, March 28, 2007

Never in the field of human indifference has so much...

Well...........I did do something that lifeless Saturday afternoon.After lunch I summoned much steely resolve to keep going and get the project going.
That's despite feeling tired and a little snuffly.
So, out with the mig and rest of tackle from MG bootspace.
Cutting cardboard templates, jigsaw buzzing, grinder scary grinding, clamps, drilling holes and finally welding. Hey,....it looks OK. My weldings getting better.
The end part of the sill needed closing in the rear wheel arch looking forward.
I've been putting it off for ages but now with mammoth effort and not a little skill..its DONE.
So just to prove it and the attempt at the rear wing attaching edge from last time
See below.............................


The left hand photo shows the cover plate welded over the sill end plate. Just like the perfect Mr Evans showed us. Even "puddle welded" onto the correct vertical flaps too.
The right hand photo probably looks worse that it actually is since I took the photo in the dark.
I think I said a few posts ago I'm resorting to using .................body filler......sin of sins
A few ( bugger, the formatting won't remove...please excuse the font and colour)
deft whacks with the planishing hammer and It'll be perfik.
I did suffer later on in the day a it was apparent I was suffering from a stonking cold so I laid low for a few hours. Addendum. lying alert. I did have the Mon and Tues off work due to sneezing and severe "man Flu".
Did manage to purchase a brand new door skin on good ole E-bay though, and quite near by.
Collected it last night and its loverly.......little things and all that smirks the wifey.
Had a good look at the sellers MG and its spurred me on a little. Thanks Andy.
Please don't laugh too much when you see my repairs......yours looks perfect .
So, since wifey's away again this weekend and if the weathers OK looks like I'll be repairing the door and fitting the door skin.............maybe.

Oh for the wings,........the wings of a ( MGB GT 1977 Passenger side rear) !


Saturday, March 24, 2007

When enthusiasm flies........part II

Yes its true, I'm almost becoming one of the fabled "unfinished Project for sale" mob.
The sad delusional mid life crisis type of bloke who thinks ***k it ! ,I don't need this aggro in my time of life.
After a long hard week on the road and more than one hotel I went to bed Friday night full of anticipation for the day ahead. Wifey was going out early off to London with her arty farty college chums, both kids had plans away from the house most of the day, so no ferrying around to do.
So, up early Saturday morning. Lovely cooked b'fast of cheesey beans, bacon and eggs and toast. Tidy up kitchen, fetch papers and chivvy kids into action.
It was only then I noticed the weather. Not raining for once, not even howling a gale windy so outside I went to remove the cover.
Brrrrrrrrrr its a little colder than it looks and with several icy gusts.
Looked at the rear sill/ inner/outer wheel arch that needs a finishing plate welding on to make the job complete.
Then It hit me............I just can't be bothered. Jigsaw cutting, hole drilling, grinding, fettling and welding....................................Its not quite mid-day so as a diversion I wrote this post in a fit of indifference. I guess I'm feeling rather tired from the travelling all week. Cambridge, Brighton, Havant, Portsmouth, Slough, Mansfield. Plus college piles on homework in a last ditch attempt to make sure they have been teaching us the correct topics at the correct level all year.
Not even a full Saturday of footy since England are playing Israel in the Euro qualifier.
So my moods rather depressed today.
Never mind, I'll do what I always do in a situation like this, .............nothing.
OK maybe I'll edit all the typos on the other posts then.
Hope the weather improves for tomorrow though.

Sunday, March 18, 2007

Rust......a show and tell story

The above shows a close up of the rear quarter. Mine has no rear wing attached at all. It was
cut off for some reason by the P.O ( Previous owner)
So you can clearly see the rust and flimsy edge at which the/a ( I ain't got a new wing yet) wing should be welded/glued/magically attracted/brazed/blu-tacked/gaffer taped/screwed/nuclear fusion.
I say this because I've taken council on how to fit the wing. One source says weld the part hidden by the chrome window surround from the outside, then weld the rear very difficult bit by trial and error.
Another source say send it to us and we'll do it for about £1000 per side, its very tricky you know and we are the **OC, we know best, we are smug and we'll charge you a fortune you skint and clueless little oik!
The absolute god and Mr wonderful, the saintly and sanguine Mark Evans ( and the bloke from Stoke) says glue them on and use the odd few tack welds at easy places.
Anyway........its still fairly irrelevant as I have no date or timescale to fix the wing on because..................................I don't have one !!!!!

In anticipation of this though I did set to work repairing this rusty edge. I have cut out three sections with trusty angle grinder. Made up one tricky repair section from flat sheet and welded another small part onto that. Please bear in mind I have now elected to use body filler to "shall we say".... enhance.... the appearance of the repairs.
I must stress that in no way is the structural integrity being compromised, only my delusional ideas of being a master M.I.G welder.

Next post will show my repairs of said area. Really, I did do it all myself. I must have, 'cause who else would own up to it ?

Bit short on witticisms this week. No one's fault really. I've been busy with work and college.
Kids same. Wifey also. Wintry weather and all that.

Sunday, March 04, 2007

Back to Normal.....vehicle wise that is

I forgot on the last post.


The Ford Ka has gone and I have my trusty old ( brand new )Avensis back.
I was just beginning to settle for the gross inconvenience of 2 doors, no remote locking, no hands free kit, no power on hills, no CD player, no satnav.
So Thursday I made it to the repairers late on. Waited say 10 mins for the said charriot to turn up. Lo and behold up it comes all shiney and newly resaprayed and valeted.
3 mins to load up with a salesman's lot and then get in and drive home.
Bliss......sheer bliss. How large the inside is. How quiet the engine, how powerful.
How clean and nice smelling. How comfortable. Music I can hear, a heater fan I can't.
It feels good. I'm not one for knocking cars especially my fave company car was a Ford but the Ford Ka is ( for high mileage driving ) ..................Pants.

All's well that ends well.......if it ever ends !


Not much has happened lately MG wise. To be honest the weather has been rubbish and my work life has been a bit up and down to say the least.
My sales area has increased to cover at least half of the UK, the half being the eastern half including London (inner and outer) and a strange place I've never heard of called Kent.
So it looks as thought my future is secure at least for the next six months even if it means more nights away from home.
The photo shows the repairs to the base of the windscreen and A post top. This is a very complex area to repair made even more difficult by the fact that I had no idea how it should look. The side was a big hole before I started and the other door/side is even worse.
How lucky for me its covered up by the wing and windscreen rubber........ eventually.
Solved the issue of the laptop.........I've got a new one !!!!. well another one at least which was a colleagues who has now left ( Bye Keef with the lovely teef ) I have also inherited half of his sales area too. Cor blimey, talk about vultures hoverin'.
The camera issue with the faulty cable has also been solved. Wife'y and I went to the local Jessops where we bought the Nikon Camera. However neither of us could remember the Model. No problem said the smooth as silk salesman, what you want is a card reader, its the same price and has the advantage of....... blah blah blah. Sold to the clueless couple for £14.99.
But, it works and its great. Now we can organise all the things we've lost digitally somewhere.
Still desperately short of funds for the project, short of good weather at weekends,
short of patience with teenage son no 1, short of ideas, short of skill panel beating, short on love and affection..............phew!! nearly burst into emotional outpouring there.
Get back to reality man.
So, almost finished one side of the car, except door and rear wing ( which I think is on the birthday prezzie list to wifey ( She's asked where they are bought from, so lookin' good )
My time has been take up by MG dreaming. What colour should I have it resprayed.
I'm thinking maybe Carmine Red with Black interior. Or Black as is now. Trouble is Black shows up any and every imperfection. For sure I'll fit an Club spoiler. I'm even thinking of lowering the suspension ( remember its a rubber bumper model which rides 1 - 1/2" higher) and converting it to a chrome bumper model ( extra £400 quid or so )
Answers on a post card please.

Sunday, February 04, 2007

Weld a go go.......and stop stop

Look folks progress..............i think
The view shows the rotten windscreen surround in the corner. The corner is a polite way ( a British Leyland polite way) of understating the rust problem and location . Its several panels, all nicely curved and spot welded in strict order rendering them virtually un-restorable.
However, not to be put off ( well I had actually for the last six months at least ) I tackled it with the usual how the hell do i do that and where do I start ?
Well after about 3 hours looking and generally doing lots of butch posturing and tidying up I made a start. It is tough. I spent all day welding in tiny bits and grinding them down.
The last job of the day was to fill in a tiny pinhole left in the outer frame where I inserted a tiny patch. So thus the stop-stop. The welding just blew holes bigger and bigger till I had to insert another patch the size of a dinner plate ( exaggeration alert.....50p size really)
Still wazzed me off though last job of the day, getting dark and cold. Cut many pieces and welded/ground down/re-welded/ground/ last little weld to fill pinhole/re-patch, mark out,cut,grind,fit/weld grind.
So in the real world the twins continue to hate each other with a vengeance. Wifey's still head down into three art assignments each weekend and day light hour midweek.
I'm confused as ever with the political and financial manoeuvring at head office in Paris and Slough. Hee Hee......how I think its funny to mention these two cities in the same sentence.
Can I remind any one who reads this who is a sales man/woman who uses the motorway frequently,don't buy or hire/lease a ford Ka
Since my Toyota Avensis is in for re-shaping the courtesy car is absolutely PANTS.
Roll on mid Feb when work things get back to almost normal.
ADDENDUM..Wifey did not buy or get a new cable for the family camera. I used my company Agfa ( which is again PANTS) but at least its USB cable works, hence the rubbish photo.
Next job is to finish off repair with yet more tiny pieces welded in and yes.......................sin of all sins I'm going to use body filler to make it all smooth.
Then move to rear of car to tackle the outer of the inner wing, then the outer wing itself.
Then believe it or not the whole of one side is complete ( Body work wise that is) except for the door and front wing which need new skin and replacement lower patch respectively.
More soon.

Tuesday, January 30, 2007

And Boy did it bite my arse

Greetings peeps................Have to sound cheery as I'm as pi***d off as hell.
The last post really did bite me on the a**e.
I nearly died a very flat squashy death. More of that later.
How's that for fate, Karma, bad vibes , ying yang, blasphemy or just plain tough titty.
There must be someone/thing/external joke player up/out/about playing some rather cruel and unfunny tricks with my life.
How I wish I'd not made the last post.............07 stinks.
I'm trying the same trick as the last post, irony and and a sense of belief in my own fate !!
Nothing much has happened MG wise.
Welded hole in floor near rear spring hanger.
Bought 2 tins of Grey etch primer.
Even collected MG roof section from Langley and deposited it at factory in Slough.
Its actually resting in a very rusty old garage out back of the toolroom, surrounded by
years of accumulated scrap machinery and 200 year old compressor.
The boss don't know its there yet. I'm have to tell him soon. Maybe he will guess when I sneak out of the next sales meeting at lunchtime and proceed to wield the grinder.
................................Oh whilst I remember......I was very nearly crushed to death by a HGV in the winds the other Thursday it's that 07 thing again !!!!!!!!!!!!!!
Yes it was really that close. Here's how it happened.
As I was wendling my way from Scotland I stopped at Castleford services to re-route my way home. The winds were getting very strong and good old Sally Traffic was giving out a list as long as yer arm of roads and motorways closed. Most of them between me and home.
Off onto the A19 from the A1 south of said services and I met a long queue of stationary traffic.
The A19 at this point is actually a minor B road, but very long and straight and very exposed in flat countryside. After 30 minutes wait in long queue orange lights appeared from the distance. Two recovery trucks were attending to a HGV that had toppled over, about 300 yards ahead on my side of the road. So, to cut a long story short. they recovered the HGV ( well I say HGV, it was actually a big removals type van transporting mattresses )
The recovery truck with HGV in tow sped towards us at about 60 mph.
Then Sh***********************t It started to fall over about 10 yards in front of me.
Its back end hit the transit van in front of me, it kept falling and I ducked down and sideways.
Smash, boom, thud, thwack. It hit me on the windscreen pillar, windscreen, roof, door front & back and bootlid.
It then went on to hit the transit van behind me ( On the roof only) and came to a standstill at 45 degrees to the HGV behind that van.
Bear in mind we were all stationary waiting for the go-ahead from somewhere down the road.
I think if I'd not been between two transit vans ( hi line ones at that) 07 would have been a very very bad year for at least three more people.
I dare not tempt fate again...so I'll sign off with a note of pessimism tha......

Hold on did...... I get my sums wrong? is it odds that are bad for me ? maybe evens then ?
or are they good. Maybe at the autumnal equinox it changes expotentially ?
There job done Not called "Captain chaos" for nothing.
I'll keep hangin in there, at least till the jobs done anyway. ( go away italics....please)
I do promise to post more often though...and if said female gets her finger out even post pictures.

See yer soon............p.s keep the messages coming I need cheering up !