Saturday, October 30, 2010

The Bodger strikes

So, a major spot of "bodging has been found on the LH suspension parts.
Half of the stuff was removed a couple of weeks ago without too much trauma. Except the top "A" arms bolt was loose, (Kingpin top) ( Nay...not enough thread actually).
Removal of the castleted nuts and lowering the spring pan was easy enough. I even managed to undo the drop link from the anti roll bar to the spring pan. It was a struggle on the other ( RH) side as the ratchet head was a little too large to allow the socket to sit on correctly and get enough purchase.
So how did I acheive it on the LH side then ?  Simples....I used the universal joint thingy in my ( sorry wifey's) Kamasa socket set, doh ! Its a lot narrower.
So where was the bodging then ?
Since I had free access to the spring pan and the drop link was off I undid the nuts holding on the lower "A" arm. During wire brushing I noticed a large blob of weld ( I first thought it was grease, as one end of everything was covered in 30 year old "stuff") but no. It was weld. I was annoyed and a bit in pain since I was using the scary grinder with the flat wire brush disc in. I managed to "wave it gently" accross my lightly surgical gloved finger, and it stung a bit.
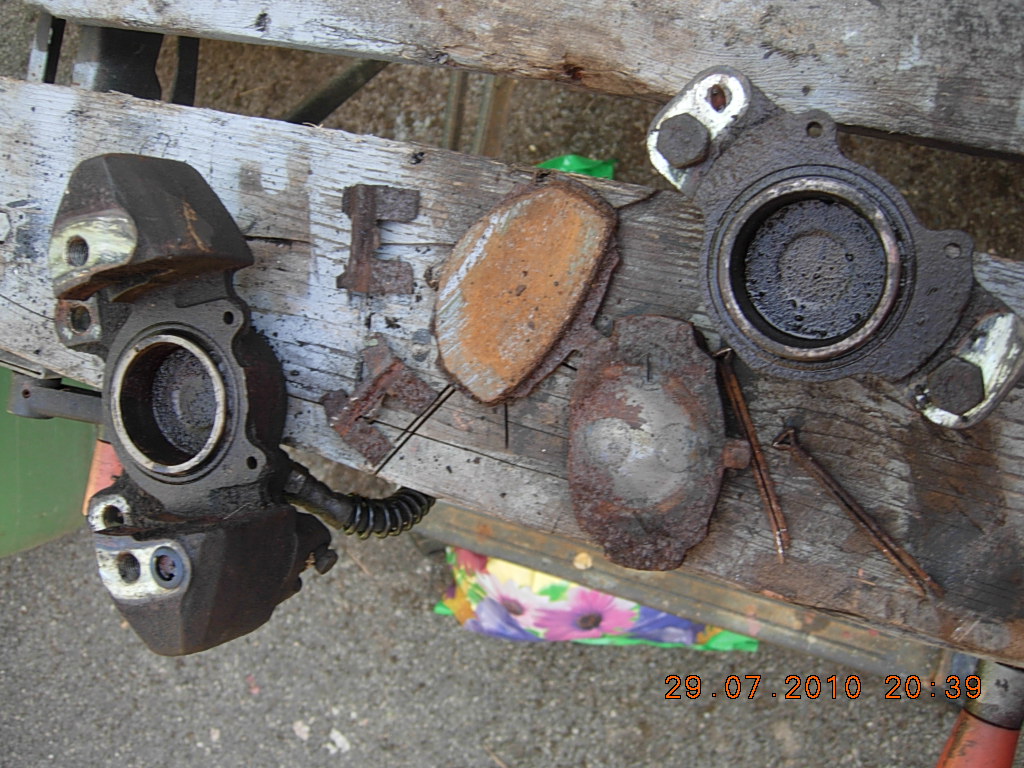
I flipped said arm over to see the full extent of why the weld was there.


Weld ???
Ovality bodge


So, some heathen had welded on a bog standard washer over the oval hole. What a cheapskate. This even makes me look positively generous.
A quick check with MG hive see the arms a a couple of quid each.
More weld was to follow. Whilst engulfed in a cloud of rust tackling the spring pan orifice I noticed a partucularly difficult patch of rust/old grease which the wire brush did its best to worry.
Once the dust cloud cleared and fufferfour had a good look, this is what I found.


Looks like rusty metal in the base was replaced with 3 tons of weld. No wonder the wire brush struggled a bit.
Anyways, I did'nt bother to paint the two "A" arms since I decided to buy new ones. I did paint the pan though, together with all the other stuff removed. Since the weather was good I also removed the anti roll bar ( sway bar for US readers) and had to find a novel way to hang it to dry.


So, there's nothing like showing your undies and smalls in public then, Ha . Hope wifey dont read this.
Mefinks this may be the last of my efforts till springtime, as the feet were freezing as the light faded.

One last point, will the tw*ts who keeps offering me medical "products" via this blog please f**k off, thankyou.

Late addition. The t***s who keep sending me the offers for financial and medical crap have hopefully been thwarted.
Aparrently its the title of the blog post that thier meta-phisers search for. So I've changed it. Lets hope thats an end to it all.
Since not much will happen in Lostsock land MG wise here's wishing you all a merry Christmas and happy new year. If you don't believe in either sorry, your missing a good holiday. 

Friday, October 15, 2010

My cover is broken

That about sums up the weatherproofness ( such a word ?) of the cars cover.
I remember when I bought it and had high hopes for it. One long year ( or is it two) the elements and ruby the cat + other vagrant cat Colin have had their toll on the then excellent Argos cover.
At £15 though I can't complain. Other than it could be better spent on the long list of items I'm likely to need hopefully before winter really sets in.
All I've done since the last post is re-paint the RH  side suspension parts a little, more like touch up. Then managed to remove the LH brake caliper, pads, pins &  back plate. Hopefully on a sunny weekend soon I'll removed the rest of the LH suspension, then pray for cash and more mild weekends so as to assemble both corners and make it moveable again.
       Right now placement at hospital and academic work seems to be taking up all of my time. That and fretting about a sudden inward leak of the elements. In fact, I remember now,  during an odd moment I actually taped up the rear window with black plastic which should stop the annoying dribble of water right into my toolbox. What prompted me to do this was a Saturday intended to be devoted to the RH suspension cleanup/touch-up. On peeling back the cover I was met with the trusty plastic tray toolbox about 2" deep in water. it took a good 2 hours to dry up the boot puddle, tools and tray.
So, next on the must do is another trip to Argos for said giant elasticated silver cover. Hope they still sell it.
More soon peeps with photos..........donations or even comments of encouragement gratefully accepted.

Sunday, September 26, 2010

watching paint dry


So, here are some parts painted today. Actually I'm a little disappointed with them. I rushed somewhat due to the imminent rain/wind/darkness since it was mid Sunday afternoon. What would have been ideal is a blasting cabinet and industrial cleaning tank. The Armstrong damper and the inside of the kingpin Assy where caked in years old grease. I did several coats of the foamy degrease stuff and a good wipes down but the grease just seem ed to be "pushed" around. Spent a not long enough time wire brushing like mad then decided to paint. Which paint though ?. I had two options. The Matt black stuff  I did the rear axle with or the Hammerite smooth Matt I purchased by accident. The axle Matt stuff was a doddle to apply and quite runny. Trouble was it lacked the " body" of a newly painted/refurbished  item. It looked more factory finish, i.e cheap for the mass market. The Hammerite was definitely thicker in consistency and not easy to apply ( or clean brushes ). Anyways, due to the parts ( stub axle and Armstrong damper mainly) being less than spotlessly clean I opted for the Hammerite. Looks good though, if not a little too thick and glossy.
                  Since "er indoors" was shouting 30 mins to evening dinner ( Nice homemade Prawn curry with all the trimmings) I packed it away to review next week.
The list of parts needed grows for this corner of the car, viz
Rubber bushes complete set
Inner rubber bearing cover
Grease gun + recommended grease
Top wishbone nut,bolt & washer
New set of split pins
New brake disc
New Brake disc back plate
New Pads, pins and strap/lock tab
New Bolts (4) and nuts - Disc to hub
mixed set of bearing shims

Then probably same for tuther side some time maybe in spring.

And that's on top of the new large oil cooler pipe, small oil gauge pipe/union, clutch rubber hose, brake fluid, clutch fluid.

Its gonna be a long hard winter............more soon folks.
( p.s WD40 is great for cleaning Hammerite off  brushes)

Thursday, September 02, 2010

suspended suspension...or suspension suspened ! Part One

Enigmatic title ? Yes that refers to my attempts to undo all the rusted and oily tough nuts on the front RH side.
Since I have no form of oxy/acetylene torch ( or common blowlamp come to that) it was an uphill struggle all the way. Or even an upside down struggle at least.
I last touched the MG a good few weeks ago prior to my exams and subsequent re-sit ( result pending ).
I had managed to remove the brake caliper, split the caliper on the bench the tried to remove the hub as a whole. It was then I discovered I didn't have a socket large enough for the hub centre ( Inch & 1/8th AF)
I tried in vain all the local tool shops in town ( 6 in total) only to be given the same bemused look from all when asking for Imperial sockets.
Good ole E-bay sorted it in minutes, and had it a few days later. When it arrived I tested it on the rear.
I had a shock, the rears are  larger nuts. At first I thought I'd bought the wrong one, but turned out I was just too lazy to lift the front cover to look at the front hub. Why did BL make them different sizes ??
Anyways, I'm not touching the rear hubs, only the front.
So in a fit of pique and guilt trip of non revision I did what I normally do, nothing, for a good few weeks
That is until yesterday.
With most of the day ahead of me I set about the front RH unit again, but this time with the correct size socket. Split pin out and nut off easy peasy, off came the rusty disc and even rustier hub.
Spent some frustrating time trying to undo the outer hub from the disc hub..........impossible.
The workmate with jury rigged "new " jaws is rapidly disintegrating.
It has 4 bolts in from the back with well recessed heads, nuts at the front but even more recessed. And there is very little room at the back, in fact no room to fit a socket over the bolt head.
So, after another liberal dousing with the sweet smelling penetrating fluid I put it to one side and set about removing the spring pan + arms and upper arms.
Disconnecting the ball joint steering arm was easy with some synchronised bashing of two hammers. Timing was essential, as was "feel" since one hammer was of the "claw" type and the other "lump" type = gross weight mismatch. It took about 15 blows in various directions and swing timings then viola, it was free.
The front anti roll bar ( sway bar for U.S readers) came away easily.
Then the problems started. Or one problem in particular.
The bolt and nut through the end ( narrow end) of the top  "A" frame where it attaches to the vertical trunnion had been ...............wait for it

Welded to the frame each side !!!!!!!      It was not even the correct bolt. One side had been a domed head with a spot of weld on the arm to stop it spinning. Tuther side had weld wire and gobs of weld on the nut and arm to stop it spinning.
A nifty slice with the super thin cutting disc in the scary grinder saw the heads sliced off expertly.
Trouble was I was left with two flush faces and a bolt that had been in situ gawd knows how long.
Repeated bashing with punch and lump hammer did nothing, either direction.
So I decided the whole assembly had to come off ( Armstrong damper with two upper wishbones, trunnion connected.
At this point sense prevailed and I took the lower pan A frame outer mountings off.
This was a scary move as there is a lot of force since the spring is forcing it apart.
Fortunately the car was supported on two axle stands so I used the trolley jack to lift up the lower pan to take the strain, undid the and nut and tapped the bolt through.
This was surprisingly easy, and it was the part I thought to be the most difficult job on suspension overhaul.
Careful lowering of the jack let the pan down gently, a few taps with lumpy ( my new best friend) and the spring was free.
I was still left with the top "a" frame connected and the lower one too !!!! albeit at the subframe side.
Since the top bolt ( welded ) would not shift the Armstrong unit complete with drop link had to come off ,so I tried to remove the Armstrong bolts (4).
The front two easy, the rear..............................gawd what a performance. RH side was slow.
LH side near impossible. No socket with my extension would fit ( if I had an extension half its length it may have worked ) but a spanner was a real tight fit movement wise. I think I moved it 1/2 a flat at a time with approx 45 seconds of fiddling to get the ring end located properly each turn, 40 minutes later the last bolt came out. The total time for the other three was about 15 minutes.
Bear in mind this was done with bleeding and sore hands, oily as f*** parts and sideways laying down right on top of our cast iron castelated sewer cover.
Then off the top half came, to join its other partly reassembled friend, fiend and co partner the hub assembly on the trusty workmate, to enjoy some time off in the sunshine bestowed on us this very late summer. As a gesture of complete juvenile frustration and envy I took enormous joy in drowning both twats in perfumey penetrating fluid..

Since that's a lot of text..........and no pictures ( hands and body too oily to get camera from bedroom) I'll leave it for now. More this weekend.

Thursday, July 29, 2010

More grunt and groan.....with pictures

Instead of doing the right thing today and yesterday ( revising for exam ) I had a major potter with the MG.

So, fitted all new copper brake pipes. Cor, they ain't half long and complex. The bending them part was easy, too easy in fact. I had the idea I'd get them straight as a die looking ever so neat and tidy. Not a chance !. Still their in and fastened. Some of the P clips were a swine to re-fasten. Namely the one directly below the master cylinder. Two pipes almost went side by side ( with some ungentlemanly language and "persuasion"), the clutch pipe (steel) was in the way as was two thick cables and starter motor solenoid with mass of other wires. The  P clips distort like buggery when bent back then forward as their holes then don't line up.
One under the rear seat was also tough as it was a strap clamp holding the fuel line and another pipe/cable + the new copper line, all had to be fitted into a rubber 1/2 grommet.

The bad news is I have 3 leaks. One oil leak cured easily on the front oil cooler/pipe union. The union was leaking, cured by buying and fitting a new oil pipe. I was dreading removing the nut from the pipe as where it attaches to the Aluminium oil cooler as last time I sheared off the base thus ruined the oil cooler. The new cooler was a second hand purchase from good ole E-bay, bought and fitted a least two years ago. Trouble was I used the old pipes that came with it ( attached at oil cooler end) since they were better than mine.
Unwise move. During the last start up it leaked/ nay dribbled out.
So its repaired now with a brand new pipe. I have to buy another pipe now as I'm not risking the other one.
as you can see from the photo I still have the  Union to undo from the cooler. Tried today and it wont budge.
I'll leave it to absorb some penetrating fluid for a few days.
The other oil leak was at the engine end of the oil gauge pipe. Again I'd bought and fitted a new one ages ago but noticed a very small leak again at start up. I knew it would though. To fit it was a nightmare as its very inaccessible and I crossed/stripped the threads in the end of the hose. So another one is needed..again.
This time I've removed as much as possible to gain better access so as not to make a balls up of it.

The other leak is new, its hydraulic,  coming from the connection of the short rubber pipe to the clutch housing cylinder. This again is in the most inaccessible of places, below the starter motor solenoid and very close to the new copper brake line installed and between the gearbox and engine chassis rail.

So I did what I normally do on these occasions.........did something else on the car.

Removed the brake caliper + hose and attempted to remove the hub. Failed miserably. I didn't have a 1-1/8" socket. So whilst all I thought I would need would be new pads then all new rubber bushes it looks like I now need new discs, back plate and maybe pistons too. They are also soaking in penetrating fuel as we speak.


 Here's a view of the somewhat bare disc as I left it today. Incidentally, last night I fractured a rib falling down some ladders at bedtime ( Long story don't ask ) so its all been a bit of a struggle in more ways than one.

Here is one member of the family ( Ruby ) who loves the car....she sleeps in it till the early hours. How the hell does she get in when the covers over and the rubber strap/hook  thingies are on ?


More soon when I've got money to buy parts and the exams out of the way.

Monday, July 26, 2010

Minor potterings lead to (near) disaster and treason

So, fitted the water pump and  fan belt without too much trauma. Quite easy really.
Then decided to tighten the cylinder head bolts and set tappet clearances before starting engine....again.

During the process, well, at the very start I noticed a tappet arm well off centre, how strange !!!
Further investigation showed the tappet rod loose and flapping around at the bottom of its shaft.
More investigation by removing the small valve/tappet chest cover at the front.

!!!!!!!!!!!!!!!!!!!!!!!!!!!!!!!!!!!!!!!!!!!!!!!!!!

There resting on its side and hiding in a puddle of oil was a tappet follower.
It was for the inlet/outlet (forgot now) of No 2 cylinder. I must have not put it back correctly during the head re-furb. They are very fiddly. They are about 2" long ( 50mm) and 3/4" diameter (15mm) with a hole in the end for the tappet rod to drop into. You need fingers like a deformed midget to get them in position and the grip of a python to hold them.
Anyways, did that eventually.
The big problem was getting the valve/tappet chest cover and gasket back on properly. It and the holding nut are directly under the manifold. No finger room at all. Bear in mind its oily too. I must have tried 15 times before biting the bullet and removing loads to access it.
viz. 
carb fuel feed pipe.
Heatshield
4 boingy springs
throttle cable
choke cable
Manifold nuts and stepped washers
4 of the most fiddly and awkward carb mounting nuts ever made
4 gaskets to carbs
inlet manifold
exhaust manifold

After that the cover and thick rubber gasket were a piece of cake.

Which reminds me, during some of the attempts at starting and trying to cure why it won't start unless off the jump leads means plug no 2 mystery solved.

Some time after starting the first time, inspection of said plug was clean as a whistle. No wonder, no spark, no compression, no exhaust ala no valve movement due to errant tappet follower.
No wonder the engine when started sounded a bit loud and rough.
Anyway, now I can't wait to restart, or at least attempt to.

I still have the oil gauge connector seal at the engine to replace, one oil cooler pipe( leaking at its union) at the oil cooler end to refit and replace some cracked fuel rubber pipes ( noticed during makeshift fuel filler /gatorade bottle).

I did remove the ancient selmer alarm fitted together with loads of bodged wiring and find where the mystery switch wires led to ( across the coil connections/ some sort of home made immobiliser device )
I've left this though to remove later.

I also solved the damper arm problem. After buying the kit to lower the rear from MGOC the Armstrong dampers looked at a too vertical angle.
A quick call ( well 2 months after fitting) to MGOC and they sent me the correct ones ( longer, you should still use the RB links even when lowering to CB height )
Spent a frustrating 3 hours replacing since it involved laying on my side and spannering away forever.

Next job is to replace the brake pipes from rear axle to front end, both front corners ( bought and waiting)
Then replace the front suspension bushes.( not purchased yet )
Then rebuild front and rear brakes. Ditto.
Between which I'll probably try the engine electrics again.

The Treason is ........horror of horrors I've been fancying a Lotus Esprit.
And , it was my hero Ed China who started it. A recent episode of Wheeler Dealer whetted my appetite for what must be the most beautiful of all sports cars ever designed. Trust my luck they are a real pain to work on though. Maybe one day well after the MG is sorted and I have money. A V8 would be nice.

Life goes on for poor old Lostsock, having an exam re-sit late August which has really ruined my summer.
Son No 1 behaves like lord rising from bed at afternoon and lounging in jimjams all day. Daughter No1 is just the opposite, full of action and plans giving us no rest. Wifey continues to nag re DIY on the house. So I'm torn between all this and revision for a tough exam in 4 weeks time.
Lets hope for some sunshine and cash.

More soon

Tuesday, June 15, 2010

Faffing around with fuel..... part IV

What I forgot to say between parts II & III is that I did try again to start the car after the first successful attempts some days later.
It would not start. never, No way.
The cause...........................bad fuel !

Remember I don't have an unleaded head. The fuel was about 10/14  days old. I should ahve known since it was a light tea colour. I dismissed this as mild contam from the plastic ( approved) container I'd previously had Diesel in.
After some research ont tinterweb I found out that fuel loses quite an amount of its octane rating if its just stood, particularly if its small amounts like less than 2 litres.
That's the reason it won't start.....................I'm sure........ish.

One tip I can pass on for all would be restorers of MG's is use a site called BBS.
Its a web ring for MG car restorers and has the best ever Forum. Post any question, General or Technical and your guaranteed to get some sound and experienced advice.
This is the link >BBS Forum   You have to register ( its free and very easy with NO commercial spam/hassles.

Its them who assisted me with my spring conundrum ( yet to be resolved- replacement wise).
Apologies for the delay in getting to the point of the thread. You knew we'd get there in the end though didn't you ?

I have a spare day from Uni/Placement Friday. So, before the big match and work in the p.m I'll put on the new fuel pump, replace the oil cooler pipe with a new one, replace the oil gauge engine block connector, re tighten cylinder head bolt, renew fan belt, set tappet clearances and renew the old wrinkly engine bay fuel pipe, get some new fuel and have another go at starting her up in attempt to find if the alternators charging and the leaks have stopped.

To keep you Interested here's  pictures of new and old fuel pumps.

 p.s I also have yet to finish fitting the new copper brake pipes from rear to front and front to L & R.
So thats enough to keep me busy for a while.
More trials and tribulations soon.

Sunday, June 13, 2010

Faffing around with fuel part III

The fuel then. After the last attempt I decided to leave the car a week to concentrate on Academic matters (Exams). Next attempt saw me spill fuel several times over the inner engine bay in an attempt to re-use the same plastic bottle/funnel arrangement. The the rubber hose perished and leaked like a sieve. Fuel spill again.
Engine turnover wobbled mounting of bottle, Fuel spill again.
The fuel did look a rather darker shade of brown from the last success full attempt though. It had been stored in the old plastic approved storage can thingy ( except it once held diesel).
The car would not start using its own battery as it gradually died. Connected up jump leads and still not starting. Employed daughter raise revs on wifeys donor car  and still no start, so I gave up for now.


Some time later.
 I emptied the water system by undoing the bottom hose. Removed the alternator bolts and fan belt. Ditto pulley housing bolts and pump housing bolts. Carefully scrutiny of wonderful Mr Haynes good book and some poking and pulling revealed the probable cause. Either a worn spindle seal near the pump impeller, or worn bearings. In fact, worn bearings definitely. The shaft veritably wobbled. So I set about taking the pump apart. Not a hope. It was harder than a Rubik's cube. The manual showed a pin/clip and or screw holding bearing/shaft in situ. Nothing doing even after about an hour of poking prodding cleaning cursing and grunting.
A careful read of the tho other guru Mr Lindsay Porters book made the following statement  "with pumps being relatively cheap and easily obtainable it is not worth refurbishing this piece of equipment".
Thanks a bunch mate. Another unexpected cost.
The good news is though, I've been putting in extra shifts at the pub and some work at Uni so the funds are good, in fact an all time high of the grand total of £42.53.
I have a shopping list and I'm off to Mechspec to buy a small list of needed goodies.

More soon.

Faffing around with fuel part II

So I left the last post with the engine going "roar" and me grinning like a demented Cheshire cat.
I removed the jump leads after a few minutes of deafening the neighbourhood and switched the engine off.
If only to let the smoke and fumes disappear.
I tried to start again and after a few /couple of splutters, then..... "roar".
I revved the engine whilst sat in the car......cooo.
It ain't half responsive and loud. Its gonna a be a real rocket........I hope.
Its then when wifey said...."whats all that brown stuff spraying everywhere ?"
A quick inspection with the engine running saw a tiny leak from where the oil gauge pipe meets the engine block. This I knew would leak as it was a swine to screw in and I think I cross-threaded it once or twice in the process. However there were three, yes three water leaks. A small one from the rear of the cylinder head gasket. Easily cured with a quick tweek from ratchet. In fact I think I will need to torque all the cylinder head bolts as I seem to remember on re-assembly I did them up by feel ( medium tight to 45/50 lbf/ft - 61/68 Nm -ish). Another dribble/bubble from what looks like a plugged up waterway in the back of the cylinder head. No worries on that score ( a dab of Araldite will resolve this ala fuel tank repair)
The two major ones were the thermostat housing ( rear bolt) and somewhere near the water pump pulley. It was the latter one that alerted wifey. The browney water was being spun by the movement of the pump pulley in a lovely arc passing each inner engine bay side and wing, right up to the wall next to wifeys worried stance.
So I did what I normally do in these situations. Switched the engine off, disconnected the earth lead on battery and faffed around looking at the engine front end with a worried look on my face. The thermostat housing was easy to remove and cure. It was a brand new housing ( another long story of postal ordering/sending back/lost in post stuff) new gasket made and lovely red gasket sealant - job done.
Pulley not so. I was not sure where the leak was. I was convinced the leak was from the above housing so I restarted the engine again after connecting up leads and battery.
Still leaking, but hard to ascertain where from. It was definitely not the thermostat housing.
I was still overjoyed at the engine firing up, it was late and I wanted a drink.
Still not got to the fuel bit yet.................see next post.

Thursday, June 10, 2010

Faffing around with fuel

So, as the title says fuel and faffing around
Let me explain. I decided, after the confusion with the rear spring dampers to move on to something else.
What I decided to do was fit the rear copper brake pipes. This I did without too much fuss and crossed threads. Only one and that was stupid. How I wish now I'd fitted them onto the axle whilst it was on the bench. The RH side was a swine to attach since now the axle and fuel tank/fuel pump and associated lines were also in position. Not until I got up in a fit of severe arm ache and frustration did I realise the 3 way union causing all the swearing was oh so easily accessible from the inside behind the battery hole. Doh !
              So what to do next ?? It was a nice sunny day, nothing else doing ( DIY etc, well lots really but I was trying to ignore it) so I decided to fire it up.
This time I would be well prepared. I needed two sets of jumpleads though. Mine don't reach from front of wifeys car to inside backseat of MG. Borrowed neighbours jumpleads then it went a little downhill.
I could'nt find my/our jumpleads. They've been in the MG for the best part of 5 years skulking in the rear wheelarch. A few months ago I had a clearout of the MG but where the hell did I put the leads ?
After about 45 mins they were found hiding at the bottom of the electrical parts way down on the bottom of a pile of stuff in the shed.
Next job get fuel. Easy peasy. 2 litres minimum.
Then..........make gravity feed fuel pipe from household plastic bottle.  Not as easy as it sounds. The day before me and wifey, as usual deposited all the plastic into the council recycle skips during our early morning grocery shopping............hmmmm.
Anyways, eventually found Gatorade bottle donated by son No 1 after some shouting and pleading round the house for  assistance in finding suitable receptacle. This was great as it even had the soft inside spout that sealed the old discarded rubber section of fuel line.
Connected up battery and jump leads. Found that my own leads did the job without having to borrow an extra set. Result No 1.
Filled makeshift funnel/Gatorade receptacle with fuel. Mopped up a few leaks and re-plumbed the few hoses responsible.
Started up wifeys car then got ready to turn the MG key..........................

HHHHrrrrrrrrrrrrrrrrrrrrrrrrrrrrrrrrrrrrrrrrrrrrhhhhhhhhhhhhhhhhhhhh
HHHHrrrrrrrrrrrrrrrrrrrrrrrrrrrrrrrrrrrrrrrrrrrrrrrrrrrrhhhhhhhhhh
HHHHrrrrrrrrrrrrrrrrrrrrrrrrrrrrrrrrrrrrrrrrrrrrrrrrrrrrrrrrrrrrrrrrrhh
HHrrrrrrrr.....rrrrrrrrrrrr...........rrrrrrrrrrrrr.......................rrrrrrrrrrrrrr
Hrrr..............rrr.........rrr........rrrrrrr...........rrrrrrrrrr..rrrrrrrrrrrrrrrrrrr.rrrrrrrrrrrrrrrrrrrrrrrr

.
.
.
.
.
.
.
.
.
.ROOOOOAAAAARRRRR!!!!!!!!!!!!!!!

Yes it actually fired up ( the above is the best way i can describe its initial reluctance to fire then its gradual ppfut/ppfutp/pfutfutfut)

I couldn't stop laughing. It sounded like the loudest thing on earth. ( Bear in mind no exhaust on )
It revved and revved and sounded like a WW1 tank.............Fantastic. Even the next door neighbour comment on it.
I was beaming ear to ear, all the family came out to see a grown man nearly crying with joy. It made my day/week/month/year/decade.

To be continued !


Saturday, May 08, 2010

Lets ave' em' !!

Comments please. Just to let me know someones reading and god forbid, enjoying.

Additional hints and tips would be nice too...................hard cash even better !

Thursday, May 06, 2010

spring lowering conundrum

Springs fitted and lowering block/bushes fitted without too many problems.

Except !

Fitting according to common wisdom saw the lower most plate which holds the bottom of the damper link arm far too low. That is the link arm was fully down and the lever arm damper was fully down. What alerted me was the fact that the top attachment of link arm was butting up to the anti roll bar.
See below


So as you see ( the RH side) the end of the drop link is miles away from the mounting hole and out of shot the lever arm it is attached to is fully  (almost) down.
So what to do ?
At this point I thought I'd been sent the wrong link arms, so a quick tinterweb surf showed that the CB links are shorter than the RB links. Puzzling ? You bet. I'd still got the original arms ( which had to be ground off ) and these looked like they would do the job a treat. That is, fit in the hole and keep the lever arm almost parallel with the floor and not foul the anti-roll bar.
So whats wrong then ?
I solved it this way.....................................see below


The plate that is normally on the very bottom of the stack of stuff was moved up on top of the spring.
It mounts good, locates well and does not foul on anything plus the lever arm is almost parallel.

Everything else is connected up except the handbrake/drum levers ( waiting for spilt pins to arrive, ditto brake lines/connectors)
I'll tell yer what though. Its definitely lower. It was a real scramble on my back fastening up all the other stuff.

I've now removed the wheels and got the car on the axle stands since this weekend I'll be fitting the brake pipes, fuel pump/hoses and fuel tank. That should see the rear end just about complete.

I've even been tinkering with leaving the front end suspension alone ( except for the fitting of a shorter pair of springs [ bought 18 months ago from E-Bay very locally])
If that's the case the time to start on the electrics..................ooooh errrr !!!!
Maybe I'll finish the odd jobs like door internals/seam sealing/ additional welding/ surface de-rusting/ tidying up shed/ polishing up chrome/ trial fitting chrome bumpers/ staring engine/ replacing engine oil pipe union ( again).

oh descisions descisions.


Wednesday, May 05, 2010

Is that a leaf spring in your eye 2.........No its on my head !

After a lot of huffing and puffing, cursing, sweating blood and almost tears I've had enough of the MG, well for a few days at least.
Getting the rear axle on was a struggle of mammoth proportions. But that's not all !
My wonderful son was enlisted to help move axle onto trolley jack. This took 15 minutes just to get him of his beloved X-box and outside. Then grumbled and whinged at the weight. Typical teenager, Hrrphh, ooohh, mmmmh, why, why. Wot yer want me for. Wifey shouts time for tea young son.............great.
Problem 1.
He was worse than useless.
How I wished in an ideal world he would show some real interest in my project instead of complete indifference.
So I managed ( with his help to get it as far as the back of the car ) before he departed.
That's when the struggled started.
Problem 2.
The axle would not sit nicely on the trolley jack. It kept sliding backwards/sideways/forward/off/down/up.
Then after a brainwave I fitted the rear wheels to aid with movement.
A Master stroke..
.
.
.
.
.Not !
It was easy to push/pull but the diff was heavy (very heavy) and wanted to stay flange down.
Moved TJ to support diff flange..................better.
I needed to align a mark on the diff flange with corresponding mark on flange of propshaft.
Problem  3.
Every time I moved wheels/axle forward/back the flange on diff turned away from said mark on propshaft.
Brainwave 2.
Get scissor jack from wifeys car to support diff flange.
Problem 4
The scissor jack don't slide with the diff.
Brainwave 3
Use TJ to support diff and take weight off wheels.
Problem 5
Where the **** are the diff nuts and bolts ( I'd  ground through 2 to get them off )
Eventually found and fitted without too much drama.
Moved on to fitting rear springs.
Done without too much drama.
Fit Poly bushes to rear mount and shackles.
Problem 6.
Very difficult. They kept popping out when the shackle went in.
Solved by fitting all bushes except one to shackle and ( after lots of puffing and swearing fitted it)
That was the LH side. The RH side was a different matter.
No matter what I did the poly bushes were not having any of it.
At this point I tried the same tactic as the LH side.
Still a struggle.
Finally, as I was flat on my back directly under the end of the spring hammering furiously to remove one bush.
BANG.
It dropped down on cracked me directly between the eyes.
To say It hurt a bit was an understatement !
So I rapidly packed the attempt in an went for my tea ( it was 8 p.m by this time)
A facial inspection saw a nice horizontal cut across the top of my nose, huge bruise where it initially impacted on my glabella ( lower forehead for non medical people) and a huge lump on my temple where it grazed on the way down.
So my head and face hurt a bit.
My ego is bruised since I could not wait for the brake pipes to arrive and the weekend, so I'd  done the normal Fufferfour trick and rushed it a bit instead of waiting for a more appropriate time ( the weekend).
Still, I've got a FULL set of brake pipes coming ( with flared ends and unions) + diff bolts/nuts+lost nut+ rubber gaiters for brake hubs.
I'm having some time off to concentrate on getting a better class of headache by studying for Uni..

Monday, May 03, 2010

All dresed up


OOOOOhh I say.

To be honest the picture doesn't do it justice. Its matt black and smooth as a babys bottom thanks to a few hours with the grinder/wire brush cup thingy.
Now for the exciting bit.....fitting it all.

Friday, April 30, 2010

where's the diff ?

A fit of yet another activity saw me grinding through two of the four bolts holding the back axle/diff to the prop shaft. And that was it, away it came, albeit very heavy and awkward to drag along the drive and onto the trusty B&D workmate. In fact I had to get son No1 to help heave it skywards. The brake pipes were a swine to remove despite at least 5 soakings with penetrating fluid.
Why is it that the MG is never symmetrically easy..........or difficult.......viz the same both sides.
The wings rusted differently each side. Two prop shaft bolt came undone easily, two had to be ground off, one sides brake pipe union came off with spanner, other didn't budge. One damper spanner ed off quick as a flash, the other took some real force. One rear side window base rusted as hell, the other OK. ???????????????????????????.

Look..............Spot the back axle


Its here  !!


So now I need some new copper brake pipes, the existing were marmalised during removal. Well they have been there 33 years and subject to all this fair Isles winters and summers. I'm havingg them as a birthday present !
The 3 way Brass union has cleaned up a treat and as we speak I'm fettling the axle with angle grinder/wire brush. Its then going to have the Matt black paint, so too is the fuel tank base then time for re-fitting. On second thoughts maybe I'll wire brush the roll bar and paint.
Just as I want to make progress I think/decide on more to do..........its gonna be a long summer, and painful too !

p.s the Matt black on the axle looks great...........I'll post photos soon.

Wednesday, April 28, 2010

Quick update

Well, I ordered said replacement bushes ( Cheap from MGB hive - £ 2.95 ish) new bump stop pedestal ( £4.95, galvanised, a real bargain) & replacement rubber brake hose. They came at 8.00 am the following morning.
So, pleased with that I legged it to Halfords and bought a can of matt black brush on enamel and PENETRATING OIL ( funnily enough the product is made by WD40 brand..ha....It smells loverly, not the metallic sickly smell I remember)
My big dilemma was Halfords prices. £9 for spray on Hammerite Matte Black, £6 for own brand matte black spray, £ 7 for brush on hammerite and £4.75 own make. In a fit of economy I bought the cheapest, feeling guilty over my recent spending spree.
I've used it and am mildly disappointed. I should have bought the gloss. The parts look ok matt, but can't help thinking they would look much better gloss and be easier to clean in the future.
            The big plus point is I've fitted the bushes into the spring fronts.
It was easy peasy. This was the part I was dreading. I have no garage/workshop, few tools and am apt to rushing things. However, with the use of the trusty B&D workmate, oversize socket and lump hammer they went in easy.Well a few ( lots) of well aimed blows in they crept, seated and positioned correctly.
            Now it seems a shame to leave the axle and brake pipes all crusty with crud. Its not easy to get down & under to attack them in situ as well as the body underside.
So, I decided to remove the axle complete, wire brush with grinder then paint before fitting the fuel tank. Then replace the rear copper brake line.
In order to do this I have to disconnect the prop-shaft at the diff.
PROBLEM. 1/. The bolts have very short heads and the nuts don't allow to get a socket on them.
I've doused them liberally several times with penetrating oil.
PROBLEM 2/. the RH brake line came undone from the hub easy, the LH wont budge. The main problem is the fear of rounding out the flats on brake nut and diff nuts. Its only possible to get a tiny thin 1/2" spanner on them and that just spins.
So its a waiting game hoping the penetrating fluid does its stuff.

Hopefully the next post will see it all fitted and looking superdooper new like.

Saturday, April 24, 2010

Onward and Inward or its spring time, literally !

Oh the joys of MG ownership.

After a long bout of thriftiness, I manage to save some money towards the rear suspension, So, from three different places I bought :-  set of Polybushes for rear spring shackles, lowering kit "u" bolts and spacers with attendant polybush covers, pair of chrome bumper shorter link arms and shorter rebound straps. That was a month or two ago. But being too cold to work outside, I decided to wait till the weather improved. I did have a half hearted attempt at removing the rear axle and springs. It was easy................ish. The "U" bolts nuts came away OK, so did the bottom end of the rear spring. The handbrake cable was a complete enigma on how to detatch. The rubber brake pipe mounted  from the battery box union bracket to the 3 way union on the axle would not budge, either end, so I left it be. The axle is supported on a trolley jack and the car on a stout timber 4x4 with 2 axle stands. Sounds a bit illogical but that's the way it is. The front end of the rear leaf spring would not budge, either side. Neither would one link arm come away from the Armstrong damper. After one mistake viz spraying liberally with WD40, they still would not budge. TECHNICAL NOTE . WD40 is not a releasing fluid, it a water dispersant. So if you need to "soak" nuts and bolts etc use PENETRATING FLUID, like Duck oil or whatever. Thanks to Octarine Engine services for pointing that out.

So, that's what it looked like for both sides.


The RH side was probably the most difficult as the battery  box and wires all impeded a good heavy swing of the trusty claw hammer. After more ( incorrect ) dousing of WD40 they ( LH & RH front spring bolts, RH drop link) still would not budge. Obvious.......................bigger hammer.
Off to brother in laws for lump/club hammer. Still no joy and still more dousing with WD40.
By this time better weather was upon us so I was going to devote a whole weekend to the jobs to do.
Besides I was itching to get the new stuff on.
Come the weekend the first job was to locate the live feed wire to the fuel pump and the earth. Their are four wires, all dirty black-ish plus a couple of dangley earth wires. I did many years ago label the wires but the elements worked their magic to make them useless. Still I'm a clever git sometimes and I've even got a multimeter ( £2.99 from Wilko's- only the best for me...hehe) and wiring diagram, so I should be able to work out the wire feed & earth. No.No.No. Even with battery connected there was no current flowing with the ignition turned on. Now here is the start of another story not yet told.....................the car immobiliser, fitted circa 1978-ish with sh** loads of red wires under the LH dash + secret on/off switch under RH dash. Methinks these have an effect on the current flowing but I'm not that much of a clever git to understand that load of spaghetti.
So we'll leave that for when I attempt the electrics proper.
For now all I wanted to know is which wire and does the fuel pump work ? I settled for the does the pump work ?
Simple answer..........................No. Rats rats and more rats. Even the recommended tap on the side didn't do the trick. I left it a day to re-think.  Moved on to more nut bashing with the lump hammer. Still no joy. The LH spring mounting bracket had taken a few hits and was beginning to bend inwards. Time for some more thinking and formulating.
BBS webring and MG forum gave the answers. Loads of em. varying from use a "sawzall" ( From the U.S bless em, they mean a reciprocating linear saw blade, i.e jigsaw or power blade ) to cut the bolt heads off, to drill through the bolt ends each side. I opted for Octarines method. Use a thin grinding disc and grind up between the spring and bracket through the bolt each side. It worked a treat. Marmalised the end of the spring a little but ,hey its off and usable.

here's proof................and them bloomin bee's are back.


The spring has had a good clean up with the wire thingy in the angle grinder. Looks almost new. Gave it a liberal soaking in thin oil and cling film wrapped it till I'm ready for the next bit.
As of yet I've not tackled the other spring removal. This is only because today ( Saturday) I forgot to buy a new thin grinding disc and I'm working most of the weekend in the pub. I chilled out and caught some rays in the garden. Uni has been manic, with a 6 week placement just ended, one exam the first week,1st day back. Essay to do + another exam + Dissertation proposal hand in.
What I did do a few weeks back is :-


All the parts holding the axle were wire brushed clean using the angle grinder then primered ready for a nice coat of black paint. Top shows the spring and tools I used for the rubber bush removal. Its a composite bush inside the end. As you can see I had to destroy it to get it out. I think destroy is a little understatement. It was rusted solid and no way was it going to shift. Even if I had a press of 100 tonnes, i doubted it would have moved. The Bush is a thin outer of tough steel, a thick rubber inner then another thin steel  inner. The offending bolt that would not come out was stuck to this surface. Its the rubber that causes all the problems. It does its job and resists and dampens any forces applied. I drilled several holes through the ruber and chisseled down the outer shell pushing it inwards as I went on. I bet the fitting of a new one will be even tougher. Which reminds me. I don't have a replacement. Thats why I'm working all weekend, I will need two, plus bolts/nuts and the rubber bump-stop pedestal. Mine disintegrated when the original "U" bolts came off. Anyways. Up until yeaterday I was also convinced I needed a new fuel pump. I tried several times time connect it and make it work.Stripped it down, cleaned it and the contacts, but to no avail. Not even a murmur. So, I checked You-Tube, John Twist of University motors again. These are wonderful clips from an MG man through and through. The clips show all the tricky probs and remedies for loads of mg makes. Tiz a pity its no longer in business.
This time I cleaned the testing wires thoroughly and the battery terminals. Rechecked and cleaned the points with emery and Bingo........................buzzzzbuzzzzzzbuzzzzzz. It now works a treat. So, since I have a day off from Uni Monday I'm ordering said parts + paint and next weekend will see me remove rear spring, clean it up, paint parts black, remove some ( lots) crud from axle, fit RH armstrong damper ( thats how I removed RH lever arm - with damper in situ and attacked on the bench- easy peasy) fit fuel tank and hopefully Sunday fit spring and new parts. If I can re-fit new front bushes. This is going to be a drama, I can feel it already !
Just to prove the car and project is politically correct and in line with all green issues I'm recycling as much of the car as possible. I've used the old doorskin for most of the patch panels on the rear and will be using it again for the door slider bracket. These have rusted badly and needed removal when I replaced the doorskins. I kept one to use as a template. They are handed too, so I made a paper template. 
Look !                                                                                                                                                                

More soon folks !


Monday, January 11, 2010

Let It Snow, eh ! .........yer want more ?

So we did have a white christmas after all. I can't honestly remember when the last one was but probably over 25 years ago. Well properly anyway. Most of the snow in the last decade has been of the very wet slushy type gone after a tiny rainfall. It still manages to disrupt things thought on almost biblical proportions. Why in the UK are we so unprepared for snow in winter, heatwaves-ish in summer, rain in autumn and insects in spring ?

         Enough winges. Christmas was good (In an overindulging kind of way ) but bad for the MG. It must feel unloved and neglected, abandoned and cold over the last few months. All I've done is repair the vynyl cover and make the rear window a mesh of duck tape. After a particularly rainy, nay torrent of a downpours for a few days I noticed the rain had collected to such an extent the cover had sagged right into the spare wheel area holding about 30 gallons of water. Some expert juggling and inexperienced manipulation saw only a little spilled inside. It did happen again but not on such a grand scale so thats when I hit on the idea of how to support the cover over the gentle slope of the rear window. It may look like the base of a well upholstered seat base but its doing its job under all that snow. I do hope my worse fears of a radiator leak is not apparent after all the freezing temperatures. Its funny how you get good intentions ( I thought of this mid repair to the rear window duck tape episode) "don't forget to empty the coolant before it gets too cold". Did I ?. well you should know the answer to that by now ( NO)
Hopefully I'll be lucky ( Never) or just completely forget come spring. 
      Any further musings car related have been regarding the colour. I think its going to be an off shade of white......................maybe. I just scared rust bubbles will show through after the expensive respray. Some slight (very slight at last look) surface rust is showing on gutter seams over the primer. Gawd knows what its like come warmer weather.  Uni/work keeps me from other thoughts, and of course the wife and kids are high maintenance at this time of year. I'll keep checking the lottery though .