As we speak all that is left is :-
1/. Sand down filler in tailgate gutter and prime
2/. Tack weld boot/wheel-arch repairs to strengthen and add some seamsealer
3/. wire brush and paint ( Hammerite- Ku rust, its brill at killing rust) tailgate inner lower lip
4/. fill and sand hole in picture now rear screen is removed.
5/. Drill out snapped bolts in front upper valence mounting captive nuts.
6/. Maybe..............only maybe, re-position front indicator mounting holes in valence,
7/. Chop off old bumper chassis leg plates ( so a chrome bumper mount can be attached)
Not bad eh !! most of the above can be achieved in the next session. if the weather of our glorious summer holds out.
Spent the last two good days helping brother in law lay vast quantities of cement for his new patio. An we aint done yet.
Below are the photos mid repair of the top RH tailgate gutter.
LH side is fine RH side poor with BIG hole


So I set too thinking....................how the hell do I repair that !
I actually spent more time thinking why did it rust there and how ??
BL cars are really amazing, they rust in all the expected places usually, them that don't rust in all the weird places and not symmetrically.
Anyways, decided since this part is not seen i would weld some thin steel over and fill to a smooth finish.
Here are the tools of the trade for weird shapes.

Sorry for the "break" in the post..................Monday above ^ Wednesday below
Its very important to use only "Shredded wheat" cardboard , as this is never missed when you spirit away the box and leave behind the bag since no-one ever bothers eating the healthy stuff.
On a serious note though, label the template front face/rear as its easy to cut a Mirror Image of what you want.
One snag is I forgot to take a photo of the finished article, since its had its plates welded on, ground down, filled and sanded ( Twice)
I have also filled and sanded the tailgate outer edge and Ku-rusted and red leaded inside lower edge + covered in primer.
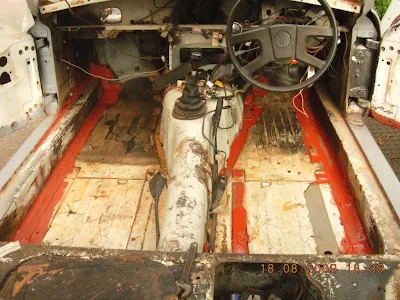
Below is foot-wells cleaned out, swept and Vac blown.
By Vac Blown I mean I used the trusty B&D leaf blower/sucker. God is it powerful.
Its like a hurricane and blows all debris into the stratosphere.
 The dreaded rubbery compound sound deadening type stuff on the floor is horrible. Its about 1/4" thick and either comes up in chunks or like soft sticky toffee. So I'm leaving it in where its sound.Besides its too much time, bother and expense to remove. Trouble is what can I replace the removed bits with ? Anyone got a spare bitumen lorry load of it, warm and ready for pouring ? Red leaded the previous welds (Again) after another Ku-rust treatment.
Decided not to weld the rear boot corners/infills. I'm going to fill with copious amounts of seal sealer. I did also drill out the one seat runner bolt head that sheared on removal a few years ago. It took 3x 4mm drills ( Damn, just bought them too), angle grinder + 6mm drill + mole grips+350 squirts of WD40 in the end, but its out clean (ish). My tactic was to file the screw head flat (mistake) it was 5mm tall off the floor. I ground it down lower, flush to floor ( after drill break no 3) then started the hole with the last 3mm drill(till that broke) then all the way down with the 6mm. Underneath I ground 2 flats on the 8mm length poking out and gripped with moles and Presto ( all this took about 40 minutes and a bit of cursing)
So next is removing the Rubber bumper mounting plates at the front and those pesky captive nuts with half a bolt in them on the lower edge of the valence/body join.
I did also start up the car again, using a makeshift fuel directly into the carbs....WD40 !!!
GREAT<<<<<<<<<< It turned over for a few seconds and the oil pressure is good. I did video the occasion but Blogspot prevents me from uploading for some reason. Maybe next time then when I've worked out the fuel pump wiring and actually put real fuel in.

No comments:
Post a Comment