Sunday, July 08, 2007

As you can see, or maybe not some things have been achieved.


I have spent lots of time getting the wing ready and prepared, mostly on the inside and adding filler to the sill/B-post join.
Why is it that things that seem to worry you most and up being the easiest to fix.


The wing mounting holes for one.


The beading and wing fit for another.


The fitting of the of the wing for yet another.


Anyways, back to the order of things since the last post.


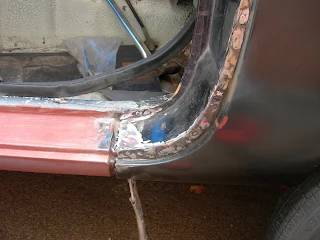
I had applied lots of filler to the B-post/sill join and to the scuttle where it meets the wing top.


I must say that I ended up sanding most of it off.


Then the rain came....................and boy did it, in bucket loads.


So not much happened for the last two weeks, except for the rain.


Sunday evening saw a veritable monsoon, from 8pm onwards till about 10.30 next day.


During the brief interlude I noticed..........Horror of horrors that the blue cover over the MG had blown off some time Sunday evening/Mon morning and left the car open to the elements.


Well, elements is a pretty light word so I'll say pissing heavy torrential rain.


Luckily, only the outer edges of the inner car were damp with light rusting on the floor & sill areas. And for some strange reason one bucket in the back containing all my precision hammers 3 inches deep in water !!.


The blue Poly cover is pretty porous though, particularly where its been dragged over the roof on the ariel base. I did have a tennis ball over the protrusion but that's long gone into the void of disappearing restoration parts.


So Monday lunchtime off to good old B&Q during a firm but constant drizzle.


£3.99 for same Blue poly cover, 3 mtrs x 4 mtrs with fastening holes, what a bargain.


Gawd.......................what a size !!! You could cover half of Derbyshire with it.


Try fitting it in a drizzle and breeze enough to get you out of the harbour.


It was everywhere on the drive, Still its not porous (yet) and the biggest ball of wifey string helped to keep it in place, with the old ( porous yet much more manageable) cover over the top.It did its job for at least 2 weeks. Yes, that's how much rain we've had.


The work done to the inside of the wing worried me lots before I started.

It wasn't until a work related detour via Cambridge that I actually bought some more new stuff from the MGOC. A wing fitting kit to be precise, a 5/16 UNF nut, a 1/4 UNF nut and a headlight inner re-enforcing ring.

Spent all Saturday welding the 5/15 UNF nut under the wing top inner edge, making a cage for a strange British Leyland round 5/15UNF nut and welding up in same top inner edge, welding the 1/4 UNF nut to the inner wing mountings ( having first spent ages drilling out broken bolt and grinding away old nut ).

All just so the wing can go back on and be bolted in all its places.

Sunday saw me paint good old Hammerite Red lead all the inner wing rust prone areas, sand the sill B-post area, try again( 38th attempt) to remove the door hinges from the A post.

This but was aborted yet again.........which is a pity because the great big f**k off screwdriver I have has a hexagon on the shaft where it enters the handle so a ring spanner fits great and offers fantastic leverage. The phillips head is buggered though, thus it stays put....maybe !!

Ran a 5/16 UNF tap down the wing edge holes then undid the wing fitting kit.

Yipeeeeeee...........loads of new shiney screws, washers and spring washers + 3 nuts too !.

Fitted wing in a trice.......could even do the nuts up with fingers mostly.

Only had to use jack to press up bottom of wing so I could drill 3 holes to accept 3/16 screws with nut to attach to castle rail and jobs done!!!!!!!!!!!!!!!!!!!!! yes it fits and looks good!!!!

To think I started this blog and spent ages in deep mid winter removing the wing, and now here I am still in July deep mid winter fitting the wing.

Removed it though and sanded and cleaned everything down one side.

Sprayed lovely clean Grey primer on door, wing rear wing, B-post and sill area, A post and finally inner front wing area.

Here have a look..............................................


How good it is to see it looking like a car again........Its given me a real sense of achievement.

Next session should see the door hung, sort of, maybe finally or time to reconsider the phillips screws again, maybe leave them.

Wing fixed with all new shiney screws and bolts.

Sill finished ( still some slight filler spots to add to get nice even gaps) and to wing too, suffering collateral damage from being removed and trial fitted too may times.

Then weld rear wing and turn attention to rear of car..........Yes a new chapter, hopefully.

Friday, July 06, 2007

Its a little damp outside dear

What can I say other than the title. Since last applying filler to the B post/sill join and filler to the wing/scuttle join its been........................well I'll say .................... wet!

The last two weekends, nay weeks, has seen torrents of rain fall, all day,all night and in between. During last Mondays deluge a quick glance at the MG and its forlorn flapping blue poly cover saw lots of rain get inside. Mid-day off to B&Q to get a new Poly cover( in the pouring rain) .

My present cover has a hole where the roof section has an ariel base protuding.

Despite having the clever idea of wedging an old tennis ball on it, the constant removing and tie-ing down has made it as firm as a vicars handshake. Not to mention the elastic bungee cords frayed to within an inch of their life. In fact on Sunday the poor old MG spent the evening till Mon Morn with the cover hiding between the fence and the driveway gate.

Fortunately I got the last blue Poly sheet at B&Q and cheap it was too (£ 3.99) .

The trouble was thought.................................Its Huge !!!!

3 metres x 4 metres. Seemed OK when I bought it. But try covering a car with it in the pouring rain, using frayed and limp bungee cords and a howling wind.

I ended up using about 70 metres of string, over, under, around, between, up and round the MG. It looked like a drunkard had tried to wrap up a Holly bush there was so much Blue poly cover. However, it made it water proof ready for the onslaught or rain we had, er........still having actually.

Prior to thison Saturday, I did remove the front wing several times to try and get a good fit between the curvy scuttle base and wing top edge............ Impossible............!!!!

In desperation I fixed the front wing with the 5/16th UNF bolt nearest the said position.

Then added filler to the join and bead ( I previously welded the bead to the wing)

So my thinking was if the join was rubbish( uneven with gaps) bolt them together, add filler, let dry, remove wing , sand to perfection and re-fit wing nicely.

WRONG

On removing wing all the filler broke off, some filler stuck to inside of wing beading and some filler was well just ..........crap.

ABANDONED...................................time for a re-think.

It needs all its bolts and holes in wing ready and clean so it can be clamped tightly, then re assess.

So, on a trip to the far SE corner of our wind and rain swept counrty I diverted via Cambridgeshire to the MGOC.

I actually bought some new ( YES NEW ) stuff, a wing fitting kit containing all the correct screws , washers and bolts. Nice and shiney.............Lovely, and only £ 6.25 !

Also got the 5/15th UNF Nut which I had to gring off the wing when refurbing it and another nut 1/4 UNF which has a sheared bolt in it on the wing.

Whilst there I also bought the headlight re-enforcing panel. This part took the best part of a whole day to remove from the wing as it was rusty and deep inside the wing.

So...............................My plan is simple.

Fit both new nuts by mig welding them in place.

How to remove the existing nuts with broken bolts in is another story.

Then fit the wing with all the bolts and nuts. To assist matters I even bought a 5/16 UNF tap.

Please dont faint, its not new. It was £1.99 + 99p p&P on..........yes you've guessed good old E-bay.

So when the rain and wind stops I'll get busy. Oh and do the sanding of the B post too.

Sunday, June 10, 2007

A little more of all life's joys and irritations

Not much has happened so far. MG wise I've pratted around doing nothing spectacular.

Well that's not exactly true.

I did set to to fit the inner wheelarch a few weeks ago. If you remember it was a panel I needed and was one of several bought as a birthday prezzie from MGB hive.

Anyways, I did all the correct things and lined it up, marked it + 1/2 inch and cut to the desired shape. Cut away the rusty wheelarch inboard of the 1/2 line.

I then set to attaching the wing, all well and good.

I spent the next few days(nay weeks) trying to get the inner wheelarch to fit the shape of the wheel arch and align front and back.

Impossible, so I left it for a further few days.

Then one bright and sunny Saturday I attacked it with renewed vigour and enthusiasm.

Gawd............................I know why it don't fit......................its the wrong side!!!!!!!!!!!

Yes, I had actually been given a RH side when I needed a left. No wonder in didn't fit.

I've not told wifey yet........No need really since I can use the panel for the RH side , but all in good time.

What I have done is welded the wing around the B post seam/door and sill area.

See Below..............................

I know the gap between the sill and b post base is a little large, but, well there really is no answer. When taking off the old sill the gap was even larger, I remember distinctly seeing all the lead loading ( Yes Lead Loading) running away as I ground through it. So It must have been made that way at good old Abingdon ( Swindon actually is where the bodies were assembled)

The front wing gap at the same spot is also same size.............WE really did know how to build cars, eh !

The gap is now full of the dreaded filler ( No I,m not going to spend several months learning how to lead load) and its waiting to dry as I write this.

I did go a bit mad with the filler and covered several spot weld and the rear wing top beading seam. So next post will be all about sanding filler........maybe.

Monday, May 21, 2007

One job leads to........fivethousand others !

So, the wing fits great with a regular gap around the door.
How to weld it on though.
This I must admit had scared me for months and months, In fact since I bought the car.
According to all the readings I've done it is really tricky with access very restricted or nigh on impossible. Even the wonder kid Mark Evans resorted to "Glueing" his on.
But since I now have the wing, its easy. Access is good to the door surround, the top front edge can be welded on the outside as a whacking great chrome strip covers it.
Access to the rear top edge ( Which is supposed to be Impossible) is easy.
Easy for a midget with nine foot arms. Not exactly.
By looking down the hole for the rear light all the internal seam is there to be seen and a welding torch fits in nicely. Will I still be saying that when I've actually welded it !
Spent most of the last few weekends offering up the rear wing, grinding shiney mating edges,
offering up and pondering, even more pondering and offering up.
Especially last weekend when it was all systems go for wing welding.
Bloody weather............wind, wet, dark........and that's only me.
Rain on and off every 5 minutes and gusts of wind between. So frustrating. Hence the offering up bit and pondering.
The rear inner outer wing (wheel arch) needs repair so I cut away the rust, and more rust and even more.
The boot corner where it fits to the inner and outer wheel arch has gone at its fitting point.
I'll need to fabricate a repair panel for this and rely on the wonderful Hammerite rust killer at the very rear behind the rear valance/wing join.

Look...........No rust its all gone
Next post should see the wing welded on and maybe the inner outer wing edge welded on.
The title e.g five thousand other jobs refers to the chopping down of the whole inner outer wheel arch panel purchased. The cutting/ shaping of above wheel arch edge, removing boot tray rust and having to remove a small portion of the inner wheel arch. All this means extra work fabricating, cutting, bending, shaping, clamping and welding. The remnants of the new outer wheel arch ( about 70%) will do for the inner arch repair ( I hope)

Not much fun and frolics away from the MG. Works been very busy with me visiting strange places like Hampshire, Kent and Guildford as well as Teeside, Borders Reigon and Hull.
France and Switzerland are also in there too, as well as too many nights away from loved ones.
Maybe next post will be on the problems of having teenage twins, since they, but one in particular is morphing into Harry Enfields "Kevin" before my very eyes. Cheeky bugger even says I'm turning into Harry Enfields dad !
An neither will help with the car !!...........................Wifey's up to her armpits in Plaster for her final Piece for Arts College......I've been plastered about four times, Ma in law at least three, sister in law twice........all in a good cause.
I must explain. She's taking moulds of our hands and arms. I've also had my face done and it has to be done again this weekend...It cracked, how funny ...............Hope it rains !!