Monday, May 29, 2006

As you can see I've been at it again.
The car that is. Although I've done lots otherwise but boring mostly.
Since a lovely bank holiday approached I hatched plans to remove the LH sill on the car.
Well "remove" is a fairly permanent word so I approached the job with some caution.
Its well said about MG sills that they are not a job for the beginner, need good welding skills and if done badly you may as well chuck the car away.
That's apart from the fact that the car can "sag" drastically in the middle if not supported correctly.
..........................Well just like me then !!!!!
( shot showing exuberance of grinding tool)
Left to my own devices I ground away the inner upper lip of the sill and peeled down the cover sill just like Mr Lindsay Porter says. So far so good.
I should have used a "Spot weld Drill" but I thought they were expensive last time I looked so I used the dreaded Grinder. I must admit this tool frightens the hell out of me.
Sure it looks cool to be grinding away with sparks flying everywhere, but one slip and that's a hand severed, a carotid vein obliterated or a facial scar the size of the cheddar gorge.
The inner sill was just about there through a thin veil of rust.
For those of you who don't know the sills are structurally important on an MG.
There are 3 main sills.
A flimsy outer sill between the door posts. Easily removed with trusty grinder.
A full length vertical sill underneath this which extends under & behind front and rear wings and acts as a Stiffener for:-
The castle rail. This is also full length and is on the underside of the sill assembly and also attached to the inside front wing rear arch and back wing arch front.
All three make up a strong box section each side of the car.
My problem is this

Sunday, May 14, 2006

No you can't

Money troubles..........pah............Depressing,morbid,tense,lifeless and monotonous.
Yes we have big money troubles but for once I don't give a toss and feel none of the above.
The troubles started when a sudden realization that our annual holiday had to be paid for in six week time. The holiday fund was -£50.
So wifey and I decide on major plan of cutbacks and 3 month plan of action. Her idea is restricting my wine and beer intake which she claims will pay for two holidays.
Slight exaggeration there since her chocolate and biscuit intake would feed a small country.
Anyways, its been tough, and still is, but we are coping..........Just.
The kids don't seem to understand " we ain't got any money to give you". They think all things come from an endless money pit. It's not until you start to count up every penny that you realize how much goes on "incidentals" & minor things.
Decided to strip an old door of the MG and take it to the restoration class for "work". It took most of Fri evening to remove the glass, winder mechanism, hinges and quarter light frames. Still, I can get there early Sat morning with a definite plan.
The hinge plates look a little worse for wear and have been " modified" at some stage. How much will have to wait till Sat morning vehicle restoration class.
Saturday dawns bright and very very wet. In fact an absolute downpour.
Me off early with my old toetectors and new secondhand lime green and blue overall.
Shaun the resto teach looks at the door and says " we have just perfect equipment for that job" great methinks. He says " look through the rain outside to the big yellow thing "
yes I say then what. " Throw the bloody thing in it, its a skip" ( dumpster to our colonial cousins).
Ten minutes later Shaun and I had decided on how to tackle the door.
I will add I got lots of sympathetic looks from everyone. I didn't have the heart to tell them its a scrap door and will only be used for practice. In fact I think I forgot to mention this to Shaun.
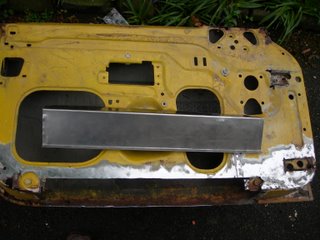
Here is the door after a couple of hours work.


On top of the door is the "new" panel I made from sheet steel .
It involved "nibbling, bending, punching and joggling " It makes me feel good to just say those let alone do them. You can see where its going to fit. The bottom RH corner has at some time had a new panel welded directly on top of the rusty stuff. Its making it tricky to get the steel to align well. I wondered why there was a hole missing when i was taking all the glass mechanisms apart. The exposed nut was completely covered by the part of the panel I had ground away.
Looks like it combines all the problems and bodges I,m likely to come up against on the proper stuff ( Mine ) Still I looking forward to the practice.
Just to keep you interested here's a shot of the MG in its normal state.


Maybe next week we may have more wit and wisdom, if I can weather the financial storm.

Wednesday, May 03, 2006

What's next then ??

The DIY is almost complete.
Only the wallpapering to do, 2nd coat of paint on woodwork and tile bath panel.
All in reverse order of course.
At least wifey is willing to help.......or hinder.
Trouble is she thinks she can paint. I have to sneakily follow her two days later and rub down all the runs and ensure I do the final coat.
Thank heavens she has no interest in the MG restoration.
Youngest daughter No 1 did help last week wire brushing the right front wing area of accumulated crud. I promised her first ride. She knows she will be at least 25 before its finished.
I had another fruitful session last weekend.
Removed some rear window trim. Examined more rust around said area.
Stored both front wings. fuel tank and both bumpers down by garden shed covered by an old woven polythene garden sack ( erratum.... new garden sack 3 years old, it split when i tried to drag the kids round the garden in it)
As I write this I can see in the distance the shed and my precious parts. The bumpers ( rubber... sorry ....Polyurethane ) are stored up against the wall covered by the old rubber floor mats and an old dustbin lid.
How I love summer.......the lawn is green, buds are sprout'n, birds are sing'n and sh***ng all over my bumpers.
How I am becoming a convert to Poly refuse sacks and sheets.

I started my restoration course at local college this week.
How I'm going to love this.
Firstly upon wandering up to a group of folks I picked the course leader to ask
" Is this where I'm supposed to be ? "
Yes he replied, the kettles over there, its always on get a brew when you feel like it. Bacon butties are ordered an will be eaten at 10.30. Wander round with me and the group then we'll get started.
What a chap...........a man after my own heart.( even if he looks like a rockabilly version of Al Bundy)
"What you all want to learn then ? " was his first question.
The usual hesitance from a group of strangers.... then I piped up "welding"
Me too ! yes me as well ! ( me anorl......best Derbyshire accent there )
OK says Shaun ( course tutor )

WELDING............. first minute.......... easy peasy
second minute..........crap, holes everywhere.
third minute........long strands of wire everywhere + birdpoo
( That's what Shaun called it)
time to let someone else have a go
same results but, different order and probably worse.

WELDING PART II first minute.......change the settings..... no description
second minute......NO PENETRATION....bad word
third minute.......change settings.......!!!!!!!!!

Butty time........its the same the world over and it takes me back to my apprenticeship days. Get your butty first. Sure enough two butties were missing.
Luckily not mine though.......remember I've done this before. I used to have to fetch them as a lad come rain or shine Saturday mornings so I was prepared for this likely possibility, thus get in quick.

Over butty had conversations with fellow restorers. One guy is restoring on old Mini
and converting from Auto to Manual gearbox.
Another has a 1960's Triumph. And Another a 40's Jaguar !!!!!!
He wants to learn how to make the curved wings and fiddly bits.
Methinks the local college is not up to this standard. If he can afford that car surely he can afford to pay someone to make them !!

WELDING....Part III..............Shaun shows us ( without a mask and closing his eyes) how easy it is. Its all in the wrist action. keep moving and set it up properly.
first attempt............crap, spatter and crackle
second attempt...........much better with gas on
third attempt.............getting clever,butt joining two pieces
fourth attempt............too clever. big holes everywhere
fifth attempt.............bird poo and wire everywhere

Guess welding is not so easy. I will admit that things got better when Shaun,seeing my enthusiasm gave me an "Auto helmet " to use.

I'm laughing like a drain as I type this. It must be the word " Auto helmet"
Sounds like a STD or kinky gay sex toy. My sense of humour is base and kind of juvenile mostly. Guffffawwwwwww.

Now I want one. Its the only way to weld.

As the title says now I have a little more skill to progress....but to what.

I still can't seem to make a plan on what to do next.
I'm sure welding panels will figure somewhere. I,m afraid to weld just yet though as I don't want to weld little rusty holes into big rusty ones and ruin £ 85 quids worth of panels.

Procrastinate............that's what I'll do next.
Job settled. good night and thank you.