Started with the passenger (LH) side and test fitted. Some slight adjustment of the bottom holes were required, and let me tell you, hardboard is rubbish to cut, machine and knife trim. It just goes all raggedy and delaminates somewhat. In my infinite wisdom I gave them a good coat, both sides of 50/50 PVA to stop the flakeyness and help prevent water damage, if the car lasts that long.
The door top padded capping cleaned up well with no visible rust on the chrome end caps ( at least no visible rust, only on the rear face) So out of sight out of mind. The best stuff I found to clean the old vinyl was a good scrub in warm soapy water, another scrub with green sponge and Cillit Bang ( Bang the grime is gone as Barry would say) finished off with " Hob Brite " a mild abrasive cream.
Used up the last of the spray on contact adhesive adding the Hobbycraft 2mm thick foam sheets. Fortunately 3 sheets placed vertically did the whole card, not bad for £3 per side.
Twas then I had a moment of craft inspiration. Why not emboss a large MG logo onto the vinyl.
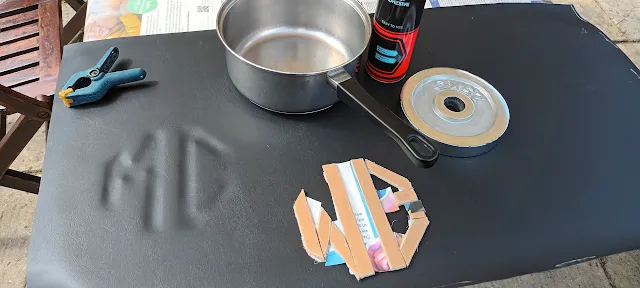
This was accomplished by drawing out accurately the logo on tracing paper. Then taped this to the stuck down foam and cut around with a scalpel and steel rule. I had the foresight to make the logo 20mm wide, and decided against having an Octagon around the outside as this would be tricky to align accurately. I then cut and shaped some very thick card to 20 mm wide, made from a length of edge protector on something we had bought, I can't remember what.
The tracing paper template in place
The cut shape with the 20mm wide die (very thick card ) taped together for rigidity and positioning (shown upside down)
Next job was to stick on the vinyl leaving about 40/50 mm overlap quickly followed placing the " die" into the recessed area. The was embossing was pressed by my digit first which gave enough " feel" to accurately locate the die. One of wifeys flat bottomed saucepans was used with 5 kg dumbbell weights to aid the impression.
I thought after just pressing with my finger it looked good enough, however the finished result below. I'm well chuffed.
It was at this point I ran out of aerosol adhesive so I left the final tuck over glueing for another day.
Next day I started on the drivers door ( RH) and expected this to be done much here quicker, alas not so.
I made a couple of errors cutting out the final shape of the door card so I had to do some "Frankenstein" stitching on corner/s I'd cut short.


No comments:
Post a Comment