Saturday, October 21, 2006

Moving forward.......... i think !


Again I'm suffering from laptop freezing. Three times I wrote this over the last week, only to suffer the cruelest of practical jokes from my friend the laptop.
On each occasion I'd posted two pictures and typed at least 300 words when it happened. Sad pity is it is all lost as I have to switch off and re-boot losing everything. So I'm typing this in three sections and posting as I go.
Bloody typical though, the last three posts/attempts were witty and interesting. Now I'm tired and its late and feeling melancholy.
But.............I have a glass of wine ( a big bottle even) so here goes.
The sill's are completely removed...........Hurrah.
Lots of rusty stuff has been painted with Hammerite rust killer.
The front footwell is all welded up.
The " trumpet" is repaired . No please don't laugh. That is its correct name.
The new sill's have been painted in anticipation.
Smelly red oxide paint has been sprayed everywhere I could think of before the aerosol ran out.
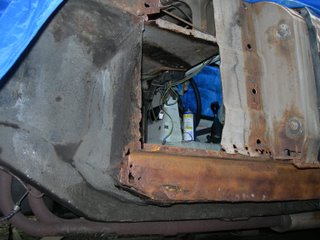
........................Oh I almost forgot. I repaired the gaping hole in the side footwell. Just to prove it here's the before and after pics. Look closely you can even see the welding too.


Sorry....lost photo in a fit of spellchecking & tidying up!
Grrrr (counts to ten slowly)...............that's the EIGHTH time I've lost a post

And now some other news from the world of Fufferfour

The bathroom is finally finished. And very nice it looks too !
I spent all day Saturday pasting and hanging wallpaper, fitting carpet trim, Laying vinyl in cubbyhole, tidying up and putting thing away, refitting all fittings taken down to wallpaper ( including Medicine cabinet & contents ) and washing the venetian blind blinds. By the way our medicine cabinet is fully equipped for a thermo nuclear war thanks to the ever loving wife.
Lost an arm sir ? No problem. Paul...pass me the thermal lance
Suffering from a headache ?......easy, we got Aspirin,Cocodamol,junior asprin,dicocodamol,asprinamol,Ibroprofen,disprin,paracetamol,paracetamol max, paracetemolmax+,calpol liquid, calpol night time, calpol daytime non-drowsy,nurofen. nurofen max,nurofen max with vanilla ( or rasberry) migralieve light. Migralieve heavy and finally Migralieve ........or course max.
Slight cut or gaping wound ? we got steristrips standard, steristrip extra long, 38 boxes of assorted waterproof plasters, 17 boxes of junior plasters, 10 pieces of cut to desired size plasters, red plasters with teddy bears, blue plasters ( just in case the environmental health call in the midst of food preparation) and crepe bandages, long, short, wide and rectangular. Even one smelling strongly of Ralgex ( lets not go there, its mine and I know where its been)
Well you get the picture by now I'm sure.
Now I've finally settled down and resigned to the fact of life that me and computers will never be an easy mix I can get on and concentrate on the more important things in life.
See you all soon for the next installment.

Thursday, September 07, 2006

Lets try again


Still "issues" with laptop and strangely enough the letter S. Its sticky.
Suspect kids somehow.

Above are the photo's I missed on the last post.

Good job I struggled with the photo's yesterday, as last night I did some welding.
CR*P..............its the only word to describe it.
Well it was dark and I did rush things a bit. It got dark because I spent too long "modifying" my B&D jigsaw to work like the powersaw I used a college.
I'll have to spend time making square holes now and save the welding for a long weekend.
More soon...............if the welding improves.

Tuesday, September 05, 2006

Its off, and no turning back

Apologies for the delay in posting any news and events over the last few months.
Its been a very busy time with work, holidays, sunshine and family getting most of my attention. I'll have to be brief here too as my laptop keeps freezing up.
Three times I've posted wit and wisdom today only for it to be lost in cyberspace.
The title refers to the castle rail sill section finally off at last. Albeit in about seventy small pieces. It was achieved with brute force and ignorance and then a little intelligence and maturity.
After being stumped for so long on how the section was attached to the underside of the floor I decided to use the brush attachment in the drill and clean the inside sill bit.
Lo and behold.............semblances of spotwelds. Trouble is I buggered up the spotweld drill trying to sharpen it with the angle grinder. So hence the brute force and ignorance bit with a bolster chisel and medium claw hammer.
I eventually bought a new spot weld brill bit and here's a story to tell of the ordeal.
I was in Sheffield one midday between customer visits. A town I know well as I was born and bred there. I thought since I'm in the east end ( the grimy Industrial part full of every type of factory and service industry) I'll buy a drill bit.
Well..................................What a performance. I must have visited eight tool hire shops/engineers supplies/cutting tool specialists/tool shops and not one had one.
Well. actually Cromwell tools did but not the type I wanted. I bought it any way.
Some shops had no idea what a spot weld brill bit was !!! In Sheffield of all places. The home of steel and steel processing. The land of welding sheets and machining, railway parts and Iraq gun barrel's, inventor of stainless steel, cutlery and nickel plating and all things engineering.
I used said drill bit and it worked a treat. It was still hard work upside down drilling at only half arms length, hair and eyes, face and mouth full of tiny MG particles. Even the sunshine made it difficult as I had to lay flat face up half looking at the dark/black sill half looking into bright sky. Still the key to it was :-
a/. clean the surface thououghly before starting
b/. use the correct tools
c/. Don't give up, its often easier than you imagine
The photo shows the sills with a good view of the large hole I cut out ready to repair with the MIG welder.

Yes........................I'm sorry I should have told you earlier. I bought it on E-bay ( again)
for £60 and it works a treat. The guy even threw in a large sheet of 1mm thick steel too.
I'm currently scheming on how to buy an Auto-helmet.
.
.
.

.guffaw & snigger............................Its that word and my base sense of humor.
Anyways. I have to repair the small holes in the footwell and front footwell fascia before attempting the sills. It will be a good opportunity to practice welding in less critical areas.
By the way I have a huge repair section for the cut away area and the inside floor from the nice chap in Doncaster where I bought the sills ( E-bay yet again)

I promise I will report more often from now on especially since I'm likely to become more frustrated with welding.

FYI had a good hol in Spain with the extended family ( In-laws) several trips abroad with work like France and Sweden and France again.
Mini holiday in Belgium for the wifeys 50th ( weird people but fun place) but not seen Chris much due to hol overlap so will get humour injection on Friday night out this Friday...yipee.

Monday, June 19, 2006

My problem is this..........


That's how I ended the last section of my blog ( see below)
Apologies for that. I was waylaid/distracted/thinking of money/beer/ etc

Here's a lovely photo of me enjoying myself on Fathering Sunday.
I spent all morning looking at the sill and thinking how the hell do I remove it ?
It appears to be welded by magic.
I've drilled all the spotwelds I can see. I've even drilled some I can't see just for good measure.
What I meant to say at the end of the last blog is the vertical sill is behind the "A" post and between two other vertical parts, and at the B post, disappears altogether in a void of important structural looking parts. I do what I normally do in situations like this: look at it for lots, make a cup of tea and look at the restoration bible from Mr Porter.
I did glean some useful info. The new rear part of the sill can be welded on top of the tabs for the old one. And I managed to remove ( or most of) the offending sill part.
The really annoying thing is though, the castle rail is still there. I cannot see for the life of me how its held in position. Its stuck like glue, even welded solid, but where ?
The Previous owner had the castle rail cut down the centre and left the inside bit there, just welded a new one onto it. No wonder it took so long to get it off.
I was amazed when I'd spent 3 weeks grinding the bead welds, removing underseal and being frightened to death of the grinding wheel only to find half of another one there. Only this time it looks a little more permanent.
After consulting all the text books and internet pages, still no sign of how to remove them.
I find this so annoying that pages and pages are written about this subject and not one explains the procedure or difficulties of removing sills.
They all say " remove sills. careful their sharp..................Thanks a lot mate

How ? where do you start ? whats the most critical bit? whats the trickiest?

Enough said. More when I've calmed down.