Or , as has been said "the kids need new shoes".
The MG fund has hit rock bottom. Just when I was beginning to dream of summer skies and long uninterrupted weekends working on YooPoo ( The MG, her new name, involving the letter suffix of her registration plate).
Last post I commented that the cash fund was growing quite nicely.
Well now its down to nothing, nought, zero, null, nuffin, zilch.....even bugger all.
Why, well let me explain. You knew I would.
Just before Christmas, Christmas eve actually, wifey asked me to put washing( Towels) onto radiator in conservatory.
Being a good ole Lostsock, and in a good mood I obliged. Only to see a strange bubble in said radiator with a little brown streak running down below. Pushing said "bubble" lead to a very thin stream of water jetting out horizontally into room. Despite my best efforts with the epoxy glue and latterly Mig welder I could not stem the flow. So, after a quick look see from the plumber to empty the rad and cut it out of the circuit a Christmas was spent with one room freezing cold. A Rad would not be available till the first week in Jan , and so it was but with me £ 100 quid poorer. Trouble was that Jan is a very expensive time for us and most people, and Feb sees most of the accumulated Xmas debts paid off.
And it came to pass I felt rather smug at using my hard earned cash to buy the rad and pay the plumber without too much extra debt incurred and some light at the end of the festive financial burden.
As Feb emerged from the torpor of a belt tightening Jan and the light at the end of the tunnel distinctly visible I did the same kindly thing again, yes hung the washing on the radiator, this time in the front room.
Horror of horrors. A huge brown stain down the wall behind the rad and a soaking wet carpet with rusty wet water. It was a big radiator too ( 72" x 37") A quick call to the plumber, a date was set and a price obtained.
£170 fookin quid. And guess what, guess how much I had in my MG pot left ?
No......................... £160 quid, exactly !! That's OK wifey said I'll lend you the rest, its the least I can do.
I quickly and politely reminded her that its "our" house, to which, made her look ready to rev up for a real argument, so I desisted and went back to feeling smug but a little wazzed off.
Just to make matters even worse, the great windy weekend saw my cover ripped to shreds and the clothes dryer ( The aluminium pole with washing line round ) went and snapped clean into two. A replacement is only £35. Since wifey is in charge of where the washed clothes are dried I kindly offered that she might buy this item. I wish it had been the other way round ( she pays for radiators,I buy rotary dryer) but ,Hey Ho.......it all comes out of the same bank account and does nothing to hide my guilt at having (or not, as of now) actual money to fritter away on a "hobby".
As the title says the kids forever need new shoes. I don't know why ? Son is 17 and spends all day in bed, rises at (usually after) lunch and wears JimJams till bedtime. The only expense he generates is food (Lots and lots, normally beans,cheese on toast, scrambled egg, pies and sausage rolls- I keep telling him I'll not perform the colonoscopy in 10 years time) and an electricity bill that could run a small city from leaving every light on possible and making his x-box so hot you could fry eggs on it. Daughter has a penchant for clothes she never wears, creams and emollients to decorate the bathroom, 45,0000 different hair products and again has the same effect as son for the electricity supply ( Namely leaving lights on) Good ole wifey spends, like me, bugger all but has more of a conscience.
At least she gets to spend the £80 or so quid a week on shopping, which was once a joy now denied me as she does it online.
At least I'll be qualified this summer and hopefully in a job within our good old NHS system.
Perhaps then I/we will then have money ? Methinks a holiday is well due first though, if only. A lottery win of modest proportions will do fine. Not much to ask is it ?
So, in a nutshell I'm well and truly skint. I've already told the landlady ( a couple of months ago) at the pub where I work Saturday evenings I'm quitting come March. So, I am well and truly stuffed, skint, wazzed off (MG wise) and not a little frustrated.
On top of which my health ain't been so good for the last 6 weeks and I'm on my 3rd set of antibiotics.
It could be worse though..........I could have bought a Triumph !!
More soon hopefully, if I've not slit my throat before.
Tuesday, February 22, 2011
Saturday, October 30, 2010
The Bodger strikes
So, a major spot of "bodging has been found on the LH suspension parts.
Half of the stuff was removed a couple of weeks ago without too much trauma. Except the top "A" arms bolt was loose, (Kingpin top) ( Nay...not enough thread actually).
Removal of the castleted nuts and lowering the spring pan was easy enough. I even managed to undo the drop link from the anti roll bar to the spring pan. It was a struggle on the other ( RH) side as the ratchet head was a little too large to allow the socket to sit on correctly and get enough purchase.
So how did I acheive it on the LH side then ? Simples....I used the universal joint thingy in my ( sorry wifey's) Kamasa socket set, doh ! Its a lot narrower.
So where was the bodging then ?
Since I had free access to the spring pan and the drop link was off I undid the nuts holding on the lower "A" arm. During wire brushing I noticed a large blob of weld ( I first thought it was grease, as one end of everything was covered in 30 year old "stuff") but no. It was weld. I was annoyed and a bit in pain since I was using the scary grinder with the flat wire brush disc in. I managed to "wave it gently" accross my lightly surgical gloved finger, and it stung a bit.
I flipped said arm over to see the full extent of why the weld was there.
So, some heathen had welded on a bog standard washer over the oval hole. What a cheapskate. This even makes me look positively generous.
A quick check with MG hive see the arms a a couple of quid each.
More weld was to follow. Whilst engulfed in a cloud of rust tackling the spring pan orifice I noticed a partucularly difficult patch of rust/old grease which the wire brush did its best to worry.
Once the dust cloud cleared and fufferfour had a good look, this is what I found.


Half of the stuff was removed a couple of weeks ago without too much trauma. Except the top "A" arms bolt was loose, (Kingpin top) ( Nay...not enough thread actually).
Removal of the castleted nuts and lowering the spring pan was easy enough. I even managed to undo the drop link from the anti roll bar to the spring pan. It was a struggle on the other ( RH) side as the ratchet head was a little too large to allow the socket to sit on correctly and get enough purchase.
So how did I acheive it on the LH side then ? Simples....I used the universal joint thingy in my ( sorry wifey's) Kamasa socket set, doh ! Its a lot narrower.
So where was the bodging then ?
Since I had free access to the spring pan and the drop link was off I undid the nuts holding on the lower "A" arm. During wire brushing I noticed a large blob of weld ( I first thought it was grease, as one end of everything was covered in 30 year old "stuff") but no. It was weld. I was annoyed and a bit in pain since I was using the scary grinder with the flat wire brush disc in. I managed to "wave it gently" accross my lightly surgical gloved finger, and it stung a bit.
I flipped said arm over to see the full extent of why the weld was there.
 |
| Weld ??? |
 |
| Ovality bodge |
So, some heathen had welded on a bog standard washer over the oval hole. What a cheapskate. This even makes me look positively generous.
A quick check with MG hive see the arms a a couple of quid each.
More weld was to follow. Whilst engulfed in a cloud of rust tackling the spring pan orifice I noticed a partucularly difficult patch of rust/old grease which the wire brush did its best to worry.
Once the dust cloud cleared and fufferfour had a good look, this is what I found.

Looks like rusty metal in the base was replaced with 3 tons of weld. No wonder the wire brush struggled a bit.
Anyways, I did'nt bother to paint the two "A" arms since I decided to buy new ones. I did paint the pan though, together with all the other stuff removed. Since the weather was good I also removed the anti roll bar ( sway bar for US readers) and had to find a novel way to hang it to dry.

So, there's nothing like showing your undies and smalls in public then, Ha . Hope wifey dont read this.
Mefinks this may be the last of my efforts till springtime, as the feet were freezing as the light faded.
One last point, will the tw*ts who keeps offering me medical "products" via this blog please f**k off, thankyou.
Late addition. The t***s who keep sending me the offers for financial and medical crap have hopefully been thwarted.
Aparrently its the title of the blog post that thier meta-phisers search for. So I've changed it. Lets hope thats an end to it all.
Since not much will happen in Lostsock land MG wise here's wishing you all a merry Christmas and happy new year. If you don't believe in either sorry, your missing a good holiday.
Friday, October 15, 2010
My cover is broken
That about sums up the weatherproofness ( such a word ?) of the cars cover.
I remember when I bought it and had high hopes for it. One long year ( or is it two) the elements and ruby the cat + other vagrant cat Colin have had their toll on the then excellent Argos cover.
At £15 though I can't complain. Other than it could be better spent on the long list of items I'm likely to need hopefully before winter really sets in.
All I've done since the last post is re-paint the RH side suspension parts a little, more like touch up. Then managed to remove the LH brake caliper, pads, pins & back plate. Hopefully on a sunny weekend soon I'll removed the rest of the LH suspension, then pray for cash and more mild weekends so as to assemble both corners and make it moveable again.
Right now placement at hospital and academic work seems to be taking up all of my time. That and fretting about a sudden inward leak of the elements. In fact, I remember now, during an odd moment I actually taped up the rear window with black plastic which should stop the annoying dribble of water right into my toolbox. What prompted me to do this was a Saturday intended to be devoted to the RH suspension cleanup/touch-up. On peeling back the cover I was met with the trusty plastic tray toolbox about 2" deep in water. it took a good 2 hours to dry up the boot puddle, tools and tray.
So, next on the must do is another trip to Argos for said giant elasticated silver cover. Hope they still sell it.
More soon peeps with photos..........donations or even comments of encouragement gratefully accepted.
Sunday, September 26, 2010
watching paint dry

So, here are some parts painted today. Actually I'm a little disappointed with them. I rushed somewhat due to the imminent rain/wind/darkness since it was mid Sunday afternoon. What would have been ideal is a blasting cabinet and industrial cleaning tank. The Armstrong damper and the inside of the kingpin Assy where caked in years old grease. I did several coats of the foamy degrease stuff and a good wipes down but the grease just seem ed to be "pushed" around. Spent a not long enough time wire brushing like mad then decided to paint. Which paint though ?. I had two options. The Matt black stuff I did the rear axle with or the Hammerite smooth Matt I purchased by accident. The axle Matt stuff was a doddle to apply and quite runny. Trouble was it lacked the " body" of a newly painted/refurbished item. It looked more factory finish, i.e cheap for the mass market. The Hammerite was definitely thicker in consistency and not easy to apply ( or clean brushes ). Anyways, due to the parts ( stub axle and Armstrong damper mainly) being less than spotlessly clean I opted for the Hammerite. Looks good though, if not a little too thick and glossy.
Since "er indoors" was shouting 30 mins to evening dinner ( Nice homemade Prawn curry with all the trimmings) I packed it away to review next week.
The list of parts needed grows for this corner of the car, viz
Rubber bushes complete set
Inner rubber bearing cover
Grease gun + recommended grease
Top wishbone nut,bolt & washer
New set of split pins
New brake disc
New Brake disc back plate
New Pads, pins and strap/lock tab
New Bolts (4) and nuts - Disc to hub
mixed set of bearing shims
Then probably same for tuther side some time maybe in spring.
And that's on top of the new large oil cooler pipe, small oil gauge pipe/union, clutch rubber hose, brake fluid, clutch fluid.
Its gonna be a long hard winter............more soon folks.
( p.s WD40 is great for cleaning Hammerite off brushes)
Thursday, September 02, 2010
suspended suspension...or suspension suspened ! Part One
Enigmatic title ? Yes that refers to my attempts to undo all the rusted and oily tough nuts on the front RH side.
Since I have no form of oxy/acetylene torch ( or common blowlamp come to that) it was an uphill struggle all the way. Or even an upside down struggle at least.
I last touched the MG a good few weeks ago prior to my exams and subsequent re-sit ( result pending ).
I had managed to remove the brake caliper, split the caliper on the bench the tried to remove the hub as a whole. It was then I discovered I didn't have a socket large enough for the hub centre ( Inch & 1/8th AF)
I tried in vain all the local tool shops in town ( 6 in total) only to be given the same bemused look from all when asking for Imperial sockets.
Good ole E-bay sorted it in minutes, and had it a few days later. When it arrived I tested it on the rear.
I had a shock, the rears are larger nuts. At first I thought I'd bought the wrong one, but turned out I was just too lazy to lift the front cover to look at the front hub. Why did BL make them different sizes ??
Anyways, I'm not touching the rear hubs, only the front.
So in a fit of pique and guilt trip of non revision I did what I normally do, nothing, for a good few weeks
That is until yesterday.
With most of the day ahead of me I set about the front RH unit again, but this time with the correct size socket. Split pin out and nut off easy peasy, off came the rusty disc and even rustier hub.
Spent some frustrating time trying to undo the outer hub from the disc hub..........impossible.
The workmate with jury rigged "new " jaws is rapidly disintegrating.
It has 4 bolts in from the back with well recessed heads, nuts at the front but even more recessed. And there is very little room at the back, in fact no room to fit a socket over the bolt head.
So, after another liberal dousing with the sweet smelling penetrating fluid I put it to one side and set about removing the spring pan + arms and upper arms.
Disconnecting the ball joint steering arm was easy with some synchronised bashing of two hammers. Timing was essential, as was "feel" since one hammer was of the "claw" type and the other "lump" type = gross weight mismatch. It took about 15 blows in various directions and swing timings then viola, it was free.
The front anti roll bar ( sway bar for U.S readers) came away easily.
Then the problems started. Or one problem in particular.
The bolt and nut through the end ( narrow end) of the top "A" frame where it attaches to the vertical trunnion had been ...............wait for it
Welded to the frame each side !!!!!!! It was not even the correct bolt. One side had been a domed head with a spot of weld on the arm to stop it spinning. Tuther side had weld wire and gobs of weld on the nut and arm to stop it spinning.
A nifty slice with the super thin cutting disc in the scary grinder saw the heads sliced off expertly.
Trouble was I was left with two flush faces and a bolt that had been in situ gawd knows how long.
Repeated bashing with punch and lump hammer did nothing, either direction.
So I decided the whole assembly had to come off ( Armstrong damper with two upper wishbones, trunnion connected.
At this point sense prevailed and I took the lower pan A frame outer mountings off.
This was a scary move as there is a lot of force since the spring is forcing it apart.
Fortunately the car was supported on two axle stands so I used the trolley jack to lift up the lower pan to take the strain, undid the and nut and tapped the bolt through.
This was surprisingly easy, and it was the part I thought to be the most difficult job on suspension overhaul.
Careful lowering of the jack let the pan down gently, a few taps with lumpy ( my new best friend) and the spring was free.
I was still left with the top "a" frame connected and the lower one too !!!! albeit at the subframe side.
Since the top bolt ( welded ) would not shift the Armstrong unit complete with drop link had to come off ,so I tried to remove the Armstrong bolts (4).
The front two easy, the rear..............................gawd what a performance. RH side was slow.
LH side near impossible. No socket with my extension would fit ( if I had an extension half its length it may have worked ) but a spanner was a real tight fit movement wise. I think I moved it 1/2 a flat at a time with approx 45 seconds of fiddling to get the ring end located properly each turn, 40 minutes later the last bolt came out. The total time for the other three was about 15 minutes.
Bear in mind this was done with bleeding and sore hands, oily as f*** parts and sideways laying down right on top of our cast iron castelated sewer cover.
Then off the top half came, to join its other partly reassembled friend, fiend and co partner the hub assembly on the trusty workmate, to enjoy some time off in the sunshine bestowed on us this very late summer. As a gesture of complete juvenile frustration and envy I took enormous joy in drowning bothtwats in perfumey penetrating fluid..
Since that's a lot of text..........and no pictures ( hands and body too oily to get camera from bedroom) I'll leave it for now. More this weekend.
Since I have no form of oxy/acetylene torch ( or common blowlamp come to that) it was an uphill struggle all the way. Or even an upside down struggle at least.
I last touched the MG a good few weeks ago prior to my exams and subsequent re-sit ( result pending ).
I had managed to remove the brake caliper, split the caliper on the bench the tried to remove the hub as a whole. It was then I discovered I didn't have a socket large enough for the hub centre ( Inch & 1/8th AF)
I tried in vain all the local tool shops in town ( 6 in total) only to be given the same bemused look from all when asking for Imperial sockets.
Good ole E-bay sorted it in minutes, and had it a few days later. When it arrived I tested it on the rear.
I had a shock, the rears are larger nuts. At first I thought I'd bought the wrong one, but turned out I was just too lazy to lift the front cover to look at the front hub. Why did BL make them different sizes ??
Anyways, I'm not touching the rear hubs, only the front.
So in a fit of pique and guilt trip of non revision I did what I normally do, nothing, for a good few weeks
That is until yesterday.
With most of the day ahead of me I set about the front RH unit again, but this time with the correct size socket. Split pin out and nut off easy peasy, off came the rusty disc and even rustier hub.
Spent some frustrating time trying to undo the outer hub from the disc hub..........impossible.
The workmate with jury rigged "new " jaws is rapidly disintegrating.
It has 4 bolts in from the back with well recessed heads, nuts at the front but even more recessed. And there is very little room at the back, in fact no room to fit a socket over the bolt head.
So, after another liberal dousing with the sweet smelling penetrating fluid I put it to one side and set about removing the spring pan + arms and upper arms.
Disconnecting the ball joint steering arm was easy with some synchronised bashing of two hammers. Timing was essential, as was "feel" since one hammer was of the "claw" type and the other "lump" type = gross weight mismatch. It took about 15 blows in various directions and swing timings then viola, it was free.
The front anti roll bar ( sway bar for U.S readers) came away easily.
Then the problems started. Or one problem in particular.
The bolt and nut through the end ( narrow end) of the top "A" frame where it attaches to the vertical trunnion had been ...............wait for it
Welded to the frame each side !!!!!!! It was not even the correct bolt. One side had been a domed head with a spot of weld on the arm to stop it spinning. Tuther side had weld wire and gobs of weld on the nut and arm to stop it spinning.
A nifty slice with the super thin cutting disc in the scary grinder saw the heads sliced off expertly.
Trouble was I was left with two flush faces and a bolt that had been in situ gawd knows how long.
Repeated bashing with punch and lump hammer did nothing, either direction.
So I decided the whole assembly had to come off ( Armstrong damper with two upper wishbones, trunnion connected.
At this point sense prevailed and I took the lower pan A frame outer mountings off.
This was a scary move as there is a lot of force since the spring is forcing it apart.
Fortunately the car was supported on two axle stands so I used the trolley jack to lift up the lower pan to take the strain, undid the and nut and tapped the bolt through.
This was surprisingly easy, and it was the part I thought to be the most difficult job on suspension overhaul.
Careful lowering of the jack let the pan down gently, a few taps with lumpy ( my new best friend) and the spring was free.
I was still left with the top "a" frame connected and the lower one too !!!! albeit at the subframe side.
Since the top bolt ( welded ) would not shift the Armstrong unit complete with drop link had to come off ,so I tried to remove the Armstrong bolts (4).
The front two easy, the rear..............................gawd what a performance. RH side was slow.
LH side near impossible. No socket with my extension would fit ( if I had an extension half its length it may have worked ) but a spanner was a real tight fit movement wise. I think I moved it 1/2 a flat at a time with approx 45 seconds of fiddling to get the ring end located properly each turn, 40 minutes later the last bolt came out. The total time for the other three was about 15 minutes.
Bear in mind this was done with bleeding and sore hands, oily as f*** parts and sideways laying down right on top of our cast iron castelated sewer cover.
Then off the top half came, to join its other partly reassembled friend, fiend and co partner the hub assembly on the trusty workmate, to enjoy some time off in the sunshine bestowed on us this very late summer. As a gesture of complete juvenile frustration and envy I took enormous joy in drowning both
Since that's a lot of text..........and no pictures ( hands and body too oily to get camera from bedroom) I'll leave it for now. More this weekend.
Thursday, July 29, 2010
More grunt and groan.....with pictures
Instead of doing the right thing today and yesterday ( revising for exam ) I had a major potter with the MG.
So, fitted all new copper brake pipes. Cor, they ain't half long and complex. The bending them part was easy, too easy in fact. I had the idea I'd get them straight as a die looking ever so neat and tidy. Not a chance !. Still their in and fastened. Some of the P clips were a swine to re-fasten. Namely the one directly below the master cylinder. Two pipes almost went side by side ( with some ungentlemanly language and "persuasion"), the clutch pipe (steel) was in the way as was two thick cables and starter motor solenoid with mass of other wires. The P clips distort like buggery when bent back then forward as their holes then don't line up.
One under the rear seat was also tough as it was a strap clamp holding the fuel line and another pipe/cable + the new copper line, all had to be fitted into a rubber 1/2 grommet.
The bad news is I have 3 leaks. One oil leak cured easily on the front oil cooler/pipe union. The union was leaking, cured by buying and fitting a new oil pipe. I was dreading removing the nut from the pipe as where it attaches to the Aluminium oil cooler as last time I sheared off the base thus ruined the oil cooler. The new cooler was a second hand purchase from good ole E-bay, bought and fitted a least two years ago. Trouble was I used the old pipes that came with it ( attached at oil cooler end) since they were better than mine.
Unwise move. During the last start up it leaked/ nay dribbled out.
So its repaired now with a brand new pipe. I have to buy another pipe now as I'm not risking the other one.
as you can see from the photo I still have the Union to undo from the cooler. Tried today and it wont budge.
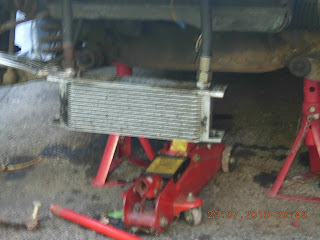 I'll leave it to absorb some penetrating fluid for a few days.
The other oil leak was at the engine end of the oil gauge pipe. Again I'd bought and fitted a new one ages ago but noticed a very small leak again at start up. I knew it would though. To fit it was a nightmare as its very inaccessible and I crossed/stripped the threads in the end of the hose. So another one is needed..again.
This time I've removed as much as possible to gain better access so as not to make a balls up of it.
The other leak is new, its hydraulic, coming from the connection of the short rubber pipe to the clutch housing cylinder. This again is in the most inaccessible of places, below the starter motor solenoid and very close to the new copper brake line installed and between the gearbox and engine chassis rail.
So I did what I normally do on these occasions.........did something else on the car.
Removed the brake caliper + hose and attempted to remove the hub. Failed miserably. I didn't have a 1-1/8" socket. So whilst all I thought I would need would be new pads then all new rubber bushes it looks like I now need new discs, back plate and maybe pistons too. They are also soaking in penetrating fuel as we speak.

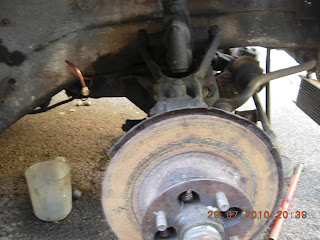 Here's a view of the somewhat bare disc as I left it today. Incidentally, last night I fractured a rib falling down some ladders at bedtime ( Long story don't ask ) so its all been a bit of a struggle in more ways than one.
Here is one member of the family ( Ruby ) who loves the car....she sleeps in it till the early hours. How the hell does she get in when the covers over and the rubber strap/hook thingies are on ?

More soon when I've got money to buy parts and the exams out of the way.
So, fitted all new copper brake pipes. Cor, they ain't half long and complex. The bending them part was easy, too easy in fact. I had the idea I'd get them straight as a die looking ever so neat and tidy. Not a chance !. Still their in and fastened. Some of the P clips were a swine to re-fasten. Namely the one directly below the master cylinder. Two pipes almost went side by side ( with some ungentlemanly language and "persuasion"), the clutch pipe (steel) was in the way as was two thick cables and starter motor solenoid with mass of other wires. The P clips distort like buggery when bent back then forward as their holes then don't line up.
One under the rear seat was also tough as it was a strap clamp holding the fuel line and another pipe/cable + the new copper line, all had to be fitted into a rubber 1/2 grommet.
The bad news is I have 3 leaks. One oil leak cured easily on the front oil cooler/pipe union. The union was leaking, cured by buying and fitting a new oil pipe. I was dreading removing the nut from the pipe as where it attaches to the Aluminium oil cooler as last time I sheared off the base thus ruined the oil cooler. The new cooler was a second hand purchase from good ole E-bay, bought and fitted a least two years ago. Trouble was I used the old pipes that came with it ( attached at oil cooler end) since they were better than mine.
Unwise move. During the last start up it leaked/ nay dribbled out.
So its repaired now with a brand new pipe. I have to buy another pipe now as I'm not risking the other one.
as you can see from the photo I still have the Union to undo from the cooler. Tried today and it wont budge.

The other oil leak was at the engine end of the oil gauge pipe. Again I'd bought and fitted a new one ages ago but noticed a very small leak again at start up. I knew it would though. To fit it was a nightmare as its very inaccessible and I crossed/stripped the threads in the end of the hose. So another one is needed..again.
This time I've removed as much as possible to gain better access so as not to make a balls up of it.
The other leak is new, its hydraulic, coming from the connection of the short rubber pipe to the clutch housing cylinder. This again is in the most inaccessible of places, below the starter motor solenoid and very close to the new copper brake line installed and between the gearbox and engine chassis rail.
So I did what I normally do on these occasions.........did something else on the car.
Removed the brake caliper + hose and attempted to remove the hub. Failed miserably. I didn't have a 1-1/8" socket. So whilst all I thought I would need would be new pads then all new rubber bushes it looks like I now need new discs, back plate and maybe pistons too. They are also soaking in penetrating fuel as we speak.


Here is one member of the family ( Ruby ) who loves the car....she sleeps in it till the early hours. How the hell does she get in when the covers over and the rubber strap/hook thingies are on ?

More soon when I've got money to buy parts and the exams out of the way.
Monday, July 26, 2010
Minor potterings lead to (near) disaster and treason
So, fitted the water pump and fan belt without too much trauma. Quite easy really.
Then decided to tighten the cylinder head bolts and set tappet clearances before starting engine....again.
During the process, well, at the very start I noticed a tappet arm well off centre, how strange !!!
Further investigation showed the tappet rod loose and flapping around at the bottom of its shaft.
More investigation by removing the small valve/tappet chest cover at the front.
!!!!!!!!!!!!!!!!!!!!!!!!!!!!!!!!!!!!!!!!!!!!!!!!!!
There resting on its side and hiding in a puddle of oil was a tappet follower.
It was for the inlet/outlet (forgot now) of No 2 cylinder. I must have not put it back correctly during the head re-furb. They are very fiddly. They are about 2" long ( 50mm) and 3/4" diameter (15mm) with a hole in the end for the tappet rod to drop into. You need fingers like a deformed midget to get them in position and the grip of a python to hold them.
Anyways, did that eventually.
The big problem was getting the valve/tappet chest cover and gasket back on properly. It and the holding nut are directly under the manifold. No finger room at all. Bear in mind its oily too. I must have tried 15 times before biting the bullet and removing loads to access it.
viz.
carb fuel feed pipe.
Heatshield
4 boingy springs
throttle cable
choke cable
Manifold nuts and stepped washers
4 of the most fiddly and awkward carb mounting nuts ever made
4 gaskets to carbs
inlet manifold
exhaust manifold
After that the cover and thick rubber gasket were a piece of cake.
Which reminds me, during some of the attempts at starting and trying to cure why it won't start unless off the jump leads means plug no 2 mystery solved.
Some time after starting the first time, inspection of said plug was clean as a whistle. No wonder, no spark, no compression, no exhaust ala no valve movement due to errant tappet follower.
No wonder the engine when started sounded a bit loud and rough.
Anyway, now I can't wait to restart, or at least attempt to.
I still have the oil gauge connector seal at the engine to replace, one oil cooler pipe( leaking at its union) at the oil cooler end to refit and replace some cracked fuel rubber pipes ( noticed during makeshift fuel filler /gatorade bottle).
I did remove the ancient selmer alarm fitted together with loads of bodged wiring and find where the mystery switch wires led to ( across the coil connections/ some sort of home made immobiliser device )
I've left this though to remove later.
I also solved the damper arm problem. After buying the kit to lower the rear from MGOC the Armstrong dampers looked at a too vertical angle.
A quick call ( well 2 months after fitting) to MGOC and they sent me the correct ones ( longer, you should still use the RB links even when lowering to CB height )
Spent a frustrating 3 hours replacing since it involved laying on my side and spannering away forever.
Next job is to replace the brake pipes from rear axle to front end, both front corners ( bought and waiting)
Then replace the front suspension bushes.( not purchased yet )
Then rebuild front and rear brakes. Ditto.
Between which I'll probably try the engine electrics again.
The Treason is ........horror of horrors I've been fancying a Lotus Esprit.
And , it was my hero Ed China who started it. A recent episode of Wheeler Dealer whetted my appetite for what must be the most beautiful of all sports cars ever designed. Trust my luck they are a real pain to work on though. Maybe one day well after the MG is sorted and I have money. A V8 would be nice.
Life goes on for poor old Lostsock, having an exam re-sit late August which has really ruined my summer.
Son No 1 behaves like lord rising from bed at afternoon and lounging in jimjams all day. Daughter No1 is just the opposite, full of action and plans giving us no rest. Wifey continues to nag re DIY on the house. So I'm torn between all this and revision for a tough exam in 4 weeks time.
Lets hope for some sunshine and cash.
More soon
Tuesday, June 15, 2010
Faffing around with fuel..... part IV
What I forgot to say between parts II & III is that I did try again to start the car after the first successful attempts some days later.
It would not start. never, No way.
The cause...........................bad fuel !
Remember I don't have an unleaded head. The fuel was about 10/14 days old. I should ahve known since it was a light tea colour. I dismissed this as mild contam from the plastic ( approved) container I'd previously had Diesel in.
After some research ont tinterweb I found out that fuel loses quite an amount of its octane rating if its just stood, particularly if its small amounts like less than 2 litres.
That's the reason it won't start.....................I'm sure........ish.
One tip I can pass on for all would be restorers of MG's is use a site called BBS.
Its a web ring for MG car restorers and has the best ever Forum. Post any question, General or Technical and your guaranteed to get some sound and experienced advice.
This is the link >BBS Forum You have to register ( its free and very easy with NO commercial spam/hassles.
Its them who assisted me with my spring conundrum ( yet to be resolved- replacement wise).
Apologies for the delay in getting to the point of the thread. You knew we'd get there in the end though didn't you ?
I have a spare day from Uni/Placement Friday. So, before the big match and work in the p.m I'll put on the new fuel pump, replace the oil cooler pipe with a new one, replace the oil gauge engine block connector, re tighten cylinder head bolt, renew fan belt, set tappet clearances and renew the old wrinkly engine bay fuel pipe, get some new fuel and have another go at starting her up in attempt to find if the alternators charging and the leaks have stopped.

To keep you Interested here's pictures of new and old fuel pumps.
p.s I also have yet to finish fitting the new copper brake pipes from rear to front and front to L & R.
So thats enough to keep me busy for a while.
More trials and tribulations soon.
Sunday, June 13, 2010
Faffing around with fuel part III
The fuel then. After the last attempt I decided to leave the car a week to concentrate on Academic matters (Exams). Next attempt saw me spill fuel several times over the inner engine bay in an attempt to re-use the same plastic bottle/funnel arrangement. The the rubber hose perished and leaked like a sieve. Fuel spill again.
Engine turnover wobbled mounting of bottle, Fuel spill again.
The fuel did look a rather darker shade of brown from the last success full attempt though. It had been stored in the old plastic approved storage can thingy ( except it once held diesel).
The car would not start using its own battery as it gradually died. Connected up jump leads and still not starting. Employed daughter raise revs on wifeys donor car and still no start, so I gave up for now.
Some time later.
I emptied the water system by undoing the bottom hose. Removed the alternator bolts and fan belt. Ditto pulley housing bolts and pump housing bolts. Carefully scrutiny of wonderful Mr Haynes good book and some poking and pulling revealed the probable cause. Either a worn spindle seal near the pump impeller, or worn bearings. In fact, worn bearings definitely. The shaft veritably wobbled. So I set about taking the pump apart. Not a hope. It was harder than a Rubik's cube. The manual showed a pin/clip and or screw holding bearing/shaft in situ. Nothing doing even after about an hour of poking prodding cleaning cursing and grunting.
A careful read of the tho other guru Mr Lindsay Porters book made the following statement "with pumps being relatively cheap and easily obtainable it is not worth refurbishing this piece of equipment".
Thanks a bunch mate. Another unexpected cost.
The good news is though, I've been putting in extra shifts at the pub and some work at Uni so the funds are good, in fact an all time high of the grand total of £42.53.
I have a shopping list and I'm off to Mechspec to buy a small list of needed goodies.
More soon.
Faffing around with fuel part II
So I left the last post with the engine going "roar" and me grinning like a demented Cheshire cat.
I removed the jump leads after a few minutes of deafening the neighbourhood and switched the engine off.
If only to let the smoke and fumes disappear.
I tried to start again and after a few /couple of splutters, then..... "roar".
I revved the engine whilst sat in the car......cooo.
It ain't half responsive and loud. Its gonna a be a real rocket........I hope.
Its then when wifey said...."whats all that brown stuff spraying everywhere ?"
A quick inspection with the engine running saw a tiny leak from where the oil gauge pipe meets the engine block. This I knew would leak as it was a swine to screw in and I think I cross-threaded it once or twice in the process. However there were three, yes three water leaks. A small one from the rear of the cylinder head gasket. Easily cured with a quick tweek from ratchet. In fact I think I will need to torque all the cylinder head bolts as I seem to remember on re-assembly I did them up by feel ( medium tight to 45/50 lbf/ft - 61/68 Nm -ish). Another dribble/bubble from what looks like a plugged up waterway in the back of the cylinder head. No worries on that score ( a dab of Araldite will resolve this ala fuel tank repair)
The two major ones were the thermostat housing ( rear bolt) and somewhere near the water pump pulley. It was the latter one that alerted wifey. The browney water was being spun by the movement of the pump pulley in a lovely arc passing each inner engine bay side and wing, right up to the wall next to wifeys worried stance.
So I did what I normally do in these situations. Switched the engine off, disconnected the earth lead on battery and faffed around looking at the engine front end with a worried look on my face. The thermostat housing was easy to remove and cure. It was a brand new housing ( another long story of postal ordering/sending back/lost in post stuff) new gasket made and lovely red gasket sealant - job done.
Pulley not so. I was not sure where the leak was. I was convinced the leak was from the above housing so I restarted the engine again after connecting up leads and battery.
Still leaking, but hard to ascertain where from. It was definitely not the thermostat housing.
I was still overjoyed at the engine firing up, it was late and I wanted a drink.
Still not got to the fuel bit yet.................see next post.
Thursday, June 10, 2010
Faffing around with fuel
So, as the title says fuel and faffing around
Let me explain. I decided, after the confusion with the rear spring dampers to move on to something else.
What I decided to do was fit the rear copper brake pipes. This I did without too much fuss and crossed threads. Only one and that was stupid. How I wish now I'd fitted them onto the axle whilst it was on the bench. The RH side was a swine to attach since now the axle and fuel tank/fuel pump and associated lines were also in position. Not until I got up in a fit of severe arm ache and frustration did I realise the 3 way union causing all the swearing was oh so easily accessible from the inside behind the battery hole. Doh !
So what to do next ?? It was a nice sunny day, nothing else doing ( DIY etc, well lots really but I was trying to ignore it) so I decided to fire it up.
This time I would be well prepared. I needed two sets of jumpleads though. Mine don't reach from front of wifeys car to inside backseat of MG. Borrowed neighbours jumpleads then it went a little downhill.
I could'nt find my/our jumpleads. They've been in the MG for the best part of 5 years skulking in the rear wheelarch. A few months ago I had a clearout of the MG but where the hell did I put the leads ?
After about 45 mins they were found hiding at the bottom of the electrical parts way down on the bottom of a pile of stuff in the shed.
Next job get fuel. Easy peasy. 2 litres minimum.
Then..........make gravity feed fuel pipe from household plastic bottle. Not as easy as it sounds. The day before me and wifey, as usual deposited all the plastic into the council recycle skips during our early morning grocery shopping............hmmmm.
Anyways, eventually found Gatorade bottle donated by son No 1 after some shouting and pleading round the house for assistance in finding suitable receptacle. This was great as it even had the soft inside spout that sealed the old discarded rubber section of fuel line.
Connected up battery and jump leads. Found that my own leads did the job without having to borrow an extra set. Result No 1.
Filled makeshift funnel/Gatorade receptacle with fuel. Mopped up a few leaks and re-plumbed the few hoses responsible.
Started up wifeys car then got ready to turn the MG key..........................
HHHHrrrrrrrrrrrrrrrrrrrrrrrrrrrrrrrrrrrrrrrrrrrrhhhhhhhhhhhhhhhhhhhh
HHHHrrrrrrrrrrrrrrrrrrrrrrrrrrrrrrrrrrrrrrrrrrrrrrrrrrrrhhhhhhhhhh
HHHHrrrrrrrrrrrrrrrrrrrrrrrrrrrrrrrrrrrrrrrrrrrrrrrrrrrrrrrrrrrrrrrrrhh
HHrrrrrrrr.....rrrrrrrrrrrr...........rrrrrrrrrrrrr.......................rrrrrrrrrrrrrr
Hrrr..............rrr.........rrr........rrrrrrr...........rrrrrrrrrr..rrrrrrrrrrrrrrrrrrr.rrrrrrrrrrrrrrrrrrrrrrrr
.
.
.
.
.
.
.
.
.
.ROOOOOAAAAARRRRR!!!!!!!!!!!!!!!
Yes it actually fired up ( the above is the best way i can describe its initial reluctance to fire then its gradual ppfut/ppfutp/pfutfutfut)
I couldn't stop laughing. It sounded like the loudest thing on earth. ( Bear in mind no exhaust on )
It revved and revved and sounded like a WW1 tank.............Fantastic. Even the next door neighbour comment on it.
I was beaming ear to ear, all the family came out to see a grown man nearly crying with joy. It made my day/week/month/year/decade.
To be continued !
Saturday, May 08, 2010
Lets ave' em' !!
Comments please. Just to let me know someones reading and god forbid, enjoying.
Additional hints and tips would be nice too...................hard cash even better !
Additional hints and tips would be nice too...................hard cash even better !
Thursday, May 06, 2010
spring lowering conundrum
Springs fitted and lowering block/bushes fitted without too many problems.
Except !
Fitting according to common wisdom saw the lower most plate which holds the bottom of the damper link arm far too low. That is the link arm was fully down and the lever arm damper was fully down. What alerted me was the fact that the top attachment of link arm was butting up to the anti roll bar.
See below

So as you see ( the RH side) the end of the drop link is miles away from the mounting hole and out of shot the lever arm it is attached to is fully (almost) down.
So what to do ?
At this point I thought I'd been sent the wrong link arms, so a quick tinterweb surf showed that the CB links are shorter than the RB links. Puzzling ? You bet. I'd still got the original arms ( which had to be ground off ) and these looked like they would do the job a treat. That is, fit in the hole and keep the lever arm almost parallel with the floor and not foul the anti-roll bar.
So whats wrong then ?
I solved it this way.....................................see below

The plate that is normally on the very bottom of the stack of stuff was moved up on top of the spring.
It mounts good, locates well and does not foul on anything plus the lever arm is almost parallel.
Everything else is connected up except the handbrake/drum levers ( waiting for spilt pins to arrive, ditto brake lines/connectors)
I'll tell yer what though. Its definitely lower. It was a real scramble on my back fastening up all the other stuff.
I've now removed the wheels and got the car on the axle stands since this weekend I'll be fitting the brake pipes, fuel pump/hoses and fuel tank. That should see the rear end just about complete.
I've even been tinkering with leaving the front end suspension alone ( except for the fitting of a shorter pair of springs [ bought 18 months ago from E-Bay very locally])
If that's the case the time to start on the electrics..................ooooh errrr !!!!
Maybe I'll finish the odd jobs like door internals/seam sealing/ additional welding/ surface de-rusting/ tidying up shed/ polishing up chrome/ trial fitting chrome bumpers/ staring engine/ replacing engine oil pipe union ( again).
oh descisions descisions.
Subscribe to:
Posts (Atom)