Sunday, March 24, 2019

Has it been that long ?

In a word yes..........9 months of not very much MG wise.

So let me fill you in a little on the last 12 months.
Both twins have left home properly, one to the environs of Birmingham to live with girlfriend but work in Coventry. The other to the northerly climes of Newcastle to live with her boyfriend and work Three, YES THREE jobs. Now her boyfriend has a Radiology post in the area they are looking at houses to buy.

I also have a new job. 20 yards down the corridor in Interventional Radiology. It has different hours . Four long days of 10 hours with a random midweek day off as well as weekends. And we  have to cover on-calls, roughly 2 days per month for 12 hours ( 24 hours at weekends). Not so bad.

Theirin lies the tale though. I've been so shattered midweek that I'm often in bed for 9pm, since my day starts at 6am. I love the job though and work with a great team, its complex but less stressful with less pain to the knees.  Even though I wear mi lead tabard most of the day, have a jcloth on mi head with green jimjams its fun. These hours were only changed weeks after I started so I'll have to see how it pans out for summer weekdays working on the car.

Some time before last Christmas uncle Bri visited and left me with more tools. A fantastic bench grinder with wire brush, Bosch grinder and a jigsaw with laser guide, wow. Just need a sander now.

For now, residing in the back of the car, together with all the other stuff that won't fit in the shed.


The future plans for the  Fufferfour household are new soffits and fascias, failed window glazing replaced, house re-wire, re-decoration and if any any dosh is left, a new shed.......whahoo.
 All due to the fact the mortgage is finished soon, as is my student loan and a salary increase come April.  

Wifey even admitted she would like me to have a big shed or garage. Methinks I will build my own garage after the aforementioned stuff is done. A new Larger shed will fit at the bottom of the garden where the existing 7x5, fit to bursting, resides. A nice 8 x 10 will do nicely. I might even re-locate the 7x5 near the house temporarily till it is no longer safe or weatherproof or in the way of a garage build.

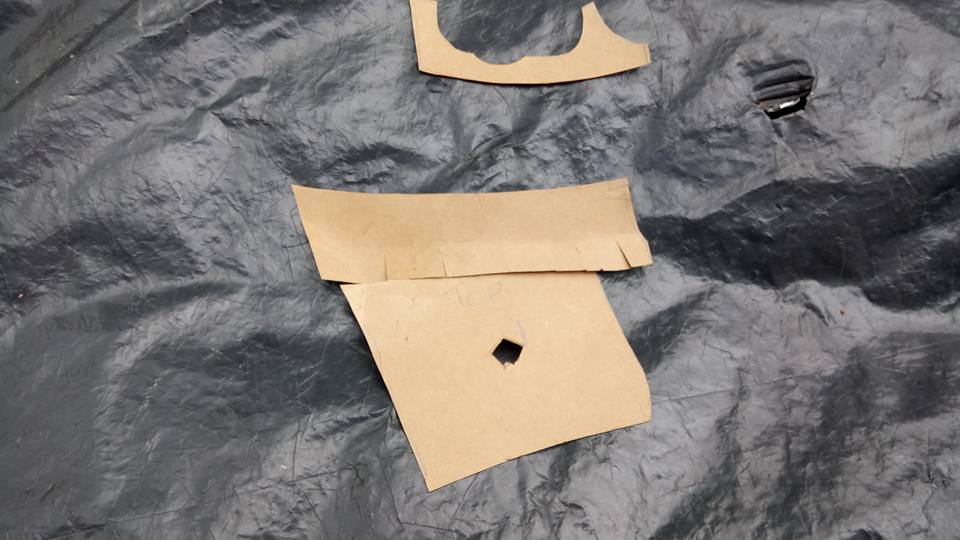
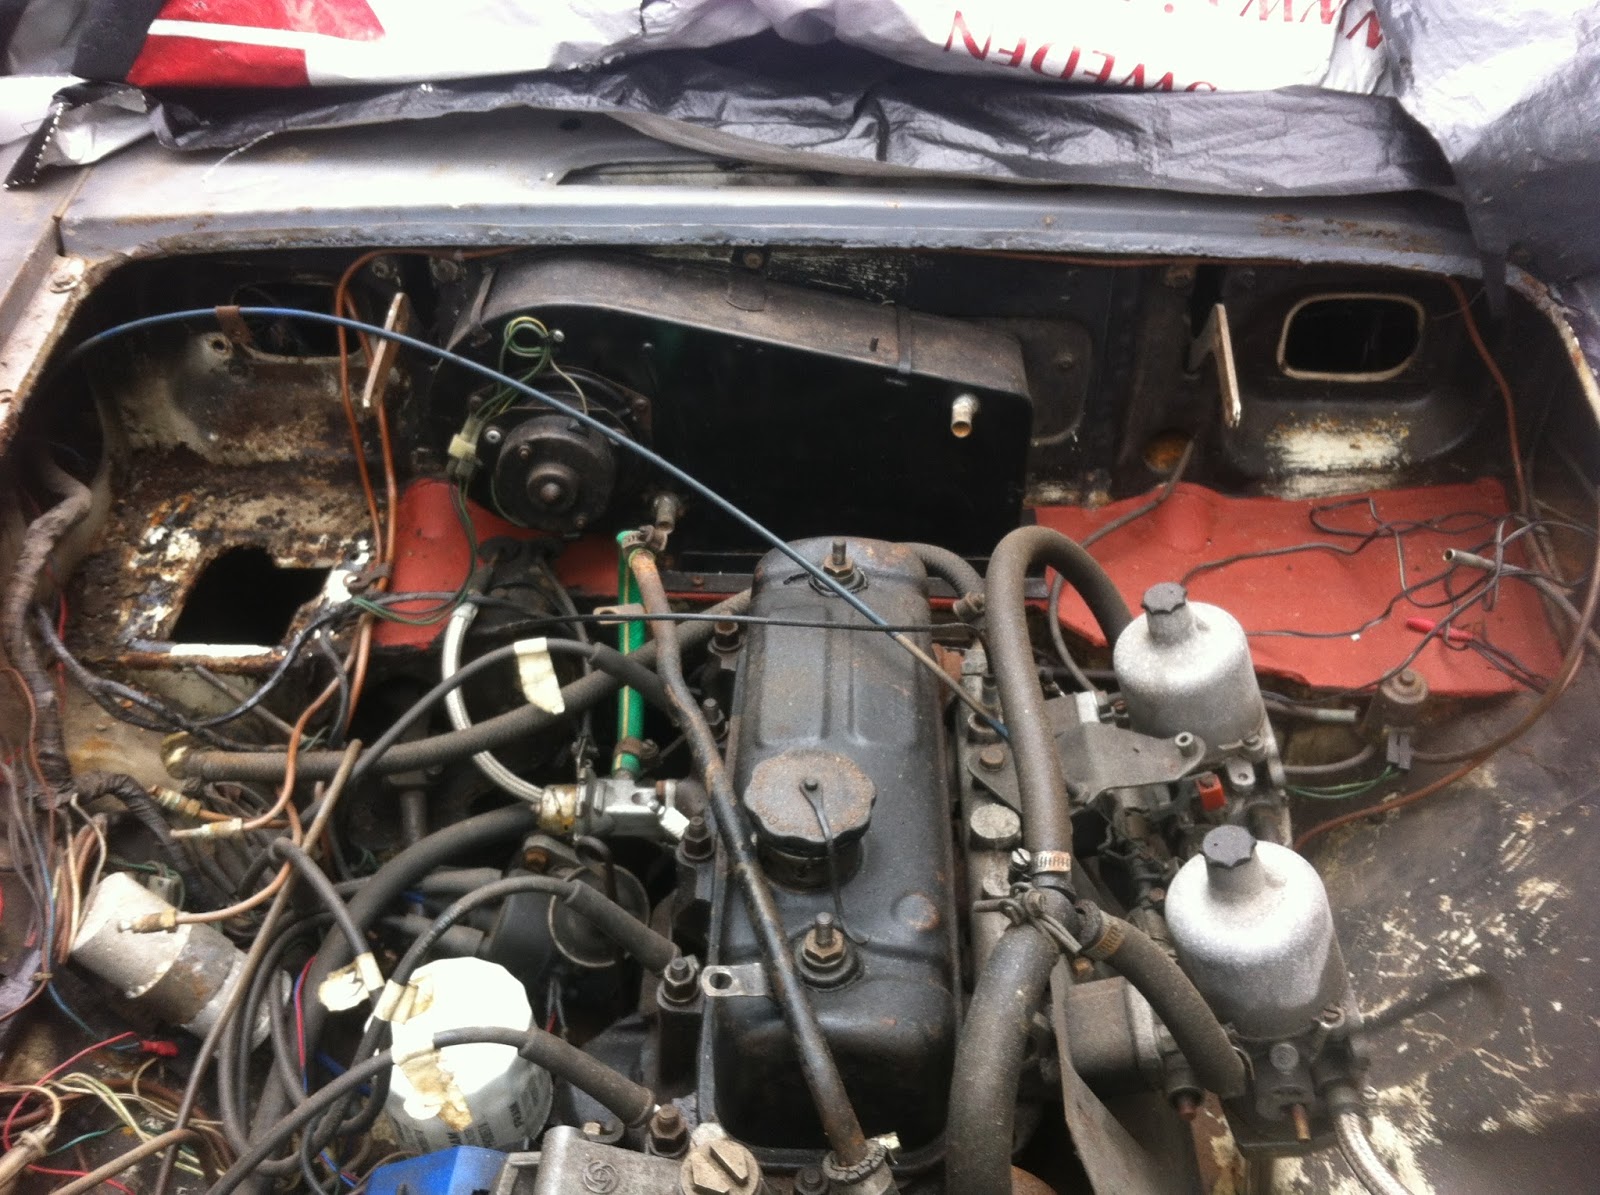
This is the current state of the MG restoration. One last welding job to do ( never say never eh ?) on the rear LH inner wheel arch. I've cut the templates using CAD ( cardboard aided design) and was going to weld  up today but am just too tired after cutting the lawns and repotting a bush for wifey. Besides, it was too windy !


Normal view of my workshop


Additional storage box which has been very handy and only cost £30 from B&Q. Wish I got two.


So what next then ? This time of year ( traditionally spring Bank Hol in a few weeks time) sees me re-organise the conservatory outhouse mess, shed mess and car mess. Basically a 2 day job of re-arranging stuff and throwing away very little after swearing this year I'll be ruthless ( I could be if Wifey wasn't hovering by my shoulder all the time inspection everything).

I'm not that far off completion........really. Now I've decided that a vinyl wrap ( £600) may be the way to go instead of a full respray ( £2500) and a full interior is not required for the m.o.t.

So after the welding to the rear arch I'll fit the window mechanisms, winders and locks. I don't know why but I have 3 locks and 2  keys, neither work. F**k me, the locks are expensive , and here's me thinking I'd fit remote central locking easy peasy, and cheap second hand. I bet the mechanisms are going to be fiddly and the window channels even worse, let alone the door and seal alignments.

Next up will be the headlights, bulbs and rear lights, the the dash and windscreens/seals which is a part I'm dreading. So if I can get all that done this year I'll be a happy Fufferfour.

I must add the impetus for the resurgence is down to me watching a lot of YouTube videos. Namely The lovely George at "SOUP" whose restoring a Range Rover ( like me outside) and a fantastic Lotus Esprit. The quality of the production and editing is brilliant. Also a mention must go to Elin Yakovs "Rusty Beauties" who restored  a Triumph GT6 and TR6. Funny guy and a wizzard.

  TREASON ALERT..........I think I want a TR6 next !!!!!!!!      ooooooooooh Matron.

Now I can get photos from my phone onto this account and now know......and more importantly wrote down, the account name and password I should be able to do this more often....hopefully !

New beardyface Fufferfour enjoying Christmas with the kids


More soon


Wednesday, June 06, 2018

Bowls, locks and scrubbing


After finishing work early and eating a nice healthy tea ( fish again,,,,,,,,,,3 days running, I'll soon be swimming) I set too with some little jobs.

Finished spraying the bowls outers and inner lip with trusty £1 tin black gloss from Poundland/Buywise/Costco etc. I must have spent £30 in grey primer and black gloss over the years. But for me it makes perfect sense as its cheap, always available and does the job. I also sprayed the window slider brackets I fabricated a few years ago. They have been skulking in a box I recently found, fortunately with a nice coating of Red lead on them. Next to them is the rusty sad original one with rusted on nut and bolt. I've no Idea where the other bolts are. Probably in one of the several bags of bits marked "Misc nuts and bolts" I seem to have hived away in some strange places.


The photo above shows the tools of the hobby that most would be restorers on a budget know. Wilko White spirit. I use gallons of the stuff. WD40 miracle fluid, 1000's of uses especially cleaning and light lubrication. Celebrations plastic container with sealable lid. Used today as a wash and rinse bath. I also filled it with White spirit and put the locks in, sealed the lid and gave it a good shake to loosen all the old crud, grease and other stuff (Cat hairs ?......how did they get there !) Small poking screwdriver (obviously) Green scouring pad ( sorry....Ed China calls them Scotchbrites) and wifeys kitchen towels . Not shown is the wire wool.........I couldn't find it ( found it when I was tidying away everything...normal for me !) and lastly Swarfega with nailbrush ( 60p from toolshop)

So the Idea is to get the door locks mounted and the actuating rods. Striker plate and door handle, all in a working order. Also to fit the door glass, winding mechanism and quarter light    ON BOTH SIDES. Not necessarily in that order though

The keen eyed among you might notice that I am cleaning two Identical locks ( i.e both LH side ) That's because I can't find that either. I've seen it during the weekends.........somewhere..........with another bag of Misc parts but I didn't have time to seek it out tonight. I'll clean these two up, see which looks/works best and use that one.
A good few years ago I bought  LH & RH complete doors from West Yorkshire on good ole E-Bay for £15 total. I collected them one Saturday morning. The trusting vendor was not in, told me to put money in letterbox and the door were in his garage ( left open for me) It contained a very nice MGA.

On Inspection of said doors many weeks later I found the bottom half of both to be rotten and full of filler, about a ton and a half. No wonder he said he would be out at the appointed time. Caveat Emptor !!!!Still all the parts were salvaged off them and that's why I have two of most door parts. The trouble is they are all rusty to some extent but I suppose at least I have some choice. Apart from the window glass felt runner and latch plate ( don't know why I removed it as I had to drill out one bolt thus rendering it useless......doh) all I need now is that precious commodity.......Time, second only to Money.

Joy of joys, MGB restoration.


Thursday, May 31, 2018

More activity, this time with photo's

So, been a bit slapdash with my efforts last few days. This is due mainly to the good old British weather. No rain but the last few mornings of my week off have looked decidedly threatening with many thunderstorms over our sceptred Isle.

The main Intention was to bleed the clutch properly. It was weeping a bit at the slave cylinder and had about 3/8" of movement. Hoping a new seal kit will do it but from experience seal kits never seem to work. The actuating rod also looks a little short ( i.e the slave cylinder is right at the end-ish of its travel before it engages on the clutch actuating rod) Hope it doesn't need a new slave as the costs are mounting up.

The next job was also to be the last bit of welding on the car hopefully !!!. The square hole I cut out of the rear Left  wheel arch inside to fit the Inner arch proper needs patching up.
See below


Its a very awkward area to repair as it is missing the top-most lip of the rear fill panel as well as where the two wheel arch sections come together. It will never be seen so there's no need to make it look concourse, just structurally sound.
Here below are the paper templates I made to eventually cut out and shape the steel.


Also one last filler piece on the LH light aperture and the welder ( stored in the passenger foot well ) can go in the shed and make me some room to restore....YAY !!


BUT........................did I do any of that ?

No

I did a little refurb on the headlamp bowls instead. Every time I had some time to spare ( or whole day)  it looked like it may Pish it down anytime, so whatever I did had to be quick and relatively easy. The finding of the headlamp bowls  in the shed not easy though. Traditionally this time of year I clear out the shed, outhouse and car but not done this year yet due to ongoing house DIY. I also seem to have 3 sets of headlights for some reason. Methinks on one of my E-bay spends years ago I bought a rear bumper and on collection in leafy Surrey somewhere he threw in a crate of dusty, cob-webby stuff.

LO !


Did the steel bowls too, these again look odd, as in not a matching pair, since one is covered in underseal and one not. I have a strange feeling I will find the correct box of bits maybe soon. Still, save myself about £50 buy not having to buy replacements. Just the screw sets and adjusters for about £6 needed.........result !!

Did manage to run the scary grinder thing with wire brush up mi finger though..........ouch


More soon when I'm mended


Monday, May 28, 2018

It moves. stops and starts..........bleeding tale of woes

So.............still at it and the weather has been on my side for weeks. As has the cash and time, albeit slow and frustrating.
Firstly I have a new job. Same place just down the corridor, but not half as demanding physically, strict 9-5 ( or 8-4) with every weekend off. Some on calls to do but that's in a month or two,s time.

Cash came by as my request for birthday cash not presents. That,s enabled me to buy a Brake master cylinder & RH indicator stalk assembly that fell apart and broke during dis-assembly. The replacement is also broken straight from the packet .!!! but thats for another time.

Last time saw me scratching my head as to why, after the engine bay tidy up of the wiring it wouldn't start. That was the back end of last year so I just left it expecting some wiring Issues/shorts/loose wires etc.

Back to the story. Left it last winter with no starting possible. Decided to re-furb the Brake master cylinder. Well, what a faff trying to work out the orientation of both seals. To cut a long story short the refurb didn't work. I even managed to chip a large lump off the Master cylinder casting. That sealed it a New Master cylinder was required.

Fast forward to last few weeks. New master cylinder purchased and fitted promptly. Trouble is though none of the family want to assist with the bleeding. Son #1/ twin 1 did a little. Has a had his ACL repaired so was not that much help. Nevertheless I managed to get some firm pressure without leaks so, so far so good.

Trouble was the car wouldn't budge. In order to fire it up I have to push it 2 metres up the driveway so I can open the large gates and get a car close enough to use the jump leads. Even with four people pushing it was going nowhere. Then a usual Fufferfour brainwave. The brake are jammed on. Simple fix........until I had a thought.

It must be several years ago I replaced the brake discs, pistons, pads and seals. The discs had mild surface rust on them. Wire brushed em and tried to push.......no chance.
So, common sense prevailed . I removed the outer drivers side brake pad with some effort.
Bingo the car would move. .......................Lets get this Engine started. I'd had all winter to think about why It wouldn't start and was sure I'd resolve it by checking all the earths and connections. Even adding an extra earth strap from Block to body.

After much revving of my donor car and lots of burps and pops from the exhaust I had to have a rethink.
The following week after some Interweb searching regarding firing order, plug gaps and distributor lead positions I was still at a loss.
Now let me tell you............Don't believe everything posted on these here web forums. Some of it is downright weird. Anyways in a lull in proceedings at work I found a picture ontweb of the distributor leads and their respective plug positions.
1 o'clock to plug No1.......1-3-4-2 anti=clockwise on Dizzy.
That's just how mine were though ???? Damn.

From all the popping and burping at the exhaust end methinks maybe not correct !!
Wait a minute. My distributor lead was not at 1 o'clock but 12 o'clock. I assumed this being the nearest must be the correct one.
So took the bull by the horns and moved all the leads 1 place clockwise. ( 3 o'clock to cylinder 1)

Lo and behold started easy peasy right on the button. Runs a bit rough as expected after such a lay up, but getting a good 60/70 psi oil pressure.

Next episode Bleeding Clutch...........soon, promise.

Son even filmed for Facebook the eventual firing up below.

https://www.facebook.com/paul.liles/videos/10156387480974621/


Thursday, December 14, 2017

still Here !!


Its just too bloody cold so here's a photo mid way through the last work. Its now finished in a lovely shade of dark metallic Grey.

Merry Christmas peeps

Thursday, July 20, 2017

Update

I'm still at it..................I think.

Money is tight, the sun is high and work long.

Struggling to keep up the enthusiasm without cash.........the kids need new shoes......blah blah.

Seriously, having money issues with life in gereral but thought I'd post just to let you all know I'm still here, the MG's still under tarps on the drive and still in my dreams.

Promise I'll post soon.........now I know my google account and password !
This is what the wind did in early January 2017 to the Tarps !!!!

Monday, October 03, 2016

3 strikes and your out ! not quite.

Another odd title.

Its because that's how many colours I've tried on the engine bay. Bear in mind the engine bay should be the same colour as the rest of the car.
So, in theory I had to make this monumental  decision  NOW ! as I was keen to get all the stuff I'd taken off, back on before I either lost the parts or forgot from where or both. The Inner engine bay sits in a nice shade of fresh grey primer. The pedal box, Vacuum cover, coil, expansion tank, heater and various brackets, nuts , screws and bolts have all been cleaned and are looking great in Black gloss  (Halfords).


Thing of beauty, Brass Expansion tank. Seems a pity to cover it but needs must. Came up excellent after 2 coats of black gloss and probably the best looking thing so far. The cap looked good in Plasti-cote Silver too.


Above was the Vacuum cover before cleaning with wire cup in drill for 20 mins 


After 2 primer coats and 2 Black coats


Same treatment for heater  too. ( Note it looked this good 4 years ago when I first did it )

So now the real gripe of late and cryptic answer of title thread.
                  The colour took three attempts at a costly £8.00 per can to decide, and I'm still not convinced but went ahead anyway.
First Attempt was Plasti-cote Brushed Aluminium Silver. Lovely coverage but oh so very silver and reflective. It also showed any flaws in the bodywork ( several small patch welds by P.O ) like a poke to the eyeball. Was very surprised how metallic it was, but not a good look for under the engine bay.

Next attempt was Peugeot Iron Grey Metallic. This I thought would be very close to the body Colour I envisaged. WRONG ! Very WRONG. It was almost Iridescent bluey/green. I don't have photos as I'm too embarrassed. Besides, money was low and I needed to crack on.

My Third and final option was the Halfords Gloss Black. I bought this at the time of the Iron Grey so I could re-coat some bolts and brackets etc. But in it went to coat the bay, quickly, the original colour I bought it with...doh

Below is the engine bay in 1 & 2 wire wool'ed and cleaned then 3 & 4  just Grey primered


How I wish I'd left it in grey primer, it looked good. But the deed was done and there was not a lot of time left in Lostsocks weekend.

An early start saw the heater go back in without drama. Pedal box too, although some BSF bolts seemed to strip partially or at least grab gingerly. The vertical bolts on the outside were a swine for me with my fat-ish mitts.

This is where I hit the frustrating and typical Leyland enigma !

The coil bracket (2 fasteners), Pedal box (7 Fasteners) Fuse box (2 fasteners) electronic Ignition (2 fasteners) earth screw ( 1 fastener)  2 relays ( 2 DIFFERENT fasteners) and overflow tank brackets ( 2 Fasteners)

WERE ALL DIFFERENT SIZED BOLTS/SCREWS !!!!

So In an act of complete rebellion and a vote against BREXIT I used M5 bolts, nuts and washers for the fuse box, relays, earth screw and Ignition box !!
It looks good, has a shiny chrome Phillips heads in the bay and M5 nuts in wheel arch but who cares !

I must admit it was very frustrating when undoing them, as if rusty , old, gnarled heads were not enough to deal with a different method was required. In truth most needed mole grips as the phillips heads were well rounded or slotted heads gnarled.

So this is how I left it. Look at that expansion tank and cap gleam.  Still needs more work after spending hours cleaning the mess of wiring with WD40 and brillo pad thing. It shines. Just ordered some new black wiring tape from Frost Auto, so when that's done I may actually start the engine before winter, I may not, who knows. Here's praying for a mild winter or money and a garage/shed

Keeeeeep restoring !!


Friday, September 09, 2016

Just a little bit more

The recovery from my three nightshifts and fair weather saw me set too with some more restoration.

I managed to get the pedal box and Vacuum cover back on easily enough with wifeys help ( I only swore once) and all the bushes, washers, split pin and screws back where they belong plus the Brake pedal.
I left the Clutch pedal since this has to be done from under the car as both pedals won't fit through the nasty hole in the engine bay as well as many wires and pipes have to be "persuaded" to move even with just the Brake pedal attached. It has to be done this way as access to the brake pedal bush, screw and mechanism are impossible to attach solely from the top access of the pedal box.

Then the bit I was dreading, cleaning the engine bay.

These are these slightly after shots, as I think its going to take a lot of effort over the coming months.
I put these on as inspiration, comparison and achievement for when its complete. Hopefully !!

The four below are general shots of the current state, alas with no garage to work in its a case of two steps forward four back.


This shows the pedal box hole after setting too with white spirit, scraper/screwdriver & wire wool.
Look at the shine of the LH wiring loom. Good Ole WD40. Bet its back to cruddy next time I look though.

I think I may remove the heater box too and re-paint it the Peugeot black I used on the vacuum cover. I did it some years ago in "Pound shop Gloss black" but it looks weather beaten and dull now, besides the heater core is leaking so that's another for the list to buy, at some point !.


The big question is though What colour do I paint the engine bay ?

For those of you who can't be arsed to read from 10 years ( yes 10 years !) of restoration the car was originally White ( which White though, for a  77 model ?)   but had a thorough re-spray early on in its life to Black. Its now mostly several shades of primer grey. Wifey wants "Old English White". I'm afraid this will show up any imperfections, poor filler repairs ( with rust surfacing) and crap shut lines.

I'm thinking a slate metallic grey, very similar to my current Renault, which I think will look good against the Black sunroof and chrome finishings. Let me know what you think........please. The comments appear to have stopped.

Tuesday, August 30, 2016

Well. I've been at it again. Today was my last day of bank holiday fun and spent most of it with Wifey at Carsington water and Bakewell.

Later on I set to with new workstand ( £10 Lidl...bargain !, the B&D one only lasted 18 years) electric drill, wire brush cup, curved hand wire brush and white spirit plus my old fave..autosol grey primer ( £1...poundshop) I'm often seen carting five of these round town Saturday mornings.
Here it is after its first light coat.


 I then set too cleaning the pedal box and cover. The pedal box was too complex and internally greasy to do too much with so after a clean on the outside I gave it a light dusting of Peugeot black gloss left over from the previous chariot.


The thing didn't half look bad to say its not really visible. The diaphram looks brand new  and a quick wire brush on the back half of the vacuum cover and all was good to go.

So the I gave the main cover a couple of coats of gloss black. It looks bloody marvellous and brand new. the pedal box cover too gave the same result as did the 8 screws holding it on.


Overall for very little effort, paint and time the results are not in proportion. See the previous post for the state of the cover before I removed it. I've still to try to assemble the cover back on yet with its giant conical spring but a least today has given me renewed optimism.

What to do about the big hole and area where its come from though. It looks very fiddly to try and look reasonable. What colour should I paint it ? Will all the pedals, bushings and pipes all go back together ?
That's for next time, anyway back to irradiating the ill and accident prone folks of the east midlands for the next five days including 3 night shifts...ho hum !

Monday, August 29, 2016

Still at it

Bank holiday weekend saw me at it again.

I've managed to finish welding a fillet to the RH side light aperture ( did the LH one some months ago) filled and sanded to look acceptable. The holes cut out during the moving from Rubber bumper back to chrome don't look pretty but at least they won't be seen. Likewise with the fillets welded in but at least they give the lower valance below the sidelights some strength. I'm amazed the welding works at all as the cheap 2nd hand MIG welder is on its last legs.

Today I removed the brake servo and pedal box. A bit of a faff reaching the bolts below and behind the pedals but done easily enough. The reason I removed it was the servo looked "Orrible", all rusty and decrepit with surrounding area of paint ( black  & white) bubbling from what I presume is spilt brake fluid on my many attempts to replace the brake master seals. Well I broke the master cylinder last year so I though might as well go the whole hog.

Not a pretty sight is it. The hole it left is just as bad.
 So my plan is to wire brush ( in drill) the servo cover. It was much easier to remove than I expected with a gentle tap with chisel and hammer after bending some of the wavy crimps  back.
The cover shot of with a mighty ping as did the huge spiral servo spring. One good thing is the diaphragm is in good shape. In fact all the internals of it are, so methinks there was just probably a leak with the servo hose connection, if at all.
           I think I'll make the servo all black and try to polish the clutch reservoir too, as when I eventually buy a new master brake cylinder I don't want it to look too out of place.
What to do about the hole though ? and the pedal box ? They will go black also. The surrounding area is going to be a nightmare with all the wiring and bubbly paint. Where do I start this ?

I'm determined to get at least these jobs done and brake cyl fitted this /next month as I feel I'm still taking things apart when I should be putting things back on. Wish me luck folks.

Thursday, May 26, 2016

I'll never make a body man

Yet more sanding and wet/drying the front ST spoiler.
Had a good couple of hours with 240 grit emery and trusty half milk carton of warm soapy water. Got it smooth as silk everywhere............or so I thought.

With my trusty £1 rattle cans of pound-land grey primer, I gave it a nice even coating. On viewing it after and even during I could see the glaring areas I'd not smoothed and flatted enough.
However, after a couple of hours I circled all the areas needing more effort. Approx 15 of them varying in size from a thumbnail to a whole thumb. So I set to work flatting again and did about five of them till the next one would not feather out, it just came off in tiny wet fragments. Obviously not dry enough yet then !. Never mind, the finish is good and compared to how it looked last week a major improvement.

Peeped at the spark plugs. All show signs of last run last summer of it being too rich. I knew that anyway. Also removed the alternator to check all the pulleys and the cause of the alarming rattle/squeak last start up. Water pump pulley seems fine, water pump is newly fitted (3 years ago! ) this also was the source of a major noise, on investigation the bearing and impelor was well and truly shot, hence the replacement. Can't be this again surely?. Alternator bearings good and free with no wobble and crankshaft pulley seems ok ( hand turned when plugs were out )

So just have to wait till I run her again. Looking at the engine bay depressed me. A bit oily, a bit rusty, a bit red leady and a bit dirty. I'm determined to get it all running fine before I attempt to renovate this area first though.

After spending a small fortune having bathroom totally renovated its time to paint. I'm gonna have to do it as wifey tends to lallop it on a bit and is a liability anymore than 1/2" above solid ground.

Its going well though and enthusiasm is returning slowly.

A view of last years spoiler before I ruined it by applying primer by brush....looks good dunit !

Sunday, May 22, 2016

And yet another list of to-do's

Alzheimer's must be setting in. I just realised I've repeated most thing in the last two posts.
So here is the definitive list I made this morning on the status so far, in no particular order.

1/.   Replace both rear tyres.
               It would appear these have only lasted 15 years plus and can no longer hold air. What I did with the front cost me a tenner ( £10 =$ 14.5) having a local company fit 2 good but bald-ish scrappers. Albeit they are low profile, but sealed up to the hilt and with new valves. Next day off will see me visit said establishment for a repeat ( but not low profile though)

Sadly I see no point in buying real tyres yet.

2/.    Buy and fit new brake servo. Had the money for it last year but frittered it away on god knows what. Commonsense say to replace rubber hoses to front too, and free of the cylinders. I replaced the caliper pistons, seals and discs ( rotors ) a few years back so I must add more effort to make them work and appear new again.

3/.   Weld/repair lower valance. I converted from RB to CB and the new holes for the side lights/indicators looks a bit dogs dinnerish with little support below.  I have to find the Jigsaw first, no mean feat as I've not yet done this years clean up of the shed and outhouse.

4/.   Yet more expense. The small heater radiator is leaking. I'm not letting this bother me yet as I'll bypass it with some jiggery pokery of hoses and it won't affect the running of the car. ( Thats if it will run after this years lay up)

5/. Buy and fit Indicator stalk mechanism. Nuf said, broken through sheer stupidity and Lostsock logic.

7/.   Re-set tappetts. Sounded very noisy when last run, or was it timing chain rattle ?

See what you think

8/. Check oil/water levels......... !!

9/.   Check dash bulbs and replace.......fit dash.........re-paint in crinkle finish ?   naah, its good to go and has only a little patina of  " old car"

10/.   Re-cover dash top panel. Not as easy as it sounds. Need hardboard, foam and jigsaw !!!

11/.   buy front bumper fitting chrome screws. A little vainglorious but hopefully it will at least look like being finished............from the front....low down, anyway.

12/.Clean engine bay..........big job and difficult with engine and all ancillaries there   !

13/.   find/acquire starter motor bolt.........for some reason the top bolt is different from the bottom and I can't find it..............or remember weather its the top or bottom I need.

14/. Sand spoiler. Well documented in previous posts. Did 3/4 of it today. Sanded off most of the ...nay all of the real primer that reacted. Even managed a quick tickle with rattle can of primer. Wish I had not. Shows up all the flaws in "too course sanding". Mostly wet an drying this today but getting there.

More next week folks.

Tuesday, May 17, 2016

Wot a faff

So, the saga still continues.

Sorry I've not posted of late. The trouble is good ole Google. I have over the years got several google accounts + the kids accounts set up on this laptop. And that's where the trouble starts, trying to log on now its all controlled by Google.

Anyways, I've written down the log on Name and password and linked it to my iphone, so, hopefully some posts on my progress with images directly from my phone. I did say hopefully, as I always have trouble with the youngster specific apps like itunes and Google+.

To fill you in regarding the MG. Nothing has happened since the last post last year.  I've still not purchased the master brake cylinder yet, but since it was birth month I may have enough cash to buy and fit.

The nice weather this week has seen me cut and strim lawn, replace 6' x 8' trellis panel after hammering in 2 fence posts, blow away leaves from autumn, paint said trellis and archway + shed front. I had only one day for MG stuff and that was spent removing all the tools and stuff, cleaning, oiling and re-organising as they suffered a major ingress of water this year due to a leaking outer cover.

Next job up is to get 2 tyres ( scrap ones) from local friendly tyre fitting company so I can at least roll the MG fore and aft to sweep the drive. Then fit master cylinder and maybe just may be run her up/down our little cul-de-sac. Todays fact..........the word Cul-de-sac is not recognised as a word or entity in French.


p.s The spoiler looks nothing like this now. In my wisdom I coated it in "proper" primer. Its reacted and needs sanding off again.....ho...hum !

More soon folks !