Tuesday, May 09, 2023

When things come together Nicely, especially Lucas wiring.

 So spent a day determined to make some positive progress after the last disappointing session. A bag of bits arrived from Moss containing misc screws, nuts , bolts, grommets, relay and a pair of window handle winders. Much joy.

Bravely, I tackled the errant relay. I had also bought a spare from Halfords so if I destroyed one so what. It would have to wait for wizard Tony's visit.

I'm thinking now that I had some duff info from one of the MG forums regarding the relay PIN numbers.

They are numbered 30, 85,86 and 87. Strangely all the wiring diagrams show W1, W2, C1 and C2 and this  is where,  I think I went wrong.

A big thanks to Paul Hunts website " Hammer & spanner". I should have gone straight there as I've been reading all things MG on there for years and it has everything you need to know, well written and loads of links.

Anyway back to the job in hand. Fitted new relay carefully ( after looking at Advance Autowires wiring diagram) about 30 times and Mr Hunts W1/ 85 pin locations.

Bingo........... Wifey even filmed it for me happening.


https://photos.google.com/u/1/partner/AF1QipMsv3jZCqGmm-IqJBI7ODXkMYvo/photo/AF1QipNl_rJoK2pLyL-3zUqOWr1YkjOe5stGXg0tJ__5

So, the annoying settings of Blogger, AppleMac and Samsung Android won't allow the lovely video, however I'll keep trying. 

Back to the story.

Engine runs albeit very rough, fuel pump pumps, wheels and tyres lovely and shiny, brakes work ( handbrake very weak though) So I took it for a spin up and down the little cul-de-sac where I live. Engine was stuttering lots, steering was heavy and clutch/ gearstick a bit iffy. Reverse works but moving forward I never got above 2nd gear.

Ah well at least it's moved. Twas then I spied a long thin trail of fluid showing where I'd been, and a bigger puddle where I'd stopped to turn round, bugger !

I'm going to try again though but this time with a fuel filter fitted and a catch container on the carb overflows. I hope it's not a fuel line issue and now wish I had checked the fuel line tank connections more thoroughly.

Hopefully it's the carbs that need a proper setting up after their thorough cleaning and dismantling a few months ago. Before that though I have to do the due diligence thing and check for the spark/ plug fouling issue/s and timing.   But at least now I know I can move it and have a good battery and wheels.

A day or so later I set too making the door cards. It was fun trying to fit a 2.5 x 1.2 met sheet of hardboard into a Toyota Yaris. ( I cheated and broke it in half knowing each half would be big enough for the roof  of 43 inches x 43 inches, just. The other Half more than enough for the door cards.


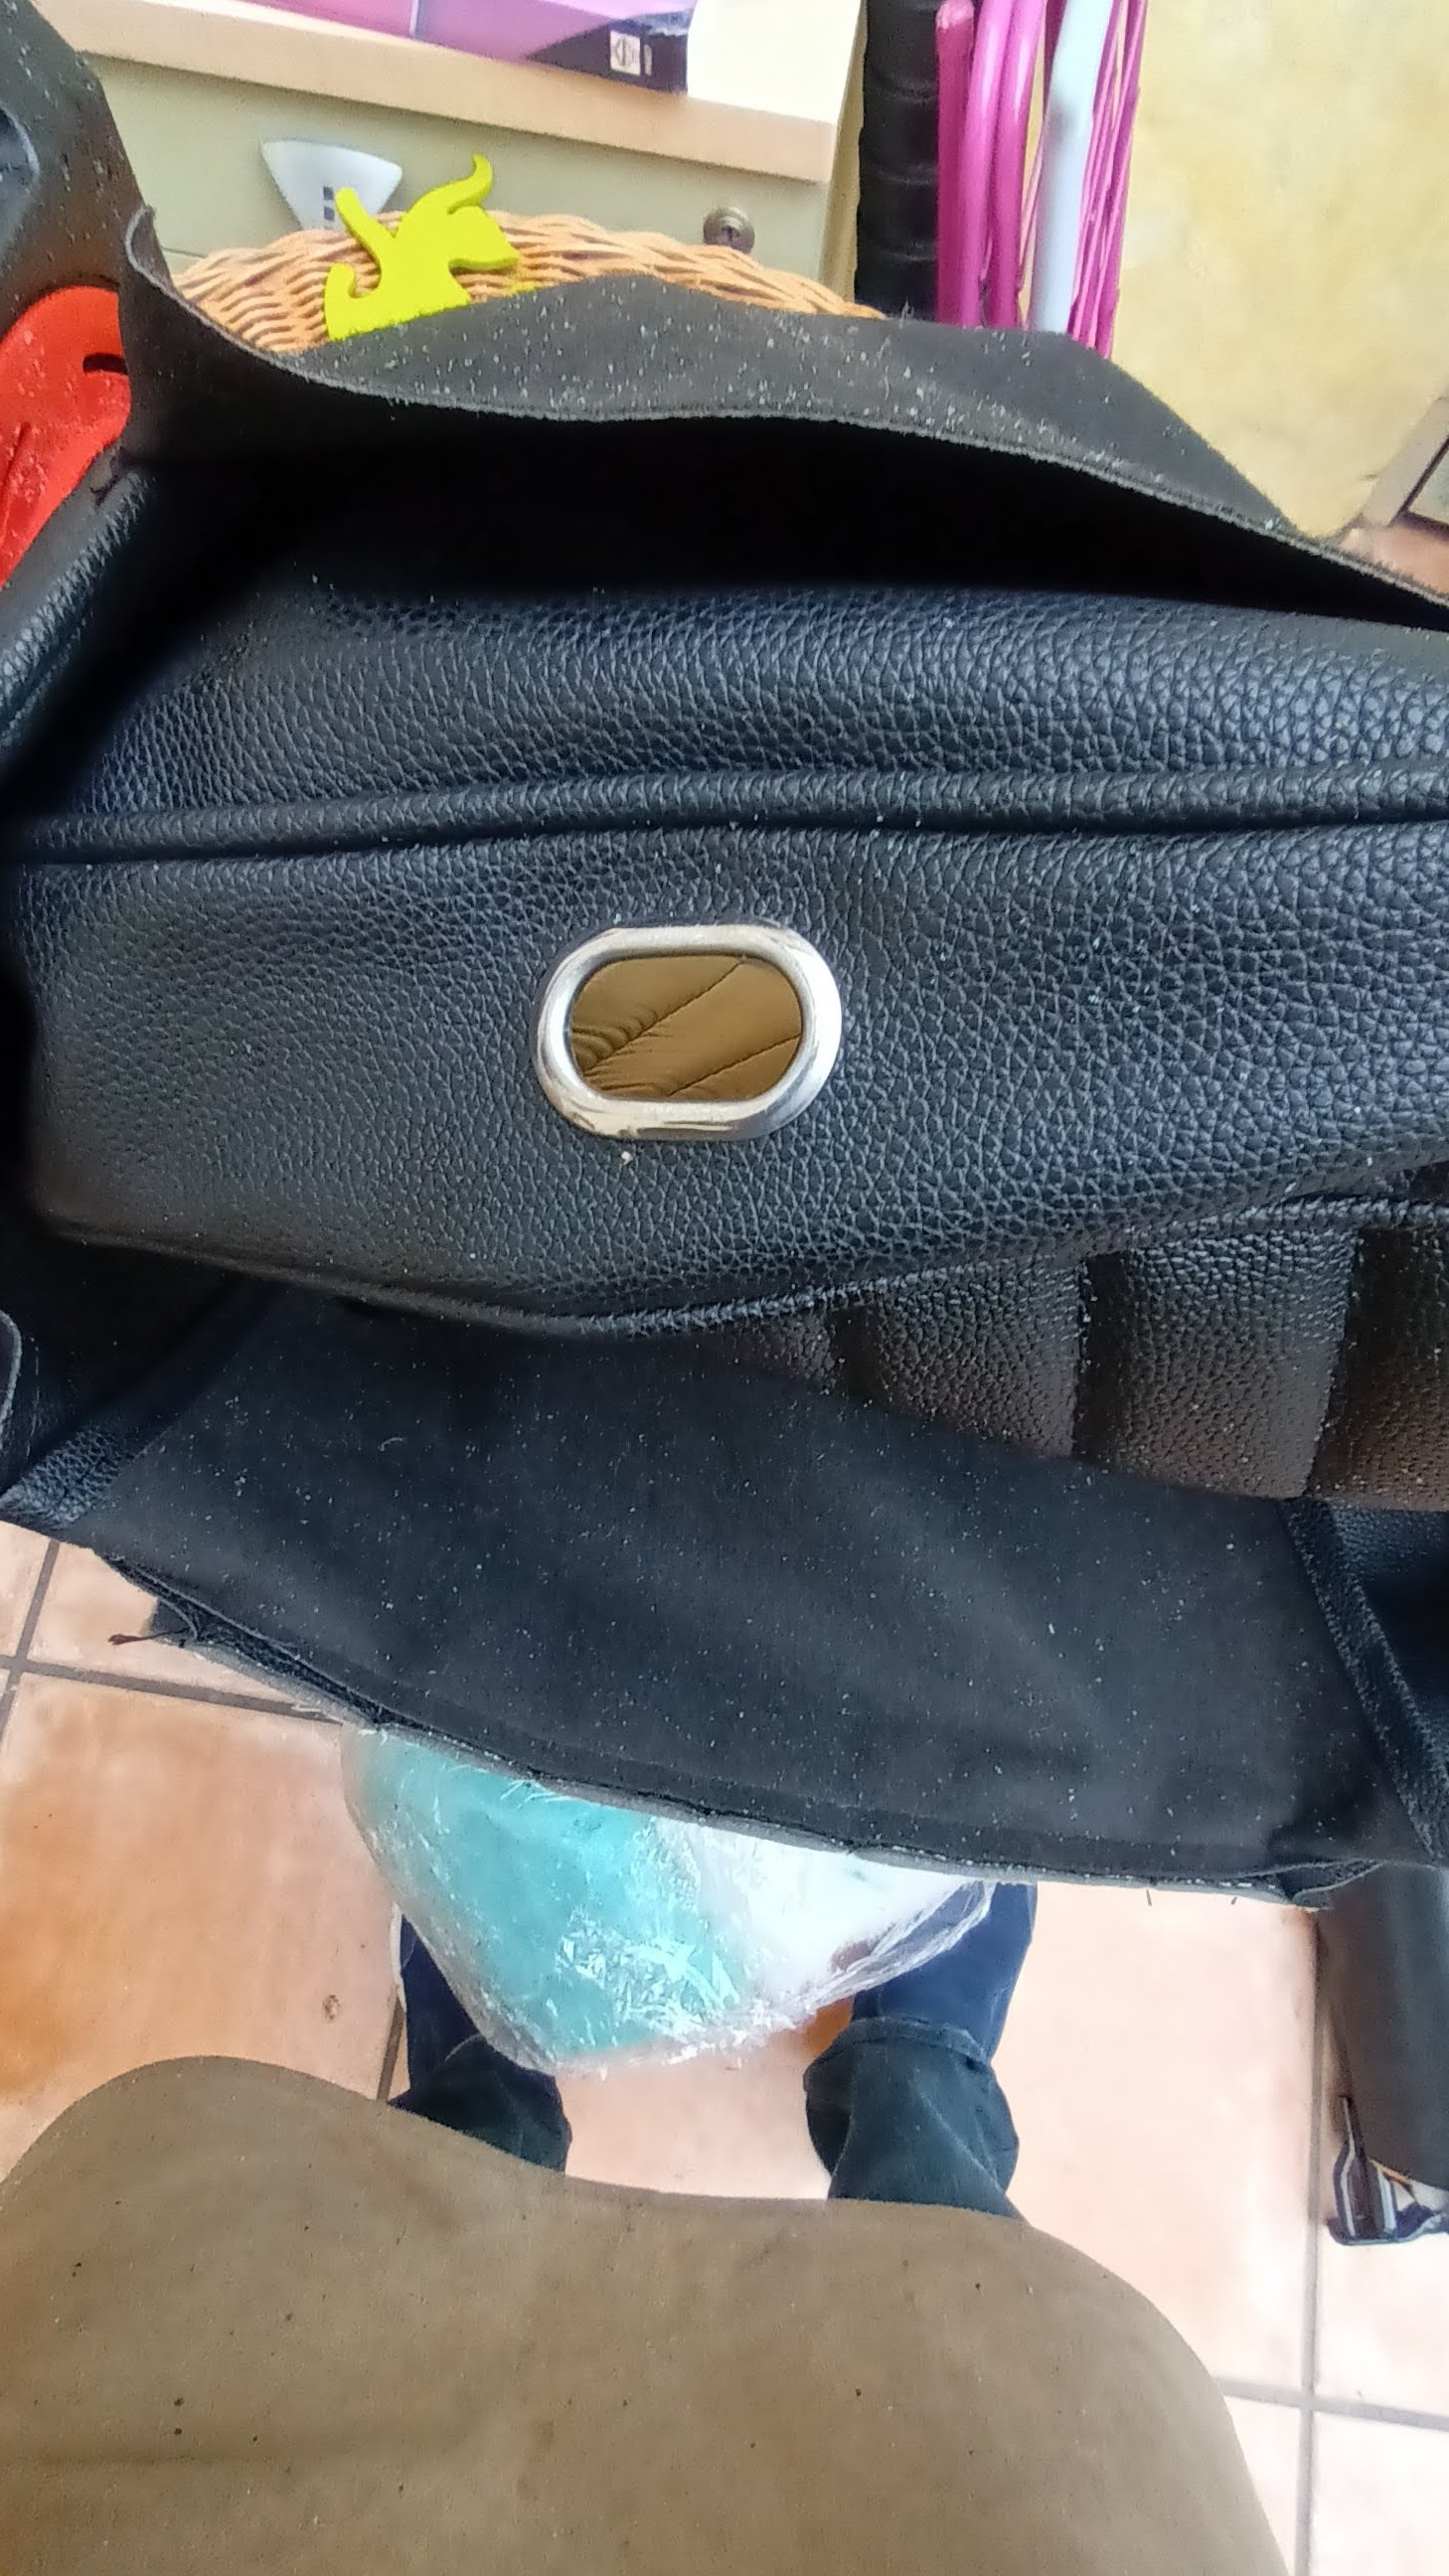
The above shows how skanky the old door cards were with the bottom 3" missing along most of its length.

The vinyl was ripped too and just as skanky. They were seperated easily and old card scribed round on the nice new stuff. Since the old cards were very warped I had no confidence that things would line up when cut out. 

I devised a cunning plan. I made a brown paper sheet and taped it to the door and by utilising wifeys charcoal art sticks and used the "dirty finger" method of finding the mounting holes.


Once the pencil centre lines were scribed onto the paper I cut out a square around the holes and offered it back up to the door. I then used a red pencil to mark the template where any slight changes were needed.


It is important to note how far off the original holes were taken from the crappy old door card, in fact not one lined up.

What to do about the "missing" holes along the bottom though. What missing holes ?

I forgot to add that the door had been repaired by me years ago by welding in a section at the bottom about 9 inches long, where some of the mounting clips go.

Then another brainwave. I assumed the doors would be symmetrical so used the paper template turned over to get the new holes that were missing on the other door. And it was a success. Transferred it to the door card and used this as a template to drill the 2 new 8mm holes for the missing clip holes.

Fortunately I saved the old door clips and managed to locate them amongst the many boxes scattered around the property ( in shed, of course ) bad news was I only had 13, but that's just enough for one door. A trial fit just using four clips, a bit of fettling of the board and Bingo , fitted.

It was easier than I thought it would be even though It took most of the day On and off,  It went on with a nice little click and also comes off with gentle persuasion from a proper trim tool.


Next job is to trim the outsides, stick on foam and then vinyl.

The handles cleaned up great using hob cleaner, however the mounting hole and screw need some jiggers pokery to make them secure and nice.

Engine wise, I have to check the fuel lines, fit tank outer grommet and inner tube clips, fit fuel filter ( I know as soon as the newly ordered one is fitted I will find the original one that was never used). Check timing ( Tony's first job when he arrives), and so it goes, endlessly.

Or I may just try making the roof lining board, or the other door card.

Fun fun fun.


Friday, April 28, 2023

Back to square one FFS

 So the day started bright and early, wifey out for the morning leaving me with a whole day to get on with stuff.


The priority was :-

1/.    Get engine running briefly, fill with water, check oil and any leaks. ( It's been connected to battery charger for at least 10 hours )

2/.   Attach choke cable to lever/pull knob ( weld) then re-route to carb linkage

3/.   Wire wheel tailgate and bonnet catches, find screws.

Well, how many do you think I achieved.

One.......number 2/. Only...........hence FFS.

As soon as he battery charger was removed and the key turned..........nothing but the fuel pump chattering away. Red light on on dash, goes out when key fully turned but nothing from the engine bay.

On investigation there was an errant black wire coming off the cluster of wires at the starter relay not connected to the terminal of the ignition relay. No bother, 5 mins to make another and attach to the earth side .

Bad move, starting up again only saw a pluther of smoke coming from said relay, and a melted wire, again.

The same thing happened a few months ago which prompted me to get Tony the wizard auto electrician. He'd had it sorted and left me with a few tasks like renew fuse box and fuses and tidy up the wiring.

So again I spent hours trying to figure out where I went wrong with the relay/fuse box wiring.

So it looks like I need another relay and another visit from Tony.

I left it at that and dragged the mig welder up from the shed and fitted a Halfords stainless steel brake cable [ more than long enough this time] It was a doddle to weld with just 3 dibs  holding it firm and a light tickle with the scary grinder fitted with a thin disc well worn down small.

I was worried about the routing of the Bowden cable ( the outer sheath) but once poked through the centre fascia it was obvious where it was to go. One problem is that when you google the routing there is so many American sites they all show the LH drive routes, so as I said it was fairly obvious once the cable was in a little way. One good tip was to fit a large nut behind the choke body on the inside of the fascia. Apparently the proper nut is a thin version and difficult to tighten as well as get to. Thank you to John Twist of University motors for that top tip.

As usual when I have a list of items to get on with I go and do something totally irrelevant, so I gave the sun visors a good scrub. They were filthy but cleaned up nice, see.


The back of the visors is cream/ beige and didn't clean up so well. So due to the fact the side cant rails are in the same condition I.e  stained and discoloured I've decided to paint/ dye them black in the fullness of time, together with a black roof lining.

I've noticed that all of the black vinyl I've cleaned always seems to leave a brown residue in the bottom of the creases/ texture. Does anyone know how to resolve this ?. So far I've tried :- windowlene, hob cleaner, meths, white spirit, WD 40 and lastly surgical spirit. At least I now know what the strange smell coming off old people is .....guffaw.

Next up is the repair ?? and cleaning of these


More soon folks after Tony electrical wizard visits . P.S.  the pressure is on as we are having the roof ridge tiles replaced and the driveway will be full of scaffold so the MG needs to move preferably under its own power.

Wednesday, April 19, 2023

Seat shennanigins and fuel faffs

 So spring has sprung and the long awaited summer heatwave promised never happened, but we did have fair weather, enough to get the MG fever going again.

All winter my aim was to start on getting the fuel pump fitted, hoses connected properly then test the pump and maybe get some fuel forced along the fuel line.

Closely followed by bleeding the brakes. After early last year I discovered the calipers were upside down and on the wrong sides. No wonder I never managed so much as a slightly firm pedal, just a soft pedal with a strange " fart" sound at the bottom of the travel. 

Since I finished the seats and underfelt ( very soft neoprene/ rubber that stuck down very well ) fitting of the seat was to be the first job, as well as fitting some old carpet from recent redecorate of sons room.

I wish now I hadn't bothered. The carpet was losing its underfelt in a mass of powdery dust and was a swine to cut. But at least it is protecting it for when I finish off the dash switches and heater pipes.


The fitting of the seats was next. I heard they can be fiddly so I was prepared for the challenge.

And what a challenge it was. 

One seat has four parts which all need aligning so the 5/16" bolts can be fitted in from above. A long steel runner each side underneath, which is fitted to the seat runner by a small lip about 3mm/ 1/8" deep.

Only the front two or rear two can be fitted then the seat moved fully forward ( or back) to fit the last two

It has to be temporarily fixed to the seat runner either sticking out fwds or rearwards so the bolt holes  are 

visible when placing the seat. There lies the problem. The lower loose runner is difficult the attatch and keep vertical on the seat underside and get the base somewhere near the holes.

The other component is the wooden runner that sits under the lower rail. It has two large holes about 25mm/  1" dia with thick 1" dia washers. This has to line up with the holes in the floor, as well as line up with the lower runner.

Then the hole in the runner, with nut inserted has to be " get attable" with a ratchet.

An added complication was that with pliable underfelt and crappy stiff as hardboard scrap carpet the bolt was about 1/4" too short to engage with the cabin floor.

I overcame that by cutting a long square slot in the carpet, another messy faff, then removing some underfelt.

However, I'd used sellotape ( yes yes I know) to hold top and bottom runners in place but it kept letting the lower runner either slide forwards or collapse sideways out of the seat channel.

Bear in mind you have to do both seat sides at the same time, get them the same amount sticking out then align over the runner hole, washer and tapped hole in floor. I must have tried about six or seven times with the seat far forward and doing the rear pair. Trouble was the " new" seat was fat and the tunnel was fat so I moved on to fitting the front pair. This time I used some electrical tape tied to the runners.

The seat would just not go back far enough. The tilting mechanism just kept hitting the outer sill.

By this time I'd been on the job about 5 1/2" hours so I decided to call it a day as I was thoroughly pissed off and hungry.

After dinner I did a quick Google photo search and saw to my horror

I WAS FITTING THE WRONG SIDE SEAT.....ffs

The following day dawned clear and bright. I did the job in 35 minutes ( after swapping over the seats)

Onto the fuel stuff. The hoses I decided were on their unions far enough. Connected the battery charger and tested the pump with the ignition on, bingo !. A nice little chatter from the rear.

I popped a container on the fuel pipe under the bonnet in place of the trusty Gatorade fuel tank and lo


Green fuel ?.  Quickly filled the tank with 5 litres of fuel, fitted the fat fuel filler hose and re tested. Result.

However, I couldn't' find the fuel filter. Its been hanging round the engine bay for about 6 years, maybe. Or I could have stored it somewhere safe, and secret. No matter, onto the brakes.

I had purchased a vaccuum bleeder kit from amazon for the princely sum of £13.25. This was forced on me due to the fact no one in the family would assist me for the normal method.

It worked a treat. Pedal firm as f@+>k. I was convinced the master cylinder or servo was causing the fart, but no all is silent. 

A few other little jobs to finish before I give it a run on the cul de sac such as:-

Attatch choke cable wire and fit to dash. I did fit another bike cable to the knob end but it was too short so I'll have to buy one and re-weld. How is it routed through the dash though ?

Clean up and paint boot lock mechanism, the fit and test.

Ditto bonnet hinge and latch.

The maybe just maybe a drive...............it'll have been about 14 years + since it last moved under its own steam. 

See you all soon.


.

Monday, March 06, 2023

Recap on status ( or a mans dismay on the winter weather)

 So, not touched the car since mid December. That month was unusually mild for the UK and especially so here in Derbyshire.

I left it with the fuel tank fitted. The fuel pump installed after some cleaning, sender unit in with a new longer black wire soldered on at source where it was spliced in badly near the battery box cover. The fuel line rubber hoses fitted......sort of. 

They are 75% pushed onto their respective unions but if I remember I did not have the correct jubilee clips and the rubber is at its most difficult when almost in place, so I did the usual fufferfour thing and left them till next time with a mental note to make it first job on the list when the weather improves.......sort of.

Thats because the very last job was to put on the rear wheels. It was at this stage I noticed the dreaded "clunk" from the diff and propshaft. Definitely at least 3/16" free play between wheel rotary movement and propshaft moving. I wonder why I never noticed it before ?. One of the mysteries of life. I'd had the whole axle off and on the bench several years ago, painted and looking good and its lead a lonely and sheltered life since, albeit being painted with cheapo  pound shop matt black paint.

It looks a fiddly frustrating job to cure and for sure the tank will have to come out after only just having been fitted. Still, the " cure kit" from MGOC only costs about £14.00 so another unforseen job to the list.

The re-cap thus is this, if I can remember, sat here waiting for the imminent snow fall thats been promised for the last few weeks.

1/.     Undo fuel tank connections and drop tank

2/.     Re-fit diff spacers ( 2 brass cup washers, 2 fibre flat washers. Clean diff cover mating faces and fit    new gasket. Sounds easy but involves partially moving drive shaft on one side 1/4" outwards, and  knocking out rollpin and pinnion pin)

3/.      Consider re-newing whole remainder of steel fuel line. I have a feeling that this would be a mot failure knowing how keen they are on fuel related stuff.  I've just looked at the prices and may defer that option.  £114 for the kit ( which I have renewed most of anyway) or £40 for the long pump to engine bay unit.          I think I'll clean up the existing then prevaricate a little more.

4/.    Test fuel pump.

5/.     Fill up radiator, drain and refresh oil

6/.     Bleed brakes ( now the front callipers are on the correct side and the right way up)

7/.     Attatch bonnet hinge, latch and release cable.

8/.     Connect tailgate lock mechanism ( I found the key so I refurbed the lock fully)

9/.     Start up and test drive up/down the cul-de-sac. ( after test fitting a refurbed seat )

10/.     Wonder when the weather is going to improve ( I think this should be first on the list but in reality its been a constant thing every hour the last 15 years.

11/.     Wonder at how expensive the Interior carpets and fittings are, what type to buy and when.

12/.     Wonder when to fit in all the home made vynyl interior things like door cards, roof lining.

13/.     Wonder how many more lists I have to make.


Here's some photos showing how good the wheels look in comparison to the rest of the vehicle.


Or I just may ignore all of the above and fit some slightly flared arches and re-align the doors again.

More soon I promise folks.


Wednesday, December 28, 2022

Tank in time out

 The fuel tank is fitted. It was easy enough using a bolt kit from MGHive. It was all painted matt black, twice and three times on its top surface. Offcuts of foamy sound deadening used as spacer cushions.


Fuel sender unit located easily enough in boot space. Attatching the hose to the fuel tank easy. Twas a new section of fuel line and quite a tight fit but eased on with some vaseline. However, attatching it to pump was not. Also I did not have the correct size jubilee clips, just a mish mash of clips and springs. To make matters worse fixing the new hose to the metal end of long fuel line and fitting the other end to the pump was not fun. It was very tricky with lots of swearing, during which I found the live feed which was crusty and brittle. It also ran a snaking route around the fuel line and earth connections. 

I bit the bullitt and added a new section of the correct colour from my " spares - electrical" collection, double insulated it well and heatshrinked it on .

But that was enough, it was cold wet dark and breezy. 

I left it there till the weather improves. I did want to run the engine but decided against. The water had been drained anyway. So a liberal dose of WD40 all around and thats how I left it.

It has a nice new multilayered waterproof cover over it, several lengths of carpet under that and a tight nylon over over all of that.

I may recover the rear seats or refurb the fuel cap. One good piece of news is I found filler cap key .

More soon-ish.


Thursday, November 10, 2022

Fighting wind and rain

 Next up on the never ending list was the handbrake lever refurb. Gawd, what an ordeal. It was stiff as hell to move up/ down, very very stiff. I managed to mangle the slightly mangled workmake jaws even more gripping the lever plate and trying to move it. Left it it soak in WD40 for a while and levered some more, not much difference !. So I did what I normally do, ignore it for a while and get on with something else. 


Halfway through, still very stiff. Why I didn't re-attach it to get better leverage I don't know. Old age and senility probably. More of that next post, if I remember !

Some of the chemicals used of late


Namely the cable itself. It came away from the car easily enough, except for the guide under the battery box. That was a swine. A pozidrive screw inserted from the top which was impossible to see. It was only after being 15 minutes on my back under the car, freezing cold and getting all the rusty crap falling onto my face that it dawned on me the nut on the underside was spinning because the screw ( not yet seen) was turning.

The cable itself was also very very stiff, neigh on impossible to move back and forward. Some impromptu invention saw me attach one end to the hosepipe mounting and the other to a bush on the drive the spray with WD40, several times. Still very stiff, then I found out maybe why.

The photos a bit blurry, but, the nylon sheath over the wire had split about halfway along its exposed  end near the handbrake pivot. A little heat from the heat gun cured this "snag" but it needed many more soaks and slides yet. I thought f**k it, leave it to soak vertically for a few days. I took off all the hardware off at the pivot end and noticed the spring had all but rusted away, another little purchase requied then, pfft !
It was actually hung up in the shed with a finger of a rubber glove over the top end full of oil.

So on to something else while waiting oil to seep, small packet to arrive and weather to settle. 

All of this occured over a period of about 12 days waiting for the wind and rain to stop. UK weather is difficult to predict and reports often change between bedtime and breakfast so its a frustrating lottery.

Whilst I had on another subsequent day time, inclination and sunshine I tackled the seat runners which were easy to find as they always fell on my head in the shed when I was rooting out long stored away parts.


They were tightly bound together with very old dry flakey masking tape. The bolts and washers had fallen off the tape and languished behind my MT bike a 1.5 mtr drawing board 3 rolls of carpet in black binliners and other assorted " sizeable" items. That hunt was for another day, on with the wire brushing. 

Since I had made a good job of the seats I debated how far I should go with the runners. After all they won't be seen.

However I found a can of  Halfords nice silver long abandoned due to the nozzle being blocked and long since lost. Found a new nozzle also. Decision made. Result below.


I even found the bolts and spacers pretty quickly too. Well six of the eight spacers, I'm using two nuts which have the same dimensions as the spacers...result.

I even managed to run a tap down the seat bolt holes. 1/4" unf I think,or maybe 5/16".

Another task completed last weekend was the fitting of the under carpet deadening. What a joyous task that was. So great to work with, soft, sticky, easy to cut and pliable.

 Lo


This was acheived at quite a speed as the weather was looking very dark and brooding. Managed it just before the rain and darkness set in. My only criticism is that the covering ( neoprene like rubber) is quite soft and easily damaged but the glue backing remains. Its going to be a swine if ever I have to remove it.

I bought another two metres of similar stuff but with foil backing to finish off the footwells and rear seat/ rear wheel arches. This has not been fitted yet but feels much stiffer and maybe not as sticky. We shall see.

Amidst all this on another sunny day I cleaned the fuel tank ( also done several years ago ) but this time removed the fuel float assy to see the rust inside the tank. I was dreading this as its been out and back on when i first got the car but i never looked inside.

Good gawd.................. it looks good and just about rust free. The float assy looked brand new too !

About time I had some good luck with the project. As well as the small blob of Araldite I applied all that time ago to a small rust hole was solid as a rock. Just light surface rust staining in a few areas and it looks good as new.


The Araldite can be seen just left of centre, gladly painted over with slightly thinned down Hammerite.

The tank fittings had long since dissapeared so I ordered a kit from MG hive together with other missing nuts, bolt and washers. They came the following day, but so did the rain ! As did four days up in the NE of England seeing daughter #1.

The fitting of the tank and attendant tubes, wires and screws is another story, of frustration and weather watching. More soon.

,


Sunday, October 23, 2022

Two steps forward one step sideways

 At least I'm heading in the right direction.

Fitted today ( after 3 days of absolutely pissing with rain ) the three fuse holders that wizzo auto elect Tony condemned. Took  2 weeks to get hold of them and used yet another supplier. MGOC had none in stock, Bhive didn't stock them and ANG/Mechspec neither. Only option was Moss ( they have the most info  on-line but are the most expensive) not to mention their tech set up for order processing , see last post !.  Trouble is I forgot to take a snap of them fitted, doh.

So on to fitting the interior sound deadening ( 6mm closed cell rubberised foam with adhesive side)

Gave the areas a good clean with white spirit and a light blow with heat gun whilst I cut out the shapes. See below for me trying to make the most of the 1 mtr x 3 mtr length. After all I am a Yorkshireman so I like getting my value for money.


One side had a newspaper template made comprising of floor, outer footwell, inner footwell, sill vertical, toeboard and transmission tunnel. The templates are simply turned over for the other side with only minor amendments for the drivers side inner due to the pedals. It took ages to maximise the 3 mts square mass with the templates but as it was getting late I was glad to finish, so in the shed it all went until a good day weatherwise.

Saturday dawned bright , sunny if a little bit breezy. I also felt a little better myself as since my Covid booster I felt rather tired and foggy. Onwards and upwards.

I really dreaded fitting the sticky sided closed cell rubber stuff. I was convinced It wouldn't stick or just unfurl half way through. No fears though, the stuff was a dream to fit. Test fitted before removing the backing, trimmed as necessary even with crap scissors.

According to the template planning I was toeboards and footwell outer shapes short ( both sides) so I did a very Fufferfour thing and ignored them all completely. Did the trans tunnel first, then floors, then  inner sides finally the sill verticals both sides. I used a couple of large offcuts to make the inner footwells in 2 pieces each and job done. Even had a couple of sizeable rectangles to do the door skin inner both sides. Well chuffed with the result.


Before


After


Next job is to refurb the handbrake mechanism as it looked a little manky ( rusty) as did the underside mechanism, spring and adjuster as well as the fuel lines looking flaky. Also to be done is the rear seat cover fitting and I've still not bled the brakes yet. Son No 1  ( I only have the one son, same as No 1 daughter, yes they are non identical twins) is 3 nil down in the favours stakes. Parenting means you are forever at the service of their needs. As he was ready to set a date for helping he had an urgent repair on his house that need my assistance. Hey ho.
Deffo next job is to protect the sound deadening as the rubber is rather delicate. I have tons of carpet in the shed left over from hallway refurb a couple of years ago. This will be used on the outer of the car under the new cover to give some air circulation. Also employed in the car over the polythene .


I had to add this photo from the dog sitting day for said son on what must have been the rainiest day of the year so far. It still makes me and wifey laugh at the sheer misery of us both out and about in that crap weather. Little boots enjoyed in not one bit, for hours.


I also purchased from Amazon a 6 layer winter cover which arrived nearr the end of todays efforts. Its massive, thick and silver. So gone is the Swedish thick timber polythene which has served its purpose well for about 8 years. It will be re purposed to protect the deadening whilst bleeding the brakes etc. 

More room in the shed too as an added bonus now the carpets gone. Sadly a load of  stacking crates being given away by out local bistro/ coffee shop has replaced them. But at least its organised storage yet to be utilised. I also took the opportunity whilst in the shed to review whats stored in there. F**k me , lots of MG bits. I did find things I knew I had, had lost and now found again. Like the seat runners. All taped up some 10 years ago. The writing on the masking tape had long since dissapeared and unfortunately so had the  8 spacers and nuts. They were found in a random ice cream tub in another  box. I think the writing on the crispy masking tape said " look in the ice cream tub" !.

More very soon..............depending on the weather of course.


Tuesday, October 18, 2022

One step forward three steps sideways.

 A few weeks back I fitted the new secondhand shorter springs and painted the suspensions in black hammerite ( at least the parts I could reach).

Whilst doing this I noticed a lack of castleated nut and split pin on the upper fulcrum LH side. A nylock nut was employed, this is an acceptable substitution according to MG OC. So I thought that whilst I was fitting the grease nipples and bleed nipples, I did an unusual thing. I looked in the Haynes manual for the torque setting for said bolt ( upper fulcrum ) 40 lb/ft.

No way could I get the nut to anything like this as there must have been only two threads engaging on the nyloc nut. 20 ft/lbs was the max I could manage without the nut spinning. Very risky indeed so used MG Hive for a new pair of bolts, castleated nut and split pin. The threads on the old one were badly cross threaded.

So easy to order, efficient staff and quick. Not so with most other vendors. And the part came in 2 days.

Some vendors are painfully slow, inputing details, doing the search even when you know the part number, checking address, da de da ditto. I'm whinging now because with my new found enthusiasm and funding I've tried most of them lately. The chap from Moss was very nice but painfully slow on a circa 1970's ZX spectrum computer, was confused because my name and postcode showed someone else !!!!!!!. In fairness it sounded like it was his first day. One of many to come it think with their computer set-up.

Back to the adventure. Fitted the bolts easy peasy. I expected trouble aligning the slots in the castleated nut with the hole in the bolt, but no, job done, torqued up to 40 ft/lb, more grease pumped into nips.

Cor what a faff fitting the lower grease nipple though. Its angled about30 degrees from the vertical and impossible to get a nut on due to the proximity of the brake dust shield. Managed it eventually with a bit of medeival sourcery and derring do attitude. I also found the location of the third nip whilst fitting the RH fulcrum bolt. On the RH side its at the front middle. On the LH side its at the back middle. Another task complete.

Next job up was seam sealing along the footwells and inner sills plus any other ( lots) of misc patch welds in the floor area.

No.

A step sideways. I'd read that if new doorskins are fitted ( mine has, several years ago) that seam sealer shoud be applied on the upturned inner edges. It took ages !

Couldn't find the caulk gun in the bowels of the shed, found one that didn't work then one that did.

Caulk all dried up in tube. Trip to Wickes to buy another tube. Got home the knocked white spirit over so back to Wickes again for another !

Did LH door on back and lower edges, front edge impossible without taking door off. No chance of that.

Cleaning the footwells was another matter. Tried Meths ( methyated spirit ) first. Rubbish, took ages to dry and didn't clean very well. Tried  "Gunk", I had high hope for this but same as meths, rubbish.

The problem appeared to be the original rubber sound deadening. Iv'e decided to leave it in situ, whats left of it , around 70 %. Its only been removed on the outer edges and footwell ends where I welded years ago. Fortunately I'd Red leaded soon afterwards. Cleaning just seemed to soften the edges of the rubberey stuff and make it snotty and smear. Lots of dust and crap was also ingrained into it as well. You could be sweeping the grime up till doomsday and it will still keep coming.

So I bought another tin of Hammerite from Halfords ( yet another trip out) but this time I'd read you could  thin Hammerite with white spirit, not the very expensive Hammerite thinners. I gave it a try. It worked. Still all the fluff and grime got into the seamsealing but by this point I didn't care.

Sat in the shed is 2 mtrs of sound deadening bought a few weeks ago after lots of soul searching and guilt at the amount I'm spending of late, not to mention the hours wifey don't see me as I'm a man obsessed.

My choice would have been Dynamat, or Noico or some other horrendously expensive stuff, but considering most of my original sound deadening is still there I bought sticky 8mm rubberised foam for £26.00.

Whilst waiting for the paint to dry in the LH footwell area I moved on the th RH cleaning. But first remove the handbrake lever. Two very tough Phillips screws, one other Impossible to move with ensuing gnarled slots.

This meant drilling out carefully with three drill sizes, then inspecting said lever and deciding it needs a clean-up and refurb..........another row on the to-do list.


A view halfway through the Hammeriting.

Almost finished


I decided to tidy up the wiring in the engine bay whilst waiting for the paint to dry. In real time I did this the previous day as I tend to have several thing ongoing at the same time. 


Before, as left by me and wonder auto electrician Tony, waiting for new In line fuses to be delivered.


After.
Took all day to do this, under the new fuse box, relays and ignition box. As usual I spent even more time wondering what the three stray wires are. I also hooked up the horns. Pfffft. One pair of purple wires gives a constant voltage thus loud horns, the other pair of purples does nothing.

More to follow later on in the week on other trials and tribulations.

Tuesday, October 11, 2022

Amazing progress at last

 The seats are done ,

I think they look rather good. Not perfect, but no wrinkles and fairly firm.

Let me pass on a helpful tip. I was going to buy new seat base foams but that would bo approx £55. I may still do yet but thats for much later on in its life. 

I used a wallpaper steamer on the old foams and poof  !!

They came up like they were inflated pretty much.  Bear in mind it won't make them firm again just back to its almost new size. Time will tell how long they keep their shape.

I couldn't resist starting her up after the electrician had finished but alas it was not to be. There was a constant leak from the gatorade bottle lash up tank and a big drizzle from the butterfly pivot hole.

So I decided to really splash out and buy a new sealing washers for the spindle at the grand sum of £1.25 each. Sorry to say that didn't work, it was still leaking this time much worse.

So I splashed out another £30 odd quid on a seal kit from Burlen fuel systems. 

Meanwhile removed the carbs to clean and fettle. What a struggle. He RH lower carb nut is really difficult to get at and it has to be unwound about 1/2" . The thread was very tight and it took a lot of effort, bent over the wing legs splayed. The other three were not as difficult but nevertheless a long back aching job.

There is a very good Youtube vid by a nice Irish chap named Endfloat who refurbs his HIF4 carbs so I followed this and it proved a great help. The RH needle spindle was stuck solid and float bowl full of a white chalky residue everywhere. So The cleaning was well justified as it would never have run properly anyway.

I'll not bore you with the details but several chemicals were used to get a cleanish looking finish. They all failed. I put four of the seals in the wrong way round then after fitting had to remove them again as the throttle spindle lever was the wrong way round.  Repeat for the choke lever assy, dohh !

One further tip I would reccomend is run a 5/16 unf die down the studs and re-tap the nuts too. This made the awkward nuts fairly spin on.


Looks much much better now and hopefully now no leaks as the gatorade bottle has had a smear of silicone sealant.

Also fitted a new front hose easy peasy. Fitted new fusebox and new starter relay. Bound the behind grille wiring after a bit of tidying up and now have only six stray wires to sort out for the horns, all Purple and purple/black but thats for later. 

Fitted new front brake bleed nipple and grease nipples because after a dog sitting favour for my son he promised to assist me at the weekend.

The lovely 6 month old Boots, an Italian greyhound ( a tiny whippet)

Just ordered a quantity of sound deadening so next up is a thorough cleaning of the inside, a little seam sealing then maybe test fit the seats.

Before all of the above happened though I fitted the dash and dash top and crash pad. This was by far the most knuckle grazing and frustrating job. It took all day and at one point was ready to walk away through frustration. Its in now though and looking good.


Just the heater controls to sort out and a few switches and it may be time to turn attentions to bodywork prep, bumbers/ brackets and front spoiler.

 More very soon folks.


Monday, October 03, 2022

Cover kerfuffles and carb conundrums

 The seat frames are all painted, webbing replaced and sat patiently in the shed whilst the wheels were finished. Now they are done I called the local upholsterer to see how he was doing with replacing both front seat deckchair orange/brown mess.

He was charging £200 for both covers with fluted seams. Fair price I though and was perfectly willing to pay except ; before I called him I was surfing good old ebay over breakfast. There I saw a set of fluted black vynyl covers, front and rear......£119.00 from Watford classics. 

Read some reviews which were mainly good with a few sniffy comments regarding made in China etc, blah blah. I'm not looking for a concourse show stopper, just some reasonably priced items. I called the upholsterer and told him to stop work on them. Nice chap but wasn't in, passed the bad news onto his wife who runs the biz whilst he's out delivering.  He'd had the new vynyl and old covers 4 weeks but fortunately not started them due to Illness etc. Collected them and the new vynyl an hour later and ordered the new covers from e-bay, around 11.30 am.

They arrived the next day after 3 pm. They  are fantastic. Well made, finished well with quality vynyl.

I couldn't wait to fit them. But first I had to fit the foams, add a little side foam and lumbar foam support as well as some 10mm thick very soft " wadding" which I cadged from the upholsterer when I first went to discuss my requirements. I had enough to completely cover both seats and backs.


Wadding applied


Foam side bolster additions


How to shape foam.

Yes an electric carving knife and the scary grinder with 80 grit flap wheel. The flap wheel worked great but made such a mess with fine particles of blue dust everywhere, and I mean everywhere. 

The first fitting of the backrest showed I'd been a little generous with the blue foam side bolsters and getting the cover all the way down was not possible. 

So thats when I had a brain wave ( yes another) I knew wifey had an electric carving machine. She's never used it as she has always been a vegetarian, I've used it once in 20 years, at christmas to slice a beef joint.

So I had no qualms in using it. Besides I needed to slice most of the bottom half of the blue side bolsters in a nice flat straight-ish line. It worked a treat. Nice even and tapered nicely at the bottom where the covers were at their tightest. Finished off with the scary grinder and on with the fitting. Once I'd got it on and looking nice I realised I needed  to remove it again to add the headrest hole and ferrule, damn.


Ferrule fitted. It was rescued from the old covers and was a swine to get them off and  bend back the
Tabs holding in place.
I made the hole in the cover top by using a soldering iron. That too did a good job. I was very nervous about getting the hole in the right place and making a mess of the whole cover alignment. Fortunately I could feel for the hole through the vynyl and used the deep slot in the seat frame to guide the soldering Iron


 This shows the blue foam prior to trimming.

Getting the covers streched and clipped in was a right faff. I did the logical thing and did the passenger seat base and back first. Lots of swearing, cursing the sky as it looked like it would rain at any moment, bruised and stabbed fingers. But got there eventually...........until I bolted back and base together.


Look closely at the very left or right flute alignment. The left outer flute seam base is about 1/2" to the right of the seat back seam. How annoying. Was it that the  covers were made incorrectly ? Was it the wrong foam ? Is it the correct back frame or base ?. It took some pondering to figure  it out eventually.


Sorry, final reveal soon and a carburretor story. Its been another long day, but this time gardening and tidying up for winter with wifey.


Sunday, October 02, 2022

Wisdom comes from having some money and enthusiasm.......usually

 Well, finally got the wheels coated in Nimbus grey ( 3 coats) and a couple of coats of clear lacquer before masking up for the black quadrants before I buggered off to Greece for a well deserved retirement present of 2 weeks at a 5 star. It was great, now its over and back to the grind. Well not really, since I don't have to go to work anymore.....yay.

First job was to take the wheels now well and truly cured after sitting the conservatory for  2 weeks for their new rubber. Before that though the black quadrants needed attending to.

Normal masking tape proved too wide to go around the tight corners, inside or out so a trip to the local craft store saw me buy a box of 3mm wide luminous craft tape. £3. Bargain.

Each wheel took around 50 minutes to mask, phew. x5 . 250 minutes just masking. By the end of it I was getting quite good. I did have to use the normal tape to and newspaper. A lot of masking. What I did was a sort of logical production line, masking one, masking the next one, back to first one for  light first coat, same for second one, mask third, coat first wheel fully, mask fourth.....ditto....ditto.

Twas a long job, 3 or 4 coats of Satin Black. I lost count near the end as I think some had four coats and some two, maybe. Anyways they looked great.

Except...........some corners had bled under the craft tape, pfffft. And one wheel had been missed altogether with its top insert horizontal craft tape......doh !!

Soon fixed a couple of days later with 400 grit sandpaper, more masking and delicate touch ups .


You might just see some of the bleed at around 1 o clock position, it happend on 4 of the 5 wheels, more or less similar. This shot was taken before the touch up, so Five rims are all looking perfect.

New boots fitted. Fat, hard, shiny and ROUND , for the first time in about 10 years.

Look.


You will note that the front end is a little high.This I knew would be the case since I fitted some new secondhand springs bought on e bay several years ago from a nice chap who lived about 5 mins away.

The springs were definitely shorter, but alas when fitted compressed a lot lot less, as in not at all,

so I left them for a few years so I could get on with other things.

Since I didn't want the brake calipers to disgrace the new wheels and tyres I decided to give the front corners a clean and paint. Removed the calipers to paint in nice Hammerite direct to rust Black.

It was then I noticed something quite startling and a little embarrassing

Amongst the various cast in markings on the caliper was a distinct "arrow".  Was this a direction indicator ?or just some random manufacturers mark. Then a thought dawned on me. When trying to bleed the brakes all four corners were difficult and I never quite managed it. 

I thought it was my " helpers" lack of perseverance, viz, wife and son got bored after 5 mins and buggered off. Also, and a very big also is that how the calipers were fitted meant the flexible hose was attached to the caliper at the bottom. When I purchased new flexible hoses from the MGOC and fitted them the hoze was bent at 90 degrees and definitely too short on full lock of the wheel.

So I spoke to MGOC and the bloke was adamant all MG's had the same hose length. 

They must be wrong !. Since the bloke was rather condescending at the time and my daughter confessed to buying me a gift voucher from them and at great difficulty as the " salesperson" on the phone was rather rude to her, I sent a snotty email to the chairman expressing my displeasure.

Never got a reply.

Now it dawned loud and clear. A confirmation from tinternet piccys of calipers showed  the flexible hose is at the top of the caliper. Many years ago when I re-furbed both sets of pistons and seals I fitted them wrong way round on opposite sides. Ooooooops. What a dick.

It gets worse. The pistons were a swine to push back into the calipers. 

Made worse by the fact my "4" G clamps were cheap pressed steel crap that always went sidways when being used. It was at this point, wrestling with many configurations of heath robinson attempts with the piston/ caliper that I broke one half of the workmate jaws. New workmate jaws !!!!

 The old ones only lasted 15 years, these lasted less than 6 months.

I managed to repair them with PVA glue and a section of  2" thick worktop screwed to the underside.

Back to the pistons. Since the crap clamps would not fit inside the caliper pad orifice I decided to slice the top off the G clamp so it would, inserted a socket into the  inside of the piston, clamp and push in. Done !

This time I fitted the calipers without the pads then fitted the pads. Three of the four pads went in easy peasy. The inner drivers side would not go in. The piston was about a millimeter too proud. I had the same problem  when I originally re-furbed the caliper so after some debating I removed the caliper and pushed the piston in more. But not enough though, it still was impossible to get the pad in.

Then a brainwave, loosen the caliper to gain a little more room between it and the disk. Job done.

Scary grinder with knotted wire wheel employed on disc ( new but lots of surface rust) outer hub and upper/arms and a coating of Hammerite.

The fitting of the new springs was an ordeal, at times it seemed impossible then bingo, in it went. Same for the other side. 

I spent a long long time filling the grease gun. How can such a simple tool be so confusing and very very messy. To cap it all no grease was going into the nipples on the suspension at all. Hey ho, new nipples needed then.

On a final note I the fitted the wheels............excitement !

The measurement before the new springs were fitted was floor to wheel arch inner was 26 ". Too high as can be seen from the picture above. After all that faffing of  calipers traumas, spring fitting, upside down calipers and broken workmate the new height was


24 7/8"        FFS.

But, and a big but. It now looks level and flatter so all is good. I'm sure it will settle more after a drive or to, to be slightly lower.

Much more to tell regarding the seats and engine bay and dash.

Here's a hint.