Monday, August 10, 2009

Homeward stretch

Well I've almost reached the point where all the bodywork is complete.
As we speak all that is left is :-

1/. Sand down filler in tailgate gutter and prime
2/. Tack weld boot/wheel-arch repairs to strengthen and add some seamsealer
3/. wire brush and paint ( Hammerite- Ku rust, its brill at killing rust) tailgate inner lower lip
4/. fill and sand hole in picture now rear screen is removed.
5/. Drill out snapped bolts in front upper valence mounting captive nuts.
6/. Maybe..............only maybe, re-position front indicator mounting holes in valence,
7/. Chop off old bumper chassis leg plates ( so a chrome bumper mount can be attached)

Not bad eh !! most of the above can be achieved in the next session. if the weather of our glorious summer holds out.
Spent the last two good days helping brother in law lay vast quantities of cement for his new patio. An we aint done yet.

Below are the photos mid repair of the top RH tailgate gutter.
LH side is fine RH side poor with BIG hole


So I set too thinking....................how the hell do I repair that !
I actually spent more time thinking why did it rust there and how ??
BL cars are really amazing, they rust in all the expected places usually, them that don't rust in all the weird places and not symmetrically.
Anyways, decided since this part is not seen i would weld some thin steel over and fill to a smooth finish.

Here are the tools of the trade for weird shapes.


Sorry for the "break" in the post..................Monday above ^ Wednesday below

Its very important to use only "Shredded wheat" cardboard , as this is never missed when you spirit away the box and leave behind the bag since no-one ever bothers eating the healthy stuff.
On a serious note though, label the template front face/rear as its easy to cut a Mirror Image of what you want.
One snag is I forgot to take a photo of the finished article, since its had its plates welded on, ground down, filled and sanded ( Twice)
I have also filled and sanded the tailgate outer edge and Ku-rusted and red leaded inside lower edge + covered in primer.
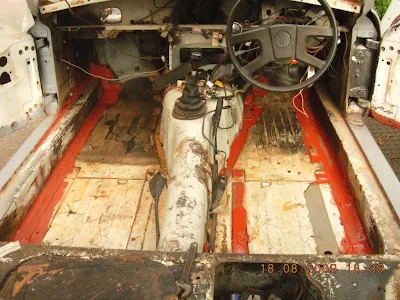
Below is foot-wells cleaned out, swept and Vac blown.
By Vac Blown I mean I used the trusty B&D leaf blower/sucker. God is it powerful.
Its like a hurricane and blows all debris into the stratosphere.


The dreaded rubbery compound sound deadening type stuff on the floor is horrible. Its about 1/4" thick and either comes up in chunks or like soft sticky toffee. So I'm leaving it in where its sound.Besides its too much time, bother and expense to remove. Trouble is what can I replace the removed bits with ? Anyone got a spare bitumen lorry load of it, warm and ready for pouring ? Red leaded the previous welds (Again) after another Ku-rust treatment.

Decided not to weld the rear boot corners/infills. I'm going to fill with copious amounts of seal sealer. I did also drill out the one seat runner bolt head that sheared on removal a few years ago. It took 3x 4mm drills ( Damn, just bought them too), angle grinder + 6mm drill + mole grips+350 squirts of WD40 in the end, but its out clean (ish). My tactic was to file the screw head flat (mistake) it was 5mm tall off the floor. I ground it down lower, flush to floor ( after drill break no 3) then started the hole with the last 3mm drill(till that broke) then all the way down with the 6mm. Underneath I ground 2 flats on the 8mm length poking out and gripped with moles and Presto ( all this took about 40 minutes and a bit of cursing)

So next is removing the Rubber bumper mounting plates at the front and those pesky captive nuts with half a bolt in them on the lower edge of the valence/body join.

I did also start up the car again, using a makeshift fuel directly into the carbs....WD40 !!!

GREAT<<<<<<<<<< IT SOUNDS LIKE A SOPWITH CAMEL BI-PLANE !!!!!!!

It turned over for a few seconds and the oil pressure is good.

I did video the occasion but Blogspot prevents me from uploading for some reason. Maybe next time then when I've worked out the fuel pump wiring and actually put real fuel in.

Sunday, August 02, 2009

What Colour ................tell me what you think

Well as the title says I've been giving this some thought, over the last 4 years actually.
The car was originally white ( Old English or Triumph White ) according to the log book and MG archives.
At some stage early on in its life it was given a very thorough respray to black. Even the engine bay ( Including wiring !!) rear tailgate inside and boot, door pillars /windows inside and bonnet underside.
Logic and common sense says make it back to original white. I think maybe so. Wifey saw a brand new re shelled Roadster at the MG hive last year in Old English White and loved it.
I'm not so sure as its a very yellowish white and it will really show up any panel gap errors.
I did see at the weekend a Fiat 500 in brilliant Blueish white. This looked really dazzling and I'm not sure if it was a White or very Pale brilliant light Blue, it still looked good though.
Below is a V8 example in Glacier white

.
I've decided that the car will be converted to chrome bumper and lowered back to standard or a little lower. However what type of grille ?. The above sports the later type ( 1970's).
There is a sixties style which I'm fancying as shown on the Bermuda Blue example car below.


This is how I envisage mine without the wire wheels and front over riders for a cleaner look.
I must admit the blaze red does look good though.

But having said that I do like the dark Midnight Blue below. Mine even has the large Chrome sill protectors and Rostyles too, plus it would hide any poor panel gaps.


Or could it be Black as it is/was now ? Shown is the older style grille and wire wheels.

I hate wire wheels, they always look dirty, must be a pain to clean and constantly need checking for loose spokes.


I suppose to keep the retro 60's look the colour should be pewter-ish ala 007's DB5 or even silver. But No, and here's why.
During my stint as a traffic surveyor recently and during the hours we got to sit down to count traffic i did my own car colour survey, By far the most common color was silver, or a variant of light blue/ green- silver, followed by Red then Black and Blue with Green last but fairly even with White. I did not count the weird colours like the Peugeot 80's Gold ingot type of aberration or the new Ford RS whatever with its bile/vomit green ( and JCB Yellow) aka 1970's glam or the boy racer pearlescent " I did this myself" paint jobs. I did see a rather attractive Brown on a Toyota Avensis ( oh.... how I miss mine) though and thought good, its nice to see one manufacturer breaking the mould a little. But not for my MG.
So What colour then...................It would be nice to hear your thoughts.


Tuesday, July 28, 2009

wheel clean

So another post, in fact two in a week. Must be a record.
Actually wifeys painting kitchen door and I've just cut the grass and done two sets of taxi -ing( Depositing kids where they want to go) so I had an hour or so pottering with the MG.

There were two reasons I tackled the spare wheel.

1/. Each time I venture into the shed at the bottom of the garden ( frequently) I see the forlorn spare wheel resting gently against the fence by the shed door. It sits there gathering leaves and fir debris as well as pine cones and general crud. Its still well inflated after years, and has been subject to a pretty poor refurb some time in its past.

2/. During said taxi-ing I deposited old newspapers in the town centre car park recycling bins. There opposite parked on the road was a lovely Red BGT with black roof, "T reg" and looking splendid with shiny Rostyle wheels.

So despite the plans I had originally made ( Fix hole in tailgate gutter & red lead floors) I set to with the wire brush in angle grinder.
Here are the before pictures.


Then some time later, after a visit to local motor factors ( I needed more primer and new goggles) a newish looking wheel was beginning to emerge.

Behold,


A little panic set in since no sooner had I finished the outside wheel to nice an almost chrome-ish finish the clouds came over very black and it started spitting with rain. So wifey was pressed into service shaking the can for the regulation 2 minutes ( She's excellent at making a noise) whilst I tidied the tools away and got the car cover/s back on loosely.
Only a few spots fell and I managed to get a good coverage of primer on as you can see.
Its by no means the finished article yet. I just wanted to see how far I could go without removing the tyre. In fact very far. The tyres whilst fully inflated and kept that way for the last three years, need replacing as the sidewalls are all cracked. I did manage to mangle the valve a little
with some not so subtle touches from the grinder/wire brush anyways.
The plan is when new boots all around are required for the m.o.t they will be removed then the wheels can be prepped and spray painted the correct silver and black with a clear lacquer for good measure. I'm not sure yet if i will attach some chrome surrounds for the wheels. I may have to depending how happy I am with my efforts at wheel re-finishing.
I also bought some correct type fuel hose and attached it to the pump & fuel tank unit.
Gosh wash it tough. Its very thick and the hole seemed very small compared to its wall thickness. Even after a good steep in boiling water ( whilst I cleaned kitchen floor, ahemmm
I spilt a whole cup onto the floor attempting to carry the hose in cup + my own coffee)
So. twenty minutes later the hose was on and I,m ready for fuel.
Not yet really, I need to weld the gutter patch directly above filler spout in boot.
But soon............................very soon !


Sunday, July 26, 2009

Admiralty, Enemy, Rival, Fallen & Angel..............

All follow or proceed ARCH(ES) .......................( OK the last one stretched it a bit )

Before we go further........I passed all my exams................Yippee !!

So Arches, or arch to be precise. I've finally finished the patchwork quilt of welding the lip of the arch inner - outer section. It was a swine. The main problem being the wheel hub right in the most awkward place imaginable. Your head needs to be there to see what you are doing and get out of the way of all the falling crud ( and grinding sparks and welding sparks). Its very difficult to get a head covered with welding mask in there and weld. It was managed albeit with some bird poo type welding in parts, lots and lots of stray sparks behind the mask ( it makes you leap around a bit) head wedged and stuck in position, mouths full of 32 year old crud and sparks falling onto your arms and chest. Yes they hurt too.

As proof see the photos below, labelled looking out from the ( left rear) arch.


Bear in mind the camera was easy to position as its small. My head+welding mask is not.
I,m rather proud of this and the composite layout ( done in paint) .
You will see in the centre the view of the tailgate section. Yes it still is a shed/tool storage space since I've long since run out of storage locations.
However, most of it will be spirited away somewhere whilst I work on the floors inside.
Bodywork wise its just about done. There is one 50p piece hole in the top RH corner of the tailgate gutter ??? and a pencil sized hole just under the rear screen rubber at the 5 o'clock position with a little more underlying rust ,so the rear windscreen is coming out soon. The rubber surround is awful anyway, very brittle and scabby. The chrome trim will be cut out, polished up and re-used.
Methinks that with a respray its imperative to have new front/rear rubbers ( fitted after respray, obviously)

AND, to continue the good news a small windfall from the tax man has allowed me some cash for the next stage. What shall be the next stage ?. I guess I must attach the fuel tank, fuel line and work on getting the engine turning over at least. This part worries me as I see it as a potentially frustrating part. Auto electrics, carb balancing, mixture adjustment all will play a part in the life of one happyish student Radiographer over summer.
Since the money is there and not needed for the above work I guess I may buy Poly bushes for the front suspension, and give each side a overhaul and refurb. I have a pair of lower springs bought on e-bay last year (£ 5/pair, if i remember correctly).

So, I must fit for now, the accelerator pedal and cable, but first wire brush the floors and red lead them.

Soon, with a little luck I may be able to drive it under its own power..............oh joy oh joy.

Bad news is wifeys on D.I.Y overdrive with the cash windfall. So far I've painted the bathroom ( twice) and toilet. She's offered to paint the kitchen. This is a sneaky feminine tactic. She's terrible at painting but denies it. However she knows I will offer to do it after making a bo****ks of her first attempt. In fact she visited B&Q.....!! EVERY DAY!! this week for one thing or another ( matchpots x 30,0000, bathmat, wallpaper [ not purchased, painted existing instead, twice] paving [n/p], look at bathroom suites, brushes.........I eventually refused to visit the last time, instead feigning a headache from all the paint fumes........two can play that game !!!!!!!