So, I'm resigned to getting a man in to sort the electrics, or the non starting at least.
Back on with other things, not neccasarily in the order I did them, but I'll try.
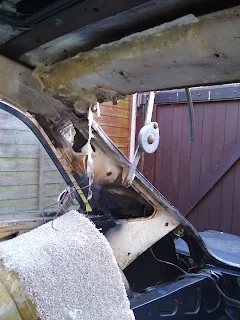
The rear cant rail and cover. Which I don't have !! Never had one, never seen, one can't afford a repro one (They are not very good anyway being a bit flimsy and cheap looking, supposedly) and second hand ones are extortionate.
So, having a naked rear cant rail I did some lateral thinking, in fact lots of weird and off centre thinking.
The result being I thought it would be a doddle to make a fibre glass mould "in-situ". So after watching a few boaty type vids on Youtube and already having most of the stuff off I went.
Its a pity the glass fibre didn't. Went off, that is. This is why !
First I covered the cant rail in cling film, not easy. Modern cling film is not like the old clingy stuff I remember. Anyways, the big tub of resin already mixed with glass fibre strands was a dogs dick to apply. It kept falling off, the cling film kept falling off and I kept falling off . Not good at all so I left it a day or too to go off only partially covered.
Crap.............. it was literally dropping off as I was shutting up shop ( I mean putting the covers over as I don't have a garage.........yet ! )
So on to plan B.
Use Aluminium baking foil !! Dead easy to apply and shape and glass fibre won't stick to Aluminium. Dead right, It didn't adhere at all. Even worse result than the clingfilm. What a mess !!
It was then I discovered my error/s
1/. Don't use resin containing pre mixed fibres
2/. When using resin, mix with a hardener/ catalyst first
So on to plan C
So what can that be ?
It took about 3 weeks to come up with the idea but.........................ping, a lightbulb moment !
Paper-mache !
I covered the cant rail in a light coating of vaseline, applied 1layer of newspaper strips approx 3" x 1" and applied with what I thought was PVA glue and left it about a week. It looked ok, but had a kind of wooly look with many strips not fully adhered to each other. So a trip to the craft shop for proper PVA glue which cost £2.99, and repeated the process with a ratio of 2:1 water and PVA, result ! Another 2 layers over the next few days with some stratecically placed magnets, clothes pegs and steel rule to keep it in place and bingo, a week later it had set hard and shapely.
It came off without too much faffing with only one area weak.
The plan next is to trim true to shape and fibre glass over this with proper resin and catalyst and real fibre glass matting. Sand, smooth and trial fit next. Thats not done yet though, I got sidetracked.


No comments:
Post a Comment