Monday, July 08, 2024

Weathered the storm but still tilting to port

 A strange title I hear you say.

Let me explain. The ground crew arrived early Monday morning after a frantic week of me and wifey preparing and moving "stuff", mainly the large Keeter storage box and other boxes, plus lumps of wood and pebbles and fences and plants and lots of plant pots full of wifeys pride and joy elsewhere to other patios.

A kind neighbour let me park the MG on his drive together with wifeys trusty Fiat panda. He has just restored his fifth ( yes fifth) MGA. It looks wonderful. Concours restoration far above what I could do. I must admit it inspired me to crack on......but wait there will be a big delay whilst the driveway and garage base is complete.

The MG did start on the second attempt, ran a little, well a lot lumpy. Move it did though and there it stayed for nearly two weeks. The old base looking like it has done for the last 20 odd years.


The new base, flat smooth, large, clean and welcoming. 


Sadly to say after standing for 10 days the MG would not move. It did start on the second attempt, ran lumpy for 5 minutes but stalled when I put it in reverse and by that time the battery was too low to initiate ignition. Big strapping son #1 to the rescue. 10 yard push off the drive slightly uphill, 20 yard easy push slightly down hill and onto new garage base. Result.Here it is in its new home.


And being actually worked on one fine day.


One Job I was keen to do was fit the newly acquired seat belts. But first I had to fit the rear wheel inner carpets. I deliberated over about say three lengthy sessions on the toilet and a few nights pondering before sleep as to fit the carpets, glued directly to the inner arch. Or fit the sound deadening that's been in the shed for about 2 years.

Unwisely I decided on the latter. It's quite stiff and not very sticky compared the the rest of the earlier deadening, which was a dream to fit, soft, sticky and extremely pliable. But sadly it was all gone so I used the stiffer silver backed stuff. I had to use some wide masking tape to hold it in place and even then it's not exactly stuck down. I may revert to using the old evo stick contact adhesive as I'm sure I 'll have to use it on the carpet anyway.

I test fitted the sort of moulded arch carpets anyway, did a little trimming and am a little unsure so I did what I normally do, go do something totally unrelated and ran the engine after having the battery on charge for a few hours. 

Again it started at the second attempt, ran quite better with the choke on at about 1000 rpm.

'

'Twas then I noticed a slight trace of steam/mist/smoke emanating from side/ front bonnet gap.

A very quick Ignition off move followed by popping the bonnet led to dismay.

Brown boiling water was spraying from the overflow vent straight back towards the scuttle and everything in between.

Moreover, there was a long stream of brownish water flowing out from underneath towards the front of the car. 


All over my new garage base. If wifey saw it she would go apeshit full tilt again. Good job she was not at home. A quick sweep up and hose away and all evidence gone......it never happened, did it ?

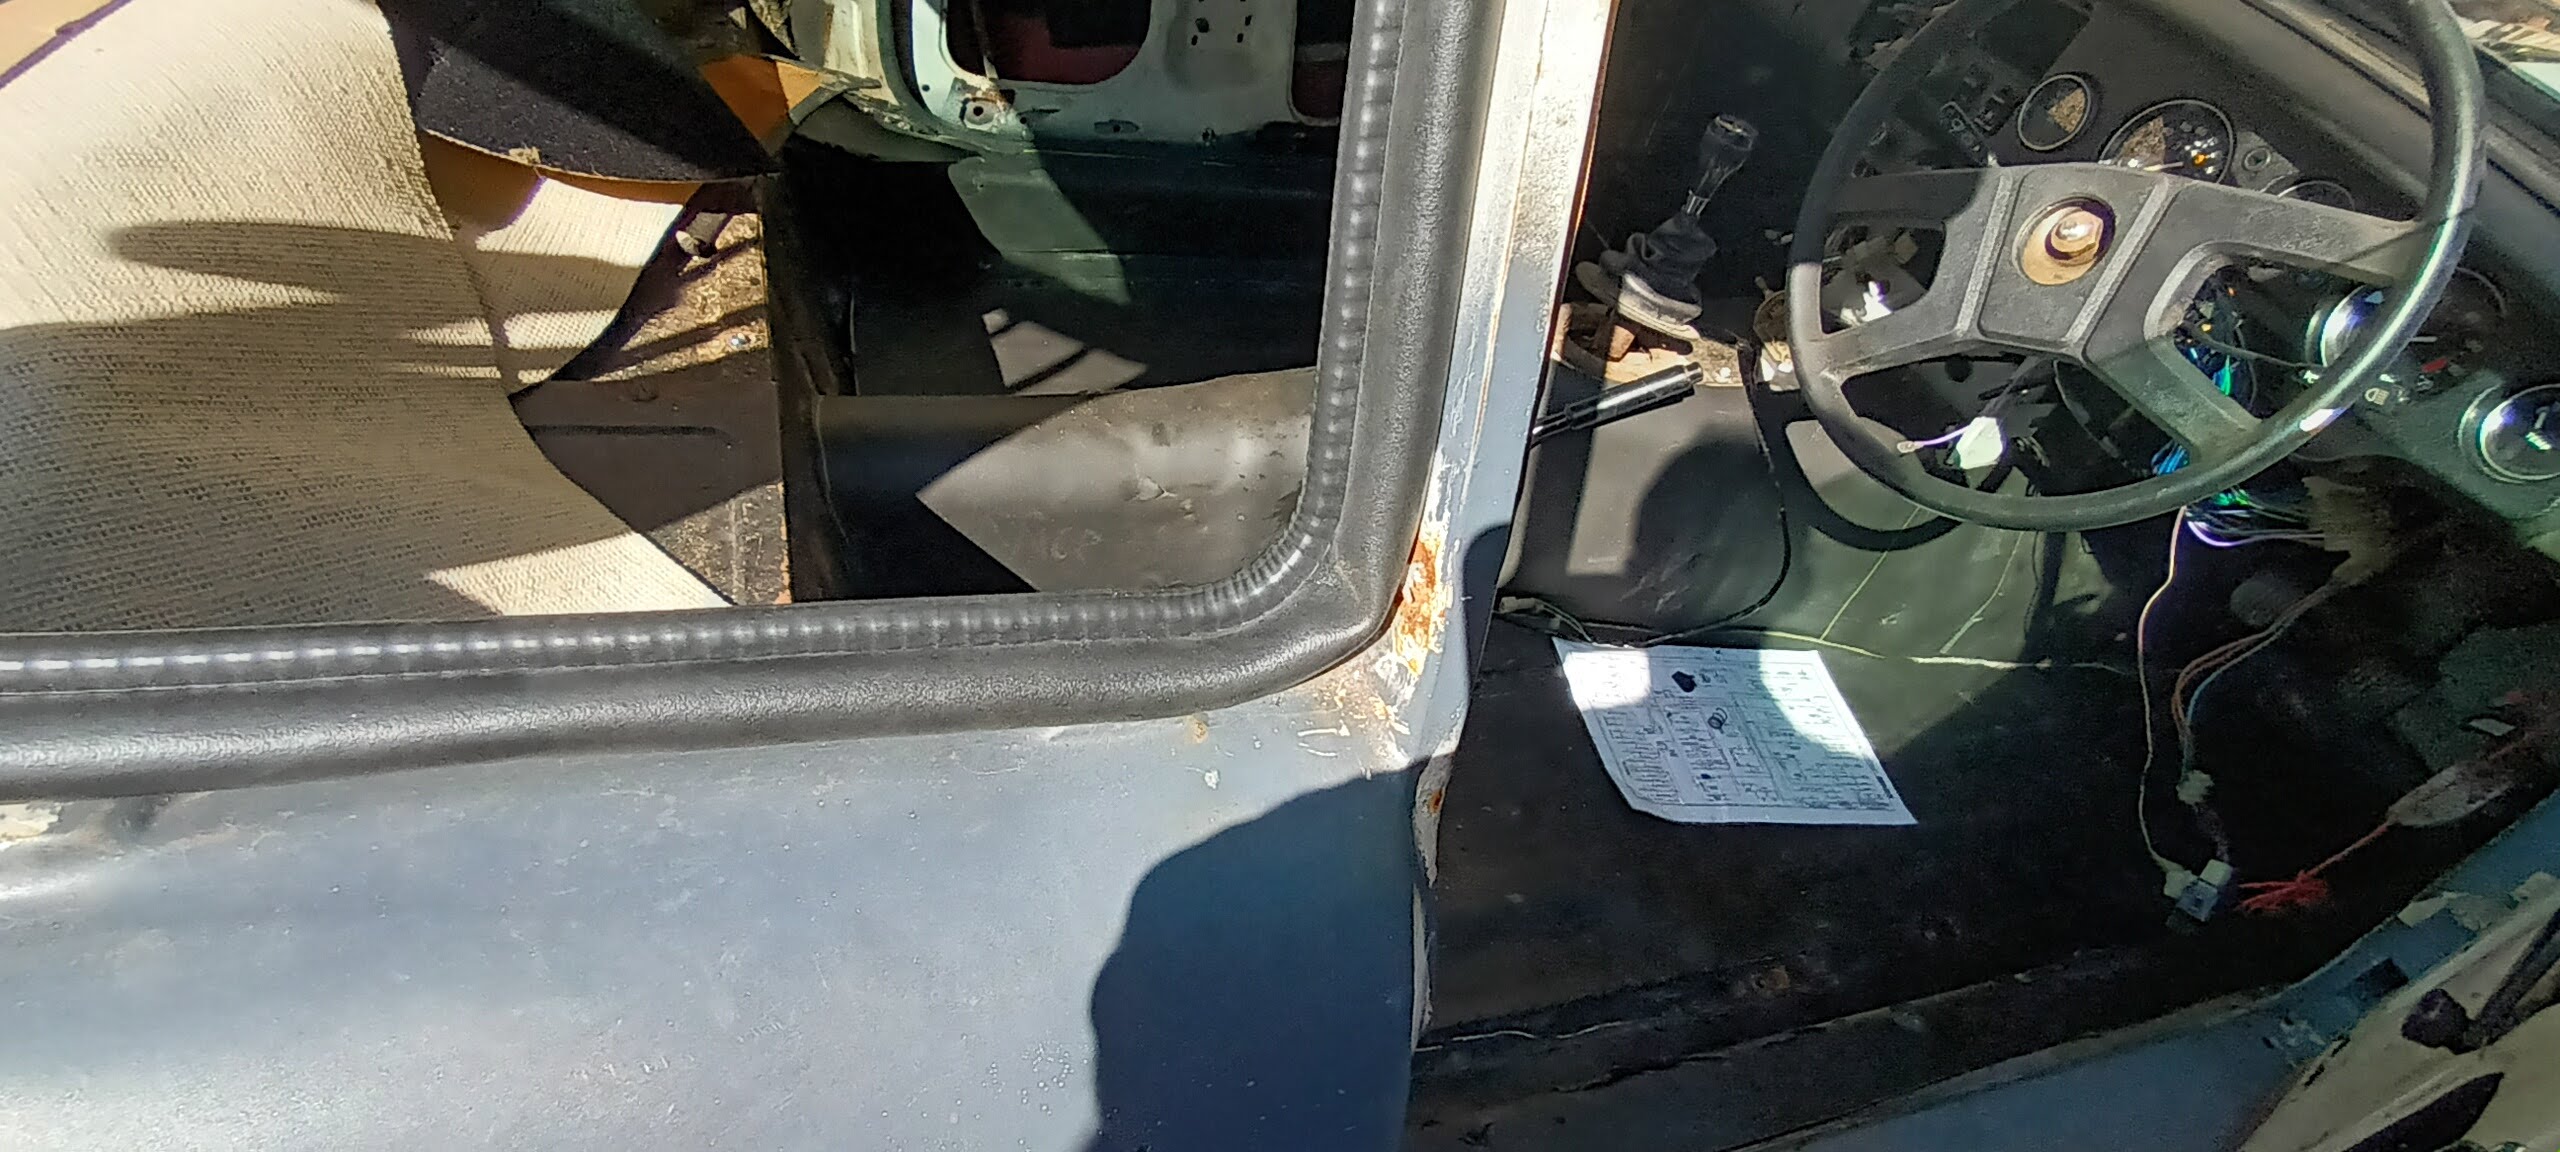
Investigating as to why it happened was more straightforward.


Top left-ish of picture shows broken thermostat temp sensor spade clip adrift from wire. For some reason I'd had it zip tied to the rather hefty engine earth strap which must have been tugging it loose. Prior to this the fan had always worked when the engine got hot. Not this time though.

One other slight annoyance was the wiper arms running slowly and even stopping. This may be to a weak battery, hopefully. If not it looks like a dash out jobby, oh no, just as I was starting to get it all together. I think I'll ignore that for now.......or run away.

Anyway I can still fit the carpets and another job halfway through are the interior rear trim panels.

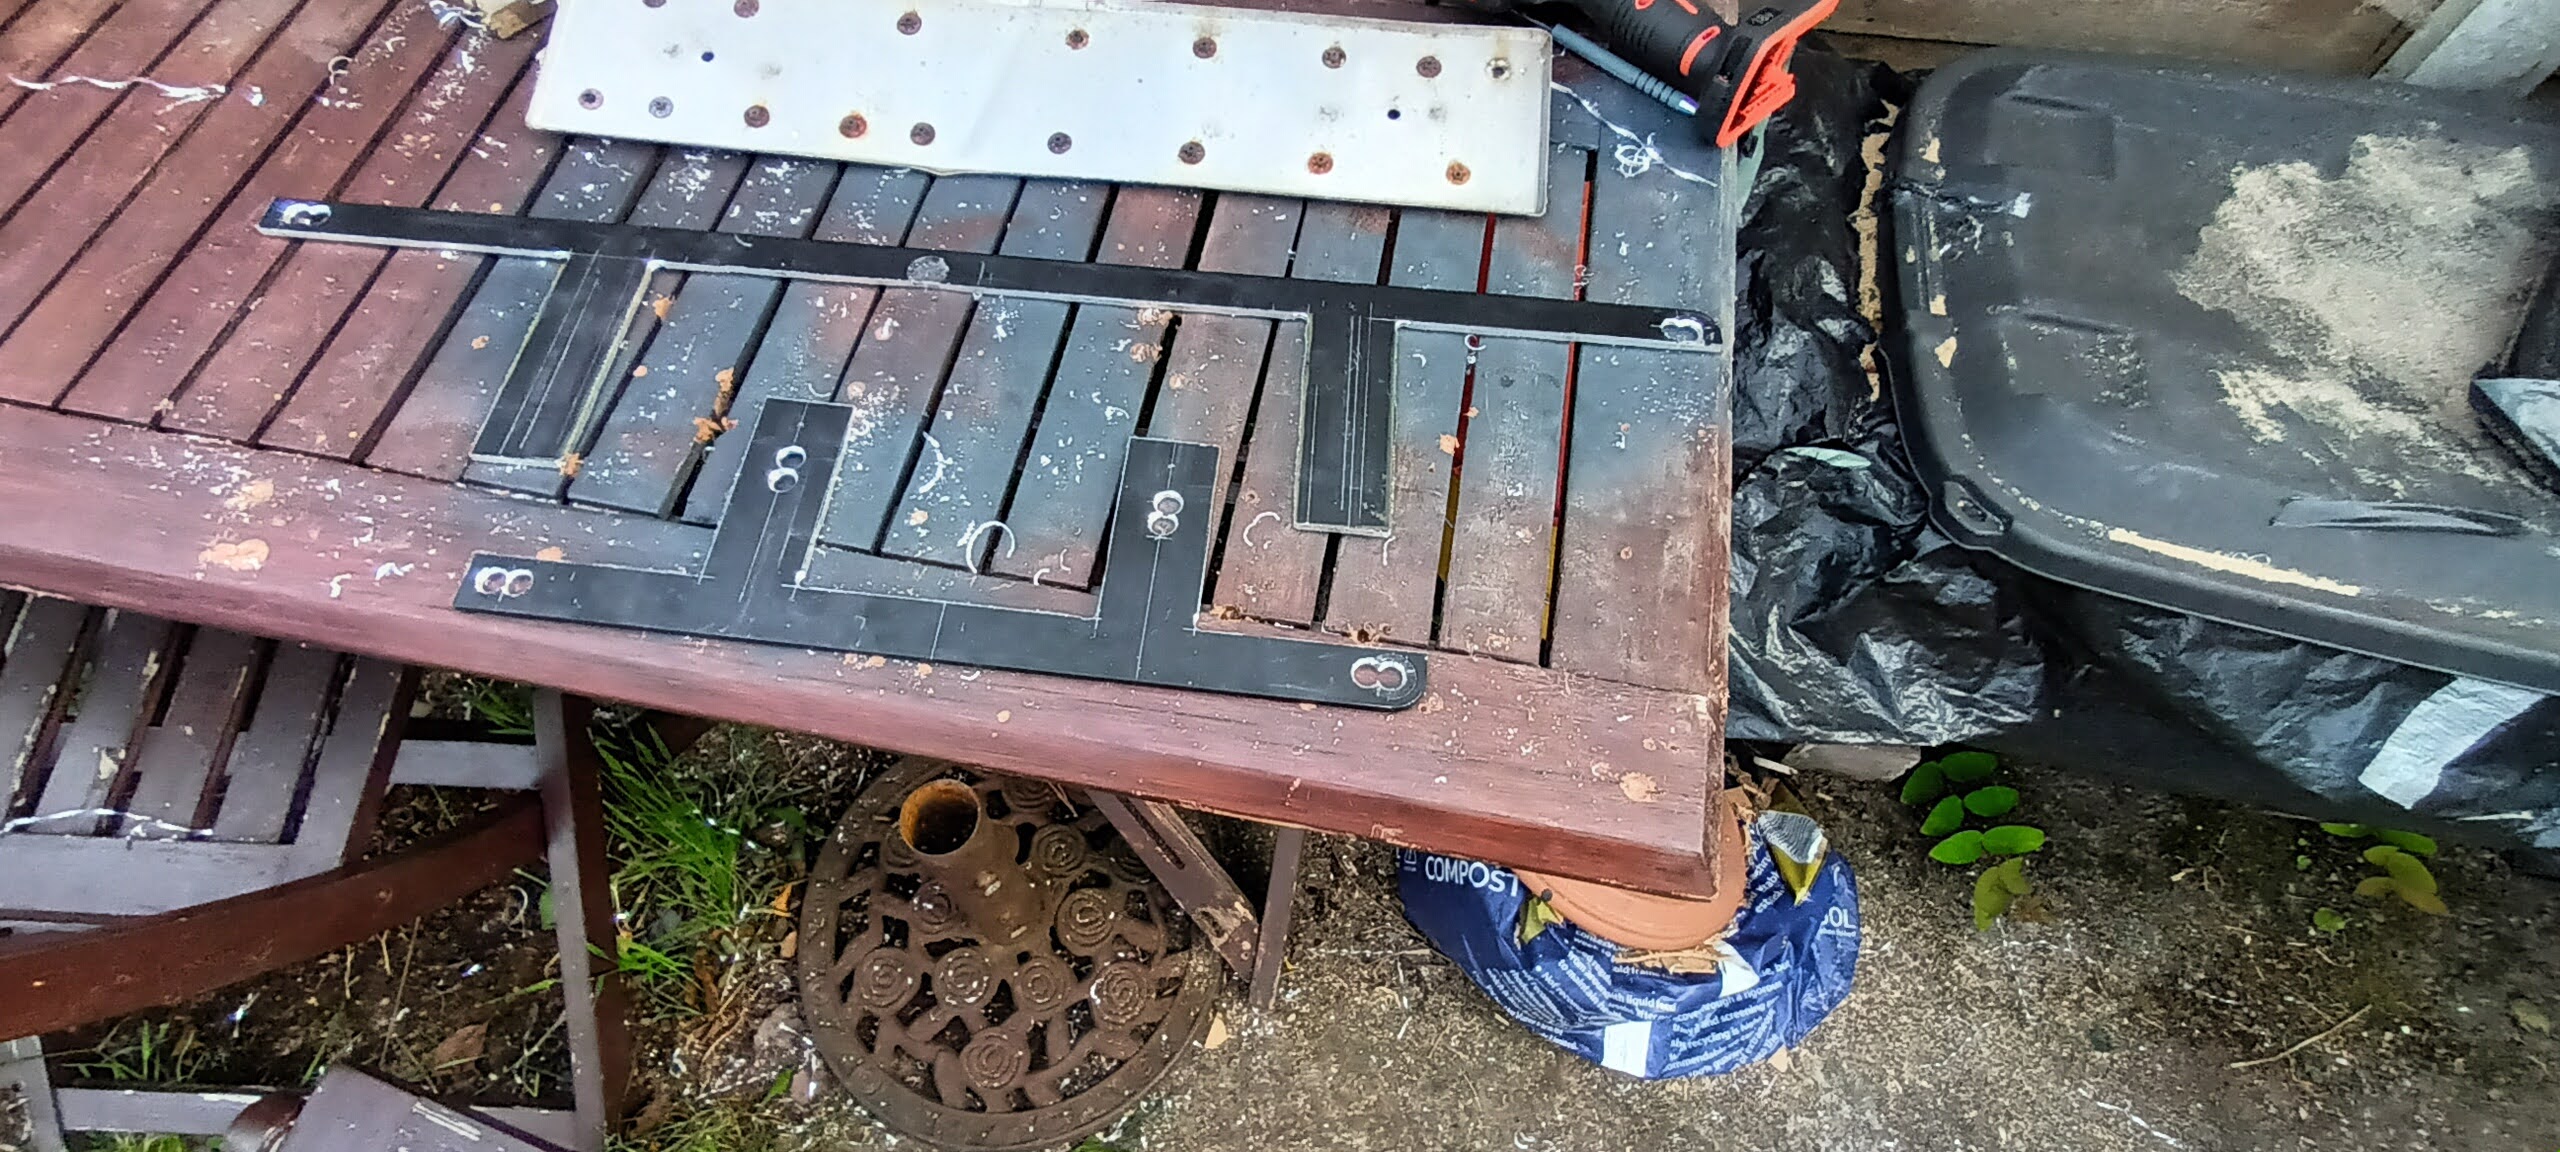
I made a replacement Left side one using the old masking tape template trick.


I have the closed cell foam sheets and plenty of Interior vinyl to complete this final stage of the interior, barring aforementioned wiper issue. I forgot to mention that I fitted the rear Cant rail. After trying for 2 hours to get the fiddly clips aligned, bending them and getting thoroughly pissed off I used three black self tapping screws. I don't care, it looks good and can easily be removed. I forgot to photograph it though !

Next up I"ll address the engine running issue by fitting the air intakes, filters and other related gubbins.

That's enough for now folks. Rain on the way so I may have a few enforced easy days. Front of house driveway looks good though.

From this 


To this in only 10 days


More soon folks. Post a comment too, please.

Tuesday, June 18, 2024

The pressures on full tilt

 So a side project has always been to have the front and side driveway re-tarmac'd as well as making the front of the drive wider and a large flat garage base to the rear of the house. Since day one the MG has sat halfway down the drive behind the large driveway gates.

Well after 30 odd years the time has come, and boy has it. The lovely contractor paid us a visit to finalise details then came the bombshell, I can start it next week !!!   it'll take just short of a week.......nearest other start date is late August.   

I bit the bullet and said " next week please". This sent wifey into a flat spin of panic mode full Tilt.

Plants to uproot, stumps to level, boxes to move, storage Keeter to empty and move, find new temporary places for some plants, order new fencing and paint, repair current fencing on driveway.

''Twas only hard labour for me but for wifey It meant making decisions, something she avoids at all costs.

Whilst I got on with the labour part of moving stuff off the drive and front, about 8 pots and 4 storage boxes ( full of all my tools and misc MG stuff ) she stood in the front garden wondering and prevaricating.

I did dig out 2 large plants then left her to her wondering.

The big thing for me was I had to get the MG looking like it was somewhat finished and would start, stop and be mostly legal and be moved each day off the driveway and onto the road.

Here is a view of my containers that's been my life for years and years.


Below is the very old garage base area that was going to be done " soon", 30 odd years ago.


Taking things in order I first had to mount front and rear number plates. I started the front last month before we decided on a contractor, but I left them loosely attached and poorly aligned. I left them like that. I needed to make a bracket to attach behind the bumper but in front of the " L" mounting brackets.

I decided to make one from the rear bumper too. The trial one I made a few weeks ago from a Fiat Panda sill section was too weak and flimsy.

I did find a large sheet of powder coated Aluminium 3mm thick left over from the new TV purchase so I utilised it, waste not want not, up cycling and all that.


Here it is marked out.


And finally cut out with trusty jigsaw using only one blade. I took ages though.

And here are the mounted plates. Again not  perfect, loosely held in position with bolts and nuts, and some ahhhem ( double sided carpet tape ) but workable.


Still got lots to tell as this was only a few days ago and only the first day of full tilt up to teatime.

So, more tomorrow...if I have the energy ,


Sunday, June 02, 2024

Too much to do.....so little time to do it.

 So I finally ordered the handbrake cable, along with another £ 80 of misc parts . Boy do the small items add up to a lot. Rear side window seals, chrome bumper bolts, door handle screw anchors etc.

The window seals were a bit of a puzzle. If you recall the shape of the outline is roughly triangular at the rear end and rectangular at the front. But the seal had only one area where the seal is/has a 90 degree mitred  corner. This meant that the seal ( luckily about 9" longer than needed) needed to be cut and joined right in the middle of the lower edge !!


Why not make the left part longer and the right side shorter so the bottom can have a nice 90 degree mitre, instead of a fiddly mid section join. Ppppffftt. 
Rant over. Also fitted vinyl to inside of window rims.


Squint hard and you can see.

Also fitted brand new wipers. Lovely. They work. The washer works. Getting there slowly.


So finally bit the bullet and fitted the handbrake cable. I must admit I struggled somewhat. I could not get the car very high up to get comfortably under the very centre. Struggle I did, that's after removing the battery clamps, battery and insulating boards as well as the P clip Phillips head screw therein hiding making mental note to fit P clip onto new cable. Twas too tricky to photo but I did my best.


Why I was dreading this is it meant having to repair the very small bracket below the handbrake lever mechanism that holds a 6mm diameter limit switch that switches off the "Handbrake on" warning light. It snapped right through the middle of the hole ages ago. Fortunately I had kept and located said part amongst this lot.


The welding of it meant a little tidy up In the shed in order to extract the mig welder. It took all afternoon. No, I don't mean the welding, just the tidying up of the shed. I did manage to find a few long lost parts that had been sought for for many years, so I stored them carefully to be lost all over again especially when they are wanted, rinse repeat for most of the " little jobs".

I did feel much better after the tidy up and the following day set to welding. I ended up making a new bracket since when using the scary grinder to clean up the tiny edges of the tiny "saved" part, it flew off at great speed into the undergrowth. Hey ho.

Cable and lever fitted, battery back in place, adjustment made and it works. 

Another step forward.

Amongst my many birthday treats was a a tool from Teemu, a rechargeable 3/8" drive ratchet. I'm quite sceptical with Teemu stuff, screws, plastics and low value stuff is very good, but manufactured tools not so. Same with the ratchet. It worked great for about 30 minutes, then sporadically for another hour.

That really pissed me off, as it's not possible to have them sent back for repair, just a refund after returning. So I dismantled it and found a wire from the batteries had come unsoldered. Re soldered it and back in business. No no no.

Same happened again. Worked sporadically, tapped it a few times and worked, sort of.

Repeated above repair but this time with much more solder. Hopefully now cured. You should not have to faff with something that cost upwards of £32 FFS !


Not resolved the front bumper alignment, so I moved onto the rear end whilst it was slightly elevated.

I've decided to locate the number plate under the chrome bumper. This means using the chrome bumper conversion brackets with a home made brackets and another home made bracket too.

The four holes in the rear needed filling but wisely decided not to weld in fresh steel. I filled them instead with aluminium mesh and glass fibre filler on the inside and good old filler on the outside.


Inside


Outside


Sanded


The whole rear valance looked a bit tawdry and a few shady rust patches were beginning to show so I set too sanding down the lower quarter, treating iffy areas with Ku-rust and giving it a good covering with some proper primer, not the crappy £1 a tin Poundland special, look 


I forgot to photo the finished article but it made it look a whole lot better. Then on to the chrome bumper and brackets.


Brackets to mount to the brackets. Home made found design on BBS MG website forum.


First fitting of the bumpers. Need to reposition a hole in the bracket bracket about 10mm up but fits much better than the front one and easier to reposition.
I'm dreading drilling an extra hole in them as they appear to be some chromed metal and are a swine to drill through.
more soon peeps


Tuesday, April 30, 2024

Back to winter and wondering

 So I've received the seat belts, carpets and misc other bits and bobs. Sadly I have spent a few weeks just staring at them as it was too cold, wet, and windy to make a start.

I did do a bit of browsing regarding the colour though. I'm undecided on which shade of green 

.

The garden pea green is more traditional, but a little boring. Still, it looks very much like I want mine to look, especially with the recessed grille and without the overriders.


Below is a more modern take on the Ford Mustang Highland green metallic ala Steve McQueens Bullit car. I think I'm favouring this colour though.


Or even this.

One point of note is the seatbelts. Mine has a sensor on the receiver end which turns off the seatbelt warning light when inserted with ignition on. The new ones don't. I knew this when I ordered them but thought....... " I bet I can modify them to work".....guess what, I was can't. They a quite a different design. I could use the original stalk and base but that wouldn't look right and I can't be bothered. I still have to weld the handbrake sensor mount, but that's after fitting the new handbrake cable.Which incidentally I forgot to order when ordering about seventyfive quidsworth of stuff !!!

So the warning light for the belts will have its bulb removed as per the advice from the MGOC.

 " They all do that Sir ". Guffaw.

The carpets look great though. Great quality and very well finished and excellent quality for only £140. I probably pondered the carpets more than anything, what with the vast price range, quality range, descriptions and postage charges from all online vendors. They did dwell in the conservatory for a few days together with the rear seats now recovered. Wifey got a bit fed up of having them take up so much room so made me move them. I loosely positioned them in the car and even literally thrown in makes a great difference to how the car looks now. Sadly I forgot to photograph them as I was in a rush to tidy up then had to mow the lawn as promised to wifey.


About ten days ago we had a rare sunny afternoon so I fitted the seat covers then set about trying to fit the front bumper. The bumper Irons are held in position with a large steel block inside the  frame rail via two M8 bolts and washers. Since I drilled the holes many moons ago there is not much room for adjustment and, this was a big and, the irons are at slightly different angles so this made getting the alignment even more difficult. I managed to get the irons more even but still struggled to get them centralised and looking concentric to the front lower apron rim, where the valance attaches. 

I spent about three hours faffing and swearing, still not perfect, so I left them as it was getting cold and dark. They are held roughly in position with two mole grips and that's how they will stay till I get all/ most of the other stuff fitted.

Middle


Right


Left


Today saw me busy all day. Fitted the new vaccuum hose, brake booster to manifold.

Hunted for in shed and found - bonnet mechanisms, all nicely painted Matt Black some time ago. The large spring loaded latch operated by a Bowden cable from inside had the  three bolts attached. 

Sadly the bonnet mounted ones did not. Neither could I find matching bolts, nuts and washers for the Bowden cable routing down the wing and front slam panel. I must have spent hours  walking up and down to the shed and back trying to find anything that would suffice but no joy, well a little joy, I found one set sort of, enough for the latch to work after some judicious lubrication. Aligning up the latch mechanism was a different matter altogether. 

What a major Faffffff !!!!!!!

I lined it up very centrally, tightened the three bolts and gingerly pushed down the bonnet.

I heard a nice thunk/click of the spring pushing the cone under the latch, the bonnet aligned perfectly, then came the crunch moment ..............would it unlatch when pulling the handle from inside the car !!!


No it would not !

That's where the major faff started. The only way to get the cone back past the sliding latch was to undo the three bolts. They were under the bonnet on the slam panel. The bonnet would only lift about one inch allowing awkward access to the bolts, about three inches into the slam panel. 

It took about 75 minutes to get the three bolts out......phewww.

I had another go, guess what, I got exactly the same result. @*&#"8%+.u*=/,0@!!

''Twas then I noticed something big, black and cone shaped in the box of painted hinge parts. 

I'd forgot the top guide thing !!!!. Just as a precaution though I ran a 1/4 unf tap down the slam panel captive bolts, lined up again and tentatively tried again knowing full well if it didn't work I was off down the shop for a big bottle of whisky.

It did though with great relief.    Look 


I still couldn't find a nut for the bonnet stay bracket which is in turn mounted to a wing attachment bolt so I bit the bullet, went online and ordered 35 quids worth of nuts bolts and washers UNF type. This will speed up the restoration greatly and save the 75 trips too and fro to the shed every time I embark on each little 10 minute job.

I'm still fretting over the passenger door gap and the fact the car now won't start. As I was packing up for the day I suddenly realised why it won't start...........,,,,there is no fuel in the tank!!!!!!!

That's enough for now, next up is making new internal panels to replace the shoddy and worn ones and then fit the carpet. Oh, and order a handbrake cable.


Tuesday, March 26, 2024

Springtime means MG time, bout time

 Is it just me or has winter lasted forever. The new garage has not yet materialised, but soon. The double tarpaulin has lasted well and had to be adjusted only three times so far due to very strong winds.


So where are we and what shall I be getting up to.

A re-cap.......the Webasto is finished on the outside and fits well, looks good and black and can be easily removed if required. This was due in part to something rather unusual, forethought !

I cut four square flaps in the rear black felt headlining to match up with the four bolts holding the Webasto rear rail. These can easily be re-stuck back down with double sided tape and are invisible, result.

Still not bought the new handbrake cable, carpets or seatbelts. But I will real soon after the Easter break which we are spending "up north" with recently married daughter. In fact I'll order them tomorrow so they are here for when I return.

Next up will be either driving or having transported the car a couple of miles to the local MG specialist to get the engine running smoothly. I've lost all patience with it. Distributor issues, fixed, issues again, timed, issues again, re-timed, firing order change due to pinion upside down? Vacuum leak, carb issues, balancing..............it was all too much so since I have the money, why not.

I have done a lot of staring and thinking over the door gaps and misalignment/ warp. Still not sure of the cure, so I"ll ask the specialist his take on it.


I have made the definite decision that I"ll be using it this summer come hell or high water, providing it passes a MOT, or somewhere near.

I'm looking forward to fitting the carpet and seatbelts as well as the rear seat, door trims and cards and the myriad of other bits cluttering up the shed. So in essence it's not going to be a show queen, just a driveable classic car to be worked on whenever.

Summers not quite here yet so no recent photos and I still have no idea as to the final colour but am starting to favour dark metallic racing green. Not the colour I sprayed the spoiler though, viz


A little less purpleish and more greenish, almost similar to a Ford mustang Highland green.... I think ,

The heater matrix needs to be replaced as it leaks, I'm dreading this as the internal hoses are a nightmare to reposition internally.

So, the car does run, but a little roughly and only with some  choke. Need to buy many chrome bolts to fit the front bumper, number plate/lights and rear bumper, reverse light, check overdrive/ switch. Fit rear seat covers, seatbelts AND.........rear can't rail. Yes I got the Holy Grail of parts on EBay for £30, complete with fitting clips !!It's a bit grubby colour wise but it's going to be sprayed Matt black anyway. 

So I promise to keep you all posted with the order of things, results and photos over the coming 
  

A belated recent treat for retirement from wifey. A few laps at Mallory Park in three Aston Martins. Without doubt the best was the Vantage. This is not the original DB 5 but a modernised copy, still very good though.