Monday, May 29, 2006

As you can see I've been at it again.
The car that is. Although I've done lots otherwise but boring mostly.
Since a lovely bank holiday approached I hatched plans to remove the LH sill on the car.
Well "remove" is a fairly permanent word so I approached the job with some caution.
Its well said about MG sills that they are not a job for the beginner, need good welding skills and if done badly you may as well chuck the car away.
That's apart from the fact that the car can "sag" drastically in the middle if not supported correctly.
..........................Well just like me then !!!!!
( shot showing exuberance of grinding tool)
Left to my own devices I ground away the inner upper lip of the sill and peeled down the cover sill just like Mr Lindsay Porter says. So far so good.
I should have used a "Spot weld Drill" but I thought they were expensive last time I looked so I used the dreaded Grinder. I must admit this tool frightens the hell out of me.
Sure it looks cool to be grinding away with sparks flying everywhere, but one slip and that's a hand severed, a carotid vein obliterated or a facial scar the size of the cheddar gorge.
The inner sill was just about there through a thin veil of rust.
For those of you who don't know the sills are structurally important on an MG.
There are 3 main sills.
A flimsy outer sill between the door posts. Easily removed with trusty grinder.
A full length vertical sill underneath this which extends under & behind front and rear wings and acts as a Stiffener for:-
The castle rail. This is also full length and is on the underside of the sill assembly and also attached to the inside front wing rear arch and back wing arch front.
All three make up a strong box section each side of the car.
My problem is this

Sunday, May 14, 2006

No you can't

Money troubles..........pah............Depressing,morbid,tense,lifeless and monotonous.
Yes we have big money troubles but for once I don't give a toss and feel none of the above.
The troubles started when a sudden realization that our annual holiday had to be paid for in six week time. The holiday fund was -£50.
So wifey and I decide on major plan of cutbacks and 3 month plan of action. Her idea is restricting my wine and beer intake which she claims will pay for two holidays.
Slight exaggeration there since her chocolate and biscuit intake would feed a small country.
Anyways, its been tough, and still is, but we are coping..........Just.
The kids don't seem to understand " we ain't got any money to give you". They think all things come from an endless money pit. It's not until you start to count up every penny that you realize how much goes on "incidentals" & minor things.
Decided to strip an old door of the MG and take it to the restoration class for "work". It took most of Fri evening to remove the glass, winder mechanism, hinges and quarter light frames. Still, I can get there early Sat morning with a definite plan.
The hinge plates look a little worse for wear and have been " modified" at some stage. How much will have to wait till Sat morning vehicle restoration class.
Saturday dawns bright and very very wet. In fact an absolute downpour.
Me off early with my old toetectors and new secondhand lime green and blue overall.
Shaun the resto teach looks at the door and says " we have just perfect equipment for that job" great methinks. He says " look through the rain outside to the big yellow thing "
yes I say then what. " Throw the bloody thing in it, its a skip" ( dumpster to our colonial cousins).
Ten minutes later Shaun and I had decided on how to tackle the door.
I will add I got lots of sympathetic looks from everyone. I didn't have the heart to tell them its a scrap door and will only be used for practice. In fact I think I forgot to mention this to Shaun.
Here is the door after a couple of hours work.


On top of the door is the "new" panel I made from sheet steel .
It involved "nibbling, bending, punching and joggling " It makes me feel good to just say those let alone do them. You can see where its going to fit. The bottom RH corner has at some time had a new panel welded directly on top of the rusty stuff. Its making it tricky to get the steel to align well. I wondered why there was a hole missing when i was taking all the glass mechanisms apart. The exposed nut was completely covered by the part of the panel I had ground away.
Looks like it combines all the problems and bodges I,m likely to come up against on the proper stuff ( Mine ) Still I looking forward to the practice.
Just to keep you interested here's a shot of the MG in its normal state.


Maybe next week we may have more wit and wisdom, if I can weather the financial storm.

Wednesday, May 03, 2006

What's next then ??

The DIY is almost complete.
Only the wallpapering to do, 2nd coat of paint on woodwork and tile bath panel.
All in reverse order of course.
At least wifey is willing to help.......or hinder.
Trouble is she thinks she can paint. I have to sneakily follow her two days later and rub down all the runs and ensure I do the final coat.
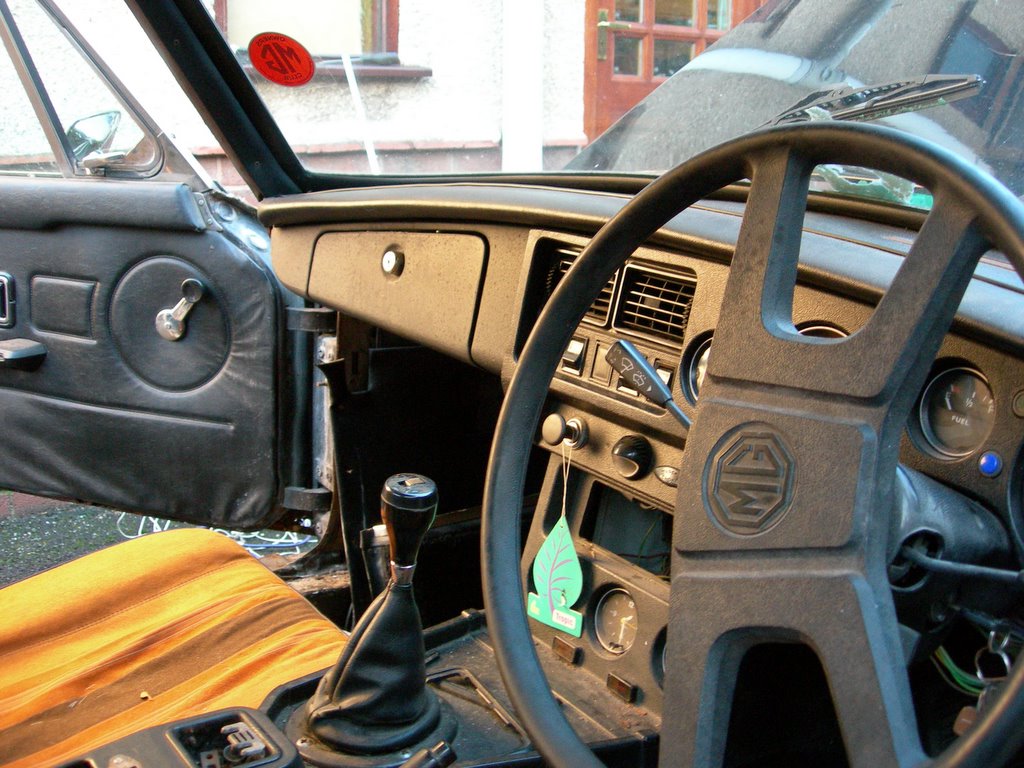
Thank heavens she has no interest in the MG restoration.
Youngest daughter No 1 did help last week wire brushing the right front wing area of accumulated crud. I promised her first ride. She knows she will be at least 25 before its finished.
I had another fruitful session last weekend.
Removed some rear window trim. Examined more rust around said area.
Stored both front wings. fuel tank and both bumpers down by garden shed covered by an old woven polythene garden sack ( erratum.... new garden sack 3 years old, it split when i tried to drag the kids round the garden in it)
As I write this I can see in the distance the shed and my precious parts. The bumpers ( rubber... sorry ....Polyurethane ) are stored up against the wall covered by the old rubber floor mats and an old dustbin lid.
How I love summer.......the lawn is green, buds are sprout'n, birds are sing'n and sh***ng all over my bumpers.
How I am becoming a convert to Poly refuse sacks and sheets.

I started my restoration course at local college this week.
How I'm going to love this.
Firstly upon wandering up to a group of folks I picked the course leader to ask
" Is this where I'm supposed to be ? "
Yes he replied, the kettles over there, its always on get a brew when you feel like it. Bacon butties are ordered an will be eaten at 10.30. Wander round with me and the group then we'll get started.
What a chap...........a man after my own heart.( even if he looks like a rockabilly version of Al Bundy)
"What you all want to learn then ? " was his first question.
The usual hesitance from a group of strangers.... then I piped up "welding"
Me too ! yes me as well ! ( me anorl......best Derbyshire accent there )
OK says Shaun ( course tutor )

WELDING............. first minute.......... easy peasy
second minute..........crap, holes everywhere.
third minute........long strands of wire everywhere + birdpoo
( That's what Shaun called it)
time to let someone else have a go
same results but, different order and probably worse.

WELDING PART II first minute.......change the settings..... no description
second minute......NO PENETRATION....bad word
third minute.......change settings.......!!!!!!!!!

Butty time........its the same the world over and it takes me back to my apprenticeship days. Get your butty first. Sure enough two butties were missing.
Luckily not mine though.......remember I've done this before. I used to have to fetch them as a lad come rain or shine Saturday mornings so I was prepared for this likely possibility, thus get in quick.

Over butty had conversations with fellow restorers. One guy is restoring on old Mini
and converting from Auto to Manual gearbox.
Another has a 1960's Triumph. And Another a 40's Jaguar !!!!!!
He wants to learn how to make the curved wings and fiddly bits.
Methinks the local college is not up to this standard. If he can afford that car surely he can afford to pay someone to make them !!

WELDING....Part III..............Shaun shows us ( without a mask and closing his eyes) how easy it is. Its all in the wrist action. keep moving and set it up properly.
first attempt............crap, spatter and crackle
second attempt...........much better with gas on
third attempt.............getting clever,butt joining two pieces
fourth attempt............too clever. big holes everywhere
fifth attempt.............bird poo and wire everywhere

Guess welding is not so easy. I will admit that things got better when Shaun,seeing my enthusiasm gave me an "Auto helmet " to use.

I'm laughing like a drain as I type this. It must be the word " Auto helmet"
Sounds like a STD or kinky gay sex toy. My sense of humour is base and kind of juvenile mostly. Guffffawwwwwww.

Now I want one. Its the only way to weld.

As the title says now I have a little more skill to progress....but to what.

I still can't seem to make a plan on what to do next.
I'm sure welding panels will figure somewhere. I,m afraid to weld just yet though as I don't want to weld little rusty holes into big rusty ones and ruin £ 85 quids worth of panels.

Procrastinate............that's what I'll do next.
Job settled. good night and thank you.

Monday, April 17, 2006

Some progress at last

Well time to report some good news at long last.
The restoration has moved forward somewhat thanks largely to an early morning leap out of bed. The kids were up early ( 7 ish) on my first days hol (Good Fri)
so I made a hearty breakfast for us all and set off down to the bottom of the garden by clearing out the shed and unearthing around the shed of old dead leaves and unknown things.
I really hate clearing up the leaves as there's always lots of worms and slimy creatures scuttling away to darkness. The 10 kg bag of chicken manure pellets didn't
help either. It had a plastic bag over it and a half housebrick.
I know why now.
At some point the lid had broken and since it was to be left outside a bag placed over it, however water had got in.
Got in big time, and it was supporting a whole new life culture of maggots, worms and other things.......All swimming in 10 kg worth of the smelliest liquid Sh*t ever. ( very good for the garden though.....but not mine, sorry ours)
I had to get the wife to move it further away from the shed area so I could carry on working. Smells are not my strong point ! Sorry don't do foul smells.
So, all non relevant things banished to on side destined for the dump-it site
and the rest, well..................How the hell is it all going to fit back in the shed ?
It was like Dr Who's tardis. Could this stuff really all come from Inside the shed ?
More ruthless discarding and several re-arranges of inside and there it was.
Loads 'o' rooooom.
Still a strong smell of Sh*t though.
Then another Idea. Wrap the tub in a strong black refuse sack and tie up tight.
thereby stopping said foul smell ruining garden and scenic tranquil atmosphere.
Smell all gone ( tub will be magically inserted into wheelie bin next bin day)
A more than slight improvement actually that would allow at least 3 or 4 boxes and trim bits into the shed.
Yipeee !!! Action stations restoration.
removed Right wing in less than 15 minutes ( It took nearly four weeks for the Left)
Admittedly most of the work had been done in a fit of frustration at the spinning nuts of the left wing.
Removed fuel tank after wrestling with only one rounded nut which I had to drill out.
This was a bit scary as it was the nut nearest the fuel filler hose inside the boot.
Today up early and drained oil ( wifey did not see this, good job a some has been deposited on drive) the old cat litter tray came in useful for once.
Emptied water....sorry coolant system. Removed radiator and hoses.
Removed oil cooler and some pipes.
Only bad news is that I broke the top hose connection on the oil cooler matrix.
Too much brute force and a cheap aluminium housing.
I think I can grind, weld and hammer to my hearts content now !!!!!
............If only I knew what I was doing...................

Tuesday, April 11, 2006

Who turned off the light at the end of the tunnel ?

The title just reflects my frustrated mood of late.
After attempting six time in two days to set up the tile cutter to cut six tiles I finally abandoned the effort to the weekend.
I did feel much better for it though.
The present tile cutter is new and works like a dream. Well it just works like any tile cutter should do. They fit perfectly. Next job is to lift all loose tiles
( approx 50% of them) and stick back down. It looks like I'll have to have a day off work to complete this or do it one evening to stop little feet walking on them till their fully stuck.
How I came to get to this stage is like a de ja vue dream. Similar to the cheap tools I bought earlier on in the year.
The present tile cuter is on its last legs. Its not mine, its my mates which I've had on permanent loan for about seven months. Brother in Law borrowed it for his tiled floor and I'm afraid it just wore out. perhaps the 15mm thick tiles he was cutting had something to do with it ?
Anyway,I decided to buy another one. Did the usual trawl of B&Q, Do-it all, Wickes etc. Decided on a "cheaper" model from B&Q: £ 29.99 and made of "stainless steel with 150mm cutting disc"
Gawd ......what a mistake.
When assembling on kitchen worktop ( yes it was raining outside) the "stainless steel" tops rectangular hole where the blade pokes through was mis-aligned.
Mis-aligned is a kind phrase. The only way the blade didn't touch the "stainless steel" top was when it was tilted at 45 degrees using the unique selling feature of " even cuts tiles on the angle". It a moment of testing I accidentally started the motor, only to see sparks fly, Howling graunching noise and a team of people rush into kitchen to expecting to see six tons of girders there with me underneath.
Crap............
I got out the trusty angle grinder to try and modify/remove the offending mis-placed hole. Reassembled and.........Crap.
Took the thing back to B&Q and got a full refund. I don't know where it was made but i suspect made in C**** was somewhere cunningly hidden.
Exactly one week later I visited B&Q and there I spied a Plas****s tile cutter for the same price. Admittedly a little smaller. I bought it and its wonderful. It did the job, easily with no fuss. I got frostbite from cutting tiles outside in the howling wind with wet hands, but hey.......the job done, almost.
My next rant is how ironic life is.
A while ago i posted on the internet somewhere, may have been this blog, the probs with the spinning captive nuts inside the wings where they were inaccessible.
I received last week a very kind and lengthy reply on how to resolve this issue.
In fact i had already resolved it, but nevertheless, the tips were excellent but not applicable in my case as the cages were inaccessible.
I still have faith in good ole E-bay. I was watching a bodyshell hoping it might go cheap. Did not win but decided to contact the winner.
A fellow MG restorer and by the sounds of it a willing and understanding bloke.
The shell is about to go to the scrapper as he has all the parts he needs from it.
Bless him, he offered to cut off the parts i need ( LH rear top wing, gutter section ect) I,m sure he will come through. Especially if he reads these pages.
I'm going for the sympathy vote.
All I've done MG wise is re-tie the poly sheet countless times after wifey bought some clothes line especially for me. To replace the 60 meters of telephone cable the Sky installer insisted on leaving I've been using.
The Easter weekend signals some positive action though...if....big if... the weathers good I'll tidy shed, dispose of lots of crap and organise the removed items from the MG.......hopefully, and after the tiling is complete.

Monday, March 20, 2006

When enthusiasm flies

Yet more wet and cold weekends have halted the frenzied pace of restoration.
Last attempts saw the removal of lots. Hope I can remember where it goes back and where I've stored it.
Frenzied is a term I've heard lots of lately.
Wifeys attitude to plotting a new bathroom......Frenzied.
Kids obsession with MSN and chats with mates.........Frenzied
Wifeys cajoling of me to make a start on said bathroom.......Frenzied
My resistance to do anything remotely interesting of a weekend........Frenzied
My boss's attempts at getting the sales team to sell more..................Frenzied.
OK you get the picture, there's some element of frustration embedded in me at not having a garage in which to work or store the items removed so far.
I guess I'm feeling guilty too of not having started on bathroom.
Well I did actually start and that was the prelude to.......well, P***edofness.
Like all males of the species I know best when it comes to DIY.
So tiling the bathroom floor should be easy. After all I'd done the toilet a few months previously ( 800mm x 1.4 meters, with 300mm square tiles)= 15 tiles including 5 cut tiles)that took best part of 2 days due to the awkward shape of the toilet base.
Under the tiles was regular hardboard. nailed every 2 inches ( just to be sure)
So they stuck fine and only one had to be uplifted and re glued.
Shaving an extra half inch of the door bottom made the largest contribution to the buggeration factor. ( undo 9 screws that have not moved for 45 years) move door downstairs, set up workmate ( all day job to remove MG bits from shed so I can see workmate, rest of weekend doing MENSA puzzle on how to extract workmate)
So work started in earnest. Except that I forgot brother in law had the electric tile cutter of mine ( I mean mine in the biblical sense, as it belongs to mate Chris. I borrowed it 5 months ago and he's forgot )
B in L used machine to do his whole bathroom and floor so its had some use and he says in need to cool down every now and then.
Frenzied comes back to haunt me again. That must have been B in L 's
F*****ed attempts at cutting at least 55mm thick cast iron tiles on a hobbyist machine.
The first cut I made the machine lasted exactly 2 inches before it conked ( sorry, overloaded the thermal protection device)
This required a wait of approx 30 minutes, still I could get on with measuring and gluing.
Things got decidedly worse.
After gluing and leaving the floor 80% tiled, the following morning displayed the tiles loose and wobbling like a see-saw.
Crap cement. Heating left on and little feet walking on them did not help.
However, my expert opinion is that I did not listen. I thought I knew best.
I used regular hardboard under the tiles. I needed to use at least 12mm thick chipboard.
So last weekend was spent chiseling off the cement from the tiles, cutting chipboard and laying tiles properly, leaving cutting tiles till the end.
By the way the cutter cuts exactly half an inch now between 2 hours cool down.
Should finish by Christmas then. Unless I ask Chris what's happened to his cutter and he buys a new one for me to borrow.
With luck the weather will improve and the bathroom finished in time for spring.
I hope the solicitor pays out by then, but that stories for next time.

Monday, January 30, 2006

When sparks fly


Well what a productive weekend. Well only Saturday actually.
After spending what seemed like ages without so much as lifting the Poly cover something actually happened according to plan...........almost.
Full of the joys of spring and having a Saturday not P***ing it down with rain I set about tackling the wing with gusto. Gusto may not be the right word as I was planning to use my new grinding machine. ( Thanks Ma, great x-mas prezzie)
I was petrified, I had visions of me in Casualty with it wedged in the middle of my forehead, or worse still the whole car going up in a fireball as I determinedly ground down the fuel filler spout.
Logic dictates that the Interior and seats should be removed but I still have no garage
in which to work or store said items, so they stayed put.
Donned in a XL disposable white paper suit I looked the strangest mechanic/repairman ever.
It is only as I write this I realise I was wearing a paper suit and would have made an excellent piece of tinder. As a practice I started on a screw on the lower valance.
He hehee....................................What sparks and noise !!!!!!!!
Positioned awkwardly under passenger footwell with grinder ready. Brrrrrrrrrrrrrrrrrrrr.
Nothing touched. The handle of the grinder fouled on the tie rod of the dash.
Remove handle and start again. He he heeee..........................
Sparks everywhere, heart pounding, mouth dry, very loud grinding noise.
I was actually grinding something.Exactly what I could not be sure but this was a sign that serious stuff was actually going to happen. Hope its to the car and not me.
Fed up upside down, I repositioned to the valance again. Still rather awkward to get behind the
headlight under the wing, so a moment of common sense hit me. Jack the bloody car up full tilt
and access will be better. And so it was, the two frozen nuts mentioned last year disappeared into a mass of sparks and blood red molten metal.
I have a feeling this car is going to be very much like a good woman.
Since I was highly delighted with the removal of two very rusty and awkward nut cages in a very inaccessible place it was then I noticed.........Horror.
I had accidentally ground a disc shaped hole of about 1" long into the front of the radiator support frame. Pants.........just when I thought I thought I was doing well. Still It can easily be repaired, sometime.
Then I realised all the wing bolts were free. I tugged the wing but it seemed still fastened somewhere. Tugged, tugged, no it must be fastened somewhere. I've missed a bolt.
Further check. Much tugging, some pushing then a quick jerk upwards and success.
I'm free....I'm Free.
Well not actually, the wiring was still attached to the headlight. Quick label job then it was well and truly free.
Only prob now is where to put it. Its only rusty on its bottom edge. Its actually wedged under a giant kids slide down the side of the shed at garden bottom.
Inspection of the new area and now exposed sill showed much rust. Only remnants of a sill visible, still the inner wing area is in sound condition.
The valance was unscrewed partially and ground down partially and it came away easily
again with only minimal rust, although it was a bit bent in one area.
I even had time to remove the other wings bonnet bolts and squirt my old friend penetrating fluid on the passenger footwell bolts. It would appear the right side is not as difficult as the left.
Hopefully.

Tuesday, January 17, 2006

Well...same old same old... nufin new there then

A new year dawns and time for some light reflection.

Yes its still raining each Saturday and not a jot has been done to the poor old MG.
All she can do is flap her makeshift polythene cover listlessly in the wind.
I can't even be bothered to re-tie down the noisy thing. I just peer at her each morning and pray for summer and cash.
The new year started like the old one finished, seamless and without fuss.
I fact I think I was first into bed before the missus, and asleep and snoring soundly before the appointed hour.
Made me laugh later on though recalling last new years eve to wifey.
We had ma- in- law staying overnight.
A fine woman and in full control of all her marbles. But..................
of all the towns etc. She decides that at 10.30 her waterworks are not functioning as they should. By 11.15 it was time for immediate action so off goes wifey an said ma-in law to local clinic/casualty..............credit to our good old NHS. They had her sorted and back ensconced in front of TV by 11.45.
I was Incumbent on sofa with leg in plaster, so that's a fair excuse. Besides, I needed lots of whisky to dull my pain. One visit up 15 steps with leg in full cast is enough to make anyone grumpy.
Work seems to have taken priority since the hols with my area almost doubling.... not the pay though. Still, I imagine I'll get more nights away and see a lot more of this fair and sceptered Isle.
I have seen more cardboard boxes though this year already!

Friday, December 09, 2005

No turning back......The project gets serious

Well the removal of the dashboard proved an enjoyable event.
If swearing, cursing, cramp in arms, cramp in neck, damp, cold, confusion and frustration can be called enjoyable.
Of course I'd read the book many many times on how to do this. In fact I'd read the book so often we needed a new toilet seat. So I was thoroughly prepared if not a little inexperienced.
More good news was that in the evening previous another cardboard box entered the house, it only cost £215 too, a bargain at half the price.
Don't know what to do with the new microwave that was inside though.

Before I embark on this new episode of no turning back let me pontificate on the dearth of cardboard boxes in our modern society. We all know what they are and what they are used for. We have all seen them many times. They are always free when you want one of them.
But let me warn you................Just try asking at a supermarket for one !!

My local 24 hour shop used to have thousands in the doorway at one time. Just take one sir, take thousands, build a new estate in Bulawayo sir, we just don't care, they are there for you because we don't want them.
Same went for the large multi nationals, Sainsbugs, TrespassCo, MoreReasons ect.
These often used but mainly Ingored items were there in their thousands ( hope the grammars good or Dave the teach will frown)

But like some Alien conspiracy now they have all GONE !!
Remember the rules on the wall in Orwells Animal farm, every time the downtrodden referred to the rule it had somehow mysteriously disappearedd.
Well supermarket cardboard boxes are like that.
First they were huge regular sizes and weird shapes that no-one ever took home.
Then they went to rectangular and square that were very handy. We all loved these.
At some point in the dim and distant past they began to get smaller and smaller till now they have disappeared completely.

Apparently they are a fire hazard and must be disposed of Immediately.
Disposed of by squashing flat in a regulation box squasher flatter , then Incinerated.
All by trained and certified supermarket staff courtesy of our wonderful H&S legislation.
I dare you, ask for a box near the large plastic doors next to the Deli counter and you'll get a look like Greek taverna owners reserve for German tourists.

On with the Dashboard.

Left hand upper bracket removed with socket set ( 1/2")
Cardboard glovebox liner removed frontwards by squashing slightly.
I must have spent 40 mins trying the former before latter occurred to me.
Removed both centre air vents easily. Dash showing signs of freedom as left side moves slightly.
Undid steering column bolts easy peasy. Whilst down there, upside down, head in footwell, feet splayed at odd angles out of window and out of sun roof I made a discovery.
previous owners of this vehicle lived like pigs. Nuff said.
I did find the trip re-set though and a "secret" switch which I will investigate sometime.
From this position of recumbent tranquility I also removed Right upper bracket.
Dash loose at both ends slightly but solid in centre.
40 minutes later it occurred to me as to why the centre vents should be removed.
" They hide the last remaining bracket holding the whole thing in position"

But that's when the serious stuff started.

Presented before me was a giant multicolour mess of spaghetti.......God what have I done.
It looks too difficult to but back quickly and run away, and its getting late.
Be brave Potter Pig.....Onwards and upwards.
To be fair the only tricky bits were the vent connections. Small nuts high under the padded top.
All the wires and cables were well colour coded.labelled them though just in case.

I have a feeling this statement will come back and haunt me later on.


Disconnect choke cable - both ends.
Disconnect & label up -:
Interior light
Cigar lighter
Ampmeter
Oil gauge
Fog light switch
Heated rear window switch
Speedo
Rev counter

And then it was lifted clean away...........Thus no turning back.

I'm sure I broke some switches or maybe they fell apart and disintegrated.
However boxed and labeled both ends and feeling rather smug.

Next job. Padded Dash top and heater pipes/vents. Maybe this can wait till after x-mas as yesterday we discussed wallpapering the bathroom this weekend.
Sacrifices. Sacrifices.

Oh yes I almost forgot..........I still need somewhere to store the bloody stuff.


Saturday, December 03, 2005

Into each life a little rain must fall.......but not every bloody Saturday


Duties and responsibilities first. After suffering all week with a heavy cold ( Man cold......much more deadly than the "other" type which affects females mildly) I/we decided to get the house ready for Christmas.
This means I have to scramble around the loft space looking for unlabelled boxes of tree's, decorations etc. Fortunately last year at tidy away time I was rather disabled ( Broken Leg )
so they were just pushed into the hatch and were easy to retrieve.
I set to with a front room spring clean. The rest of the family pottered around attempting lots but accomplishing nutin'. Luchtime over I set too an the MG.
Yes I am actually going to drop the dashboard in order to get at those pesky frozen and spinning bolts holding the front wing solid.
Easy Peasey removing the gearstick gaiter. Not so untangling the wires for the overdrive and removing what must be 25 year-old Insulation tape............Not looking good methinks.
Bugger..........someone has soldered the wired together hence the tape.
Looks like Bodget & Scarper did work on this car sometime, hope it wasn't often, or a sign of things to come. Centre armrest removed to driveway. NOTE armrest well contains a small shops-worth of misc screws, fuses, bulbs etc.. all used/abused. Must keep them though, who knows where they came from. I must add at this point It was around 3pm and getting a little dark and cold to add to the already very damp driveway.

Removed the centre console after labelling the wires from the heater controls. I even had a box in which to put all the things in.
Then I noticed the rain. Absolutely P****ng down. And my feet and bottom half was also wet through.
NO......................................NO...........................The box and more Importantly the newly found "Kamasa" tools were wet through. The "dry cover" wet. The wet cover very wet and me wazzed off.

Fast paced was the next operation. Box in car. Tools into kitchen. Dry cover on. wet cover on.
Elastic thingies with hooks on on. Man In house very wet.

I decided to do the sensible thing and change clothes then settle down to a dark room lit by a warm fire and listen to the footy results ( Big match for me. Owls v Blades )

Then it all went wrong.
I'm putting the tree up in the room said wifey. Other room looks like an explosion at WH Smiths.
Bedroom same.
Time for some macho posturing.......................not a chance, guilt of happy families putting up the tree and smiling, Christmas records playing, chocolate being passed round.
Yes you can be happy when you think your world is crap.........thank heavens for marriage.

So it did end happily, almost. Room dark and fire lit + tree lights. Me on sofa Horizontal with remote control and quiet peace.

Except my team lost 1-0.

Never mind Toto, well always have Kansas.

Top of the British Blogs

Thursday, December 01, 2005

The last person I expected to come to the rescue......

The Wife....!!..( said like Peter Kay repeats " Garlic bread")

Yes her Indoors. Overlapping domestic slave. The boss and giver of all things nice.

After another weekend of rounding off the incredible putty-like sockets whilst attempting to remove the left front wing she actually came to the rescue.
Here's how it all happened.

Mid week at ma in laws. Nice lady who looks after the kids and all her daughters and sons in law too.
So in a never ending attempt to get her daughter to take some of her "stuff" from her old bedroom she pipes in ..........................There's some tools upstairs you might use , let me find them this week.
Me "yes Please".
Several days later at Ma in Laws " here's them tools "
"I thought they were Bills" ( deceased Pa in Law) but they have Sue's name on the outside of the tin"
Tin !...........Sue' name on them ( Wifeys name) KAMASA HIGH QUALITY SOCKET SET .............AF...............HALF INCH DRIVE.........WITH PLUG SPANNER !!!!!!!!!!!
It did take some time to sink in. And is has rained every day since the epiphany but well........
who'd have thought that !

Wives are like elephants
Wonderful to view, they never forget and can be surprising....But choose your time, place and proximity with them carefully. Keep quiet

Top of the British Blogs

Wednesday, November 23, 2005

Frozen nuts...........is there a cure ? Will the captive nuts ever stop turning ?


Well never a truer term was invented. Simply remove the bolts highlighted inside the passenger footwell, bonnet gutter, front apron and inside engine bay front. ( 1/2 bolts ) p.s the upper ones are rather awkward.

After seven and a half hours interspersed with bleeding knuckles, cramped knees, aching back and a pair of broken glasses approx half of the bolts are removed.

The remainder either spin in their captive nuts or are rusted solid.

I did manage to remove the front bumper ( Rubber - but very heavy ) as the previous owner
had only fastened two of the four and obviously removed it recently as a socket did break when
pressured.This was a welcome diversion due to the above frustrations.

At this stage I must confess I did the macho male thing and Ignored the normal advice and bought the largest & cheapest socket set on sale at the auto shop.
How I wish I was Intelligent and experienced.
Still, why is experience is something you always get after you need it.

Keep in touch for a blow by blow account of my MGB-GT restoration on a budget and clueless as the weeks unfold and the wife see's less and less of me.

Top of the British Blogs