Greetings peeps................Have to sound cheery as I'm as pi***d off as hell.
The last post really did bite me on the a**e.
I nearly died a very flat squashy death. More of that later.
How's that for fate, Karma, bad vibes , ying yang, blasphemy or just plain tough titty.
There must be someone/thing/external joke player up/out/about playing some rather cruel and unfunny tricks with my life.
How I wish I'd not made the last post.............07 stinks.
I'm trying the same trick as the last post, irony and and a sense of belief in my own fate !!
Nothing much has happened MG wise.
Welded hole in floor near rear spring hanger.
Bought 2 tins of Grey etch primer.
Even collected MG roof section from Langley and deposited it at factory in Slough.
Its actually resting in a very rusty old garage out back of the toolroom, surrounded by
years of accumulated scrap machinery and 200 year old compressor.
The boss don't know its there yet. I'm have to tell him soon. Maybe he will guess when I sneak out of the next sales meeting at lunchtime and proceed to wield the grinder.
................................Oh whilst I remember......I was very nearly crushed to death by a HGV in the winds the other Thursday it's that 07 thing again !!!!!!!!!!!!!!
Yes it was really that close. Here's how it happened.
As I was wendling my way from Scotland I stopped at Castleford services to re-route my way home. The winds were getting very strong and good old Sally Traffic was giving out a list as long as yer arm of roads and motorways closed. Most of them between me and home.
Off onto the A19 from the A1 south of said services and I met a long queue of stationary traffic.
The A19 at this point is actually a minor B road, but very long and straight and very exposed in flat countryside. After 30 minutes wait in long queue orange lights appeared from the distance. Two recovery trucks were attending to a HGV that had toppled over, about 300 yards ahead on my side of the road. So, to cut a long story short. they recovered the HGV ( well I say HGV, it was actually a big removals type van transporting mattresses )
The recovery truck with HGV in tow sped towards us at about 60 mph.
Then Sh***********************t It started to fall over about 10 yards in front of me.
Its back end hit the transit van in front of me, it kept falling and I ducked down and sideways.
Smash, boom, thud, thwack. It hit me on the windscreen pillar, windscreen, roof, door front & back and bootlid.
It then went on to hit the transit van behind me ( On the roof only) and came to a standstill at 45 degrees to the HGV behind that van.
Bear in mind we were all stationary waiting for the go-ahead from somewhere down the road.
I think if I'd not been between two transit vans ( hi line ones at that) 07 would have been a very very bad year for at least three more people.
I dare not tempt fate again...so I'll sign off with a note of pessimism tha......
Hold on did...... I get my sums wrong? is it odds that are bad for me ? maybe evens then ?
or are they good. Maybe at the autumnal equinox it changes expotentially ?
There job done Not called "Captain chaos" for nothing.
I'll keep hangin in there, at least till the jobs done anyway. ( go away italics....please)
I do promise to post more often though...and if said female gets her finger out even post pictures.
See yer soon............p.s keep the messages coming I need cheering up !
Tuesday, January 30, 2007
Sunday, January 07, 2007
Happy New Year....................Its an odd one
Happy new year to all my fans and avid followers of nothing in particular.
The odd bit refers to the year number 07.
Traditionally for us ( me actually) odd number years seem to treat me better than even ones.
Before I get into this too deep.
Congratulations Hayley and Matt...........A lovely new little girl Daisy
So the year dawns bright and new, if not a little windy and wet.
Christmas was good, the house full of food and booze, family and friends, mess and arguments, indigestion and late rising, shopping and spending.
So fairly normal then.
I did get several invites to parties over the festivities which were all very good. So good in fact that i even turned one down, very near home and on a Saturday night. Wifey and daughter went though and enjoyed it immensely.
One sad note was that the rear wing never appeared as a Christmas present though.
However, a fantastic Red MG Keyfob did appear ( thanks Han) and a rather expensive looking travel bag with subtle embroidered MG logo on the side.
The MG has been rather neglected of late since the fitting of the sill section.
As you may be aware of the sill fit is not actually perfect. I think the gap is too large.
I've spent a lot of time thinking about this as a precursor to know what to do next.
Now I'm of the opinion that the door needs better alignment. Its been on and off many times and is a swine to tighten up.
The sill gap is probably 8-10 mm when it should be 3-5mm. The problem is twofold -:
The sill will not move up any higher as the A post prevents this, it and has to be welded together to give some rigidity.
The door catch at the B post seems very high as the door has to be lifted to be closed.
Not having the rear wing in position to give the B post some strength don't help.
So the upshot is I will reposition the door by dropping whole door down approx 5mm.
Re align the door catch on the B post, hopefully it will drop down enough.
This is all better done once I have a new rear wing welded in position ( Hope wifey's reading)
Before this though, the inner/outer wheel arch must be completed.
I have started this and welded the inner strengthener plate onto the end of the open ended sills. The wheel arch sections are welded on top of this to align with the outer wing wheel arch.
So, cash needed for the inner wheel arch section/s. Luckily repair panels and not the whole arch can be purchased from MGBhive/MGOC. The rear wing bit is about £57 and not £350 as first thought. .......................... I told you 07 is lucky for me.
As I started to say for me and the family odd numbered years seem to be very good. Or is it that the even number years have always been bad.
I broke my leg in 04........................................Bad
Born in 57..........................................................Good
Heart attack in 96.............................................Bad
Married in 89.....................................................Good...........( brains with tact)
Redundant in 2002............................................Bad
6 month holiday/work in USA in 2001..........Good
Twins born in 96..................................................Good at first, but 13 years later maybe bad!!
Anyway, you get the picture. 2007 good year. Hope this statement don't come back to bite me on the ar**.
Back to the resto. Yesterday I welded a small repair patch in the front wing/ bonnet gutter.
Re-welded the sill in places. Sprayed primer on all the other sill areas that were showing surface rust from welding.
Noticed the windscreen bottom/rubber gutter rust hole that's going to be a dogs d*** to cut out and repair. Looked into hole in passenger rear floor. Stood around lots and pondered.
Other breaking news is I still have to collect the roof section from a nice chap in Slough.
I turned up 3 weeks ago and for some strange reason thought it might fit into the rep mobile.
Not a hope. Not even into an estate car. So I have to borrow estate car with roof bars to transport it to works in Slough for storage/chopping up. This will be done next sales meeting early Jan. Promise Chris. Thanks for your patience.
Must concentrate on removing and storing engine/ancillary parts till cash flows.
See you all soon. P.S Wifey's not yet replaced camera cable so no pictures as yet.
Sunday, November 26, 2006
Not just a metaphoric gap ............?
How profound of of me. Sometimes I amaze myself and other people too !.
The gap in question refers to two things. Firstly the blog and photographs out of synch and the gaps in the restoration story.
The second is the gap in the sill end plate now I've attached the outer cover sill.
As you are all aware my laptop has been giving me grief ( a lot actually) as the photographs would not download, the Bloggers website just froze usually threequarters of the way down a newly created post. Or the laptop just switched itself off without rhyme or reason.
Good news. After a bit of wheeling and dealing I'm ( we also, as the whole family benefits)
the proud owner of a BT home hub. This means the ancient but reliable PC can also be connected to the broadband. The Laptop issue will have to be resolved at work after the crisis of new management is primed.
It transpires the cable of the Nikon camera is to blame for the photo errors.
It fried the laptop and the PC's USB connections. Repaired for £45 quid and now we're cookin on gas as they say.
Back to the restoration though.
The castle rail sill is on. Welded like no other. Gone a bit overboard actually but what the hell.
Spent ages fettling the inner membrane sill and drilling about 30 five mm holes for plug welds.
The plug welds were a swine. It took me about seven weak and crap welds before I realised
that maybe eight mm holes are better. Typical fufferfour. Do the job again but this time much better. Spent even longer offering up the outer sill after hours grinding down all the plug and seam welds done. All this took place throughout October when the weather was good each weekend. Now I'm rushing a little to get the sill complete before the rain starts every weekend. But, the cover sill was welded on, on the top seam last week, and today I completed the rest of the welding on the sill. I even repaired the "A" Post hole with a nicely fitting patch. The sill end cover was welded on at the rear.
To keep it interesting here is a picture of the sill during a trial fit.
Pity the gap under the door though. Its about eight to ten mm. There was no way it could be any less. I'm hoping the door ( which has been on and off several times) is aligned poorly.
If not another job for the welder when its doorskin time. Once everloving wifey has purchased said cable for the ( her ) Camera I'll post the photo's of my handiwork so far.
The next jobs are :- Hole in floor near spring hanger. Cut away. grind. fit patch and weld.
Gutter section on front wing/bonnet side gutter. same as above.
Then yipee.........................weld or glue on rear outer wing ( wifey's buying it me for christmas)
Be patient folks......................................its getting there.
The gap in question refers to two things. Firstly the blog and photographs out of synch and the gaps in the restoration story.
The second is the gap in the sill end plate now I've attached the outer cover sill.
As you are all aware my laptop has been giving me grief ( a lot actually) as the photographs would not download, the Bloggers website just froze usually threequarters of the way down a newly created post. Or the laptop just switched itself off without rhyme or reason.
Good news. After a bit of wheeling and dealing I'm ( we also, as the whole family benefits)
the proud owner of a BT home hub. This means the ancient but reliable PC can also be connected to the broadband. The Laptop issue will have to be resolved at work after the crisis of new management is primed.
It transpires the cable of the Nikon camera is to blame for the photo errors.
It fried the laptop and the PC's USB connections. Repaired for £45 quid and now we're cookin on gas as they say.
Back to the restoration though.
The castle rail sill is on. Welded like no other. Gone a bit overboard actually but what the hell.
Spent ages fettling the inner membrane sill and drilling about 30 five mm holes for plug welds.
The plug welds were a swine. It took me about seven weak and crap welds before I realised
that maybe eight mm holes are better. Typical fufferfour. Do the job again but this time much better. Spent even longer offering up the outer sill after hours grinding down all the plug and seam welds done. All this took place throughout October when the weather was good each weekend. Now I'm rushing a little to get the sill complete before the rain starts every weekend. But, the cover sill was welded on, on the top seam last week, and today I completed the rest of the welding on the sill. I even repaired the "A" Post hole with a nicely fitting patch. The sill end cover was welded on at the rear.
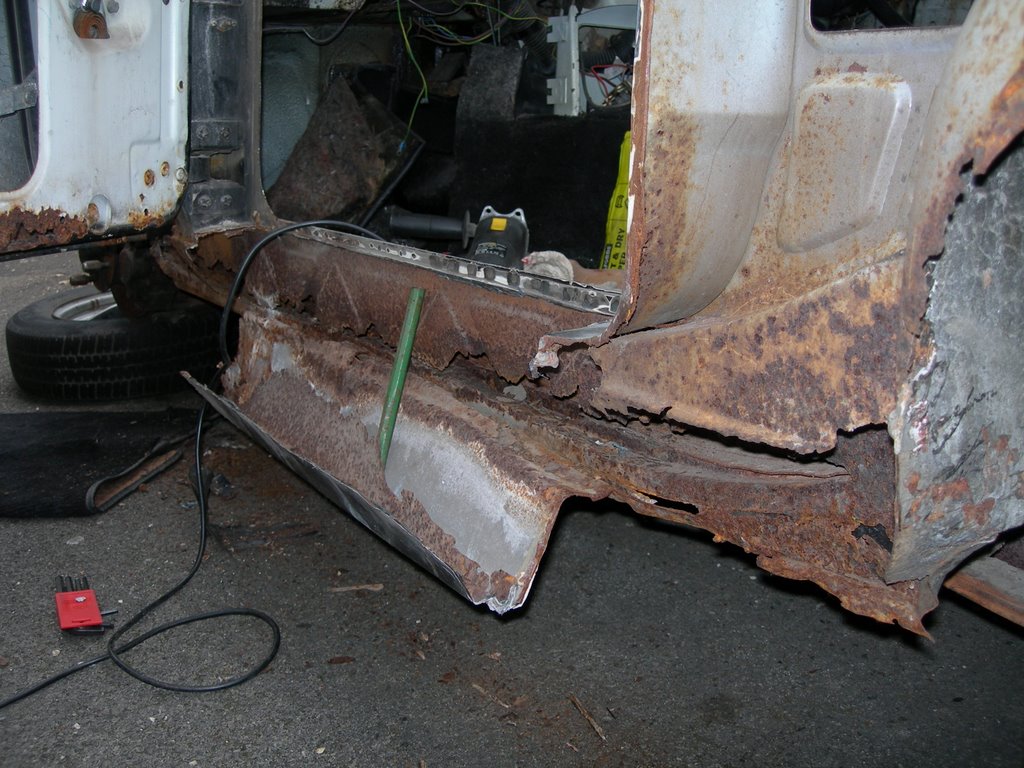
To keep it interesting here is a picture of the sill during a trial fit.

NOTE.... the hi-tech shovel holding the outer sill and wing bottom in place!!!!.................
Well it was the only thing that fitted at the time.
Pity the gap under the door though. Its about eight to ten mm. There was no way it could be any less. I'm hoping the door ( which has been on and off several times) is aligned poorly.
If not another job for the welder when its doorskin time. Once everloving wifey has purchased said cable for the ( her ) Camera I'll post the photo's of my handiwork so far.
The next jobs are :- Hole in floor near spring hanger. Cut away. grind. fit patch and weld.
Gutter section on front wing/bonnet side gutter. same as above.
Then yipee.........................weld or glue on rear outer wing ( wifey's buying it me for christmas)
Be patient folks......................................its getting there.
Saturday, October 21, 2006
Moving forward.......... i think !
Again I'm suffering from laptop freezing. Three times I wrote this over the last week, only to suffer the cruelest of practical jokes from my friend the laptop.
On each occasion I'd posted two pictures and typed at least 300 words when it happened. Sad pity is it is all lost as I have to switch off and re-boot losing everything. So I'm typing this in three sections and posting as I go.
Bloody typical though, the last three posts/attempts were witty and interesting. Now I'm tired and its late and feeling melancholy.
But.............I have a glass of wine ( a big bottle even) so here goes.
The sill's are completely removed...........Hurrah.
Lots of rusty stuff has been painted with Hammerite rust killer.
The front footwell is all welded up.
The " trumpet" is repaired . No please don't laugh. That is its correct name.
The new sill's have been painted in anticipation.
Smelly red oxide paint has been sprayed everywhere I could think of before the aerosol ran out.
........................Oh I almost forgot. I repaired the gaping hole in the side footwell. Just to prove it here's the before and after pics. Look closely you can even see the welding too.

Sorry....lost photo in a fit of spellchecking & tidying up!
Grrrr (counts to ten slowly)...............that's the EIGHTH time I've lost a post
And now some other news from the world of Fufferfour
The bathroom is finally finished. And very nice it looks too !
I spent all day Saturday pasting and hanging wallpaper, fitting carpet trim, Laying vinyl in cubbyhole, tidying up and putting thing away, refitting all fittings taken down to wallpaper ( including Medicine cabinet & contents ) and washing the venetian blind blinds. By the way our medicine cabinet is fully equipped for a thermo nuclear war thanks to the ever loving wife.
Lost an arm sir ? No problem. Paul...pass me the thermal lance
Suffering from a headache ?......easy, we got Aspirin,Cocodamol,junior asprin,dicocodamol,asprinamol,Ibroprofen,disprin,paracetamol,paracetamol max, paracetemolmax+,calpol liquid, calpol night time, calpol daytime non-drowsy,nurofen. nurofen max,nurofen max with vanilla ( or rasberry) migralieve light. Migralieve heavy and finally Migralieve ........or course max.
Slight cut or gaping wound ? we got steristrips standard, steristrip extra long, 38 boxes of assorted waterproof plasters, 17 boxes of junior plasters, 10 pieces of cut to desired size plasters, red plasters with teddy bears, blue plasters ( just in case the environmental health call in the midst of food preparation) and crepe bandages, long, short, wide and rectangular. Even one smelling strongly of Ralgex ( lets not go there, its mine and I know where its been)
Well you get the picture by now I'm sure.
Now I've finally settled down and resigned to the fact of life that me and computers will never be an easy mix I can get on and concentrate on the more important things in life.
See you all soon for the next installment.
Thursday, September 07, 2006
Lets try again


Still "issues" with laptop and strangely enough the letter S. Its sticky.
Suspect kids somehow.
Above are the photo's I missed on the last post.
Good job I struggled with the photo's yesterday, as last night I did some welding.
CR*P..............its the only word to describe it.
Well it was dark and I did rush things a bit. It got dark because I spent too long "modifying" my B&D jigsaw to work like the powersaw I used a college.
I'll have to spend time making square holes now and save the welding for a long weekend.
More soon...............if the welding improves.
Tuesday, September 05, 2006
Its off, and no turning back
Apologies for the delay in posting any news and events over the last few months.
Its been a very busy time with work, holidays, sunshine and family getting most of my attention. I'll have to be brief here too as my laptop keeps freezing up.
Three times I've posted wit and wisdom today only for it to be lost in cyberspace.
The title refers to the castle rail sill section finally off at last. Albeit in about seventy small pieces. It was achieved with brute force and ignorance and then a little intelligence and maturity.
After being stumped for so long on how the section was attached to the underside of the floor I decided to use the brush attachment in the drill and clean the inside sill bit.
Lo and behold.............semblances of spotwelds. Trouble is I buggered up the spotweld drill trying to sharpen it with the angle grinder. So hence the brute force and ignorance bit with a bolster chisel and medium claw hammer.
I eventually bought a new spot weld brill bit and here's a story to tell of the ordeal.
I was in Sheffield one midday between customer visits. A town I know well as I was born and bred there. I thought since I'm in the east end ( the grimy Industrial part full of every type of factory and service industry) I'll buy a drill bit.
Well..................................What a performance. I must have visited eight tool hire shops/engineers supplies/cutting tool specialists/tool shops and not one had one.
Well. actually Cromwell tools did but not the type I wanted. I bought it any way.
Some shops had no idea what a spot weld brill bit was !!! In Sheffield of all places. The home of steel and steel processing. The land of welding sheets and machining, railway parts and Iraq gun barrel's, inventor of stainless steel, cutlery and nickel plating and all things engineering.
I used said drill bit and it worked a treat. It was still hard work upside down drilling at only half arms length, hair and eyes, face and mouth full of tiny MG particles. Even the sunshine made it difficult as I had to lay flat face up half looking at the dark/black sill half looking into bright sky. Still the key to it was :-
a/. clean the surface thououghly before starting
b/. use the correct tools
c/. Don't give up, its often easier than you imagine
The photo shows the sills with a good view of the large hole I cut out ready to repair with the MIG welder.
Yes........................I'm sorry I should have told you earlier. I bought it on E-bay ( again)
for £60 and it works a treat. The guy even threw in a large sheet of 1mm thick steel too.
I'm currently scheming on how to buy an Auto-helmet.
.
.
.
.guffaw & snigger............................Its that word and my base sense of humor.
Anyways. I have to repair the small holes in the footwell and front footwell fascia before attempting the sills. It will be a good opportunity to practice welding in less critical areas.
By the way I have a huge repair section for the cut away area and the inside floor from the nice chap in Doncaster where I bought the sills ( E-bay yet again)
I promise I will report more often from now on especially since I'm likely to become more frustrated with welding.
FYI had a good hol in Spain with the extended family ( In-laws) several trips abroad with work like France and Sweden and France again.
Mini holiday in Belgium for the wifeys 50th ( weird people but fun place) but not seen Chris much due to hol overlap so will get humour injection on Friday night out this Friday...yipee.
Its been a very busy time with work, holidays, sunshine and family getting most of my attention. I'll have to be brief here too as my laptop keeps freezing up.
Three times I've posted wit and wisdom today only for it to be lost in cyberspace.
The title refers to the castle rail sill section finally off at last. Albeit in about seventy small pieces. It was achieved with brute force and ignorance and then a little intelligence and maturity.
After being stumped for so long on how the section was attached to the underside of the floor I decided to use the brush attachment in the drill and clean the inside sill bit.
Lo and behold.............semblances of spotwelds. Trouble is I buggered up the spotweld drill trying to sharpen it with the angle grinder. So hence the brute force and ignorance bit with a bolster chisel and medium claw hammer.
I eventually bought a new spot weld brill bit and here's a story to tell of the ordeal.
I was in Sheffield one midday between customer visits. A town I know well as I was born and bred there. I thought since I'm in the east end ( the grimy Industrial part full of every type of factory and service industry) I'll buy a drill bit.
Well..................................What a performance. I must have visited eight tool hire shops/engineers supplies/cutting tool specialists/tool shops and not one had one.
Well. actually Cromwell tools did but not the type I wanted. I bought it any way.
Some shops had no idea what a spot weld brill bit was !!! In Sheffield of all places. The home of steel and steel processing. The land of welding sheets and machining, railway parts and Iraq gun barrel's, inventor of stainless steel, cutlery and nickel plating and all things engineering.
I used said drill bit and it worked a treat. It was still hard work upside down drilling at only half arms length, hair and eyes, face and mouth full of tiny MG particles. Even the sunshine made it difficult as I had to lay flat face up half looking at the dark/black sill half looking into bright sky. Still the key to it was :-
a/. clean the surface thououghly before starting
b/. use the correct tools
c/. Don't give up, its often easier than you imagine
The photo shows the sills with a good view of the large hole I cut out ready to repair with the MIG welder.
Yes........................I'm sorry I should have told you earlier. I bought it on E-bay ( again)
for £60 and it works a treat. The guy even threw in a large sheet of 1mm thick steel too.
I'm currently scheming on how to buy an Auto-helmet.
.
.
.
.guffaw & snigger
Anyways. I have to repair the small holes in the footwell and front footwell fascia before attempting the sills. It will be a good opportunity to practice welding in less critical areas.
By the way I have a huge repair section for the cut away area and the inside floor from the nice chap in Doncaster where I bought the sills ( E-bay yet again)
I promise I will report more often from now on especially since I'm likely to become more frustrated with welding.
FYI had a good hol in Spain with the extended family ( In-laws) several trips abroad with work like France and Sweden and France again.
Mini holiday in Belgium for the wifeys 50th ( weird people but fun place) but not seen Chris much due to hol overlap so will get humour injection on Friday night out this Friday...yipee.
Monday, June 19, 2006
My problem is this..........
That's how I ended the last section of my blog ( see below)
Apologies for that. I was waylaid/distracted/thinking of money/beer/ etc
Here's a lovely photo of me enjoying myself on Fathering Sunday.
I spent all morning looking at the sill and thinking how the hell do I remove it ?
It appears to be welded by magic.
I've drilled all the spotwelds I can see. I've even drilled some I can't see just for good measure.
What I meant to say at the end of the last blog is the vertical sill is behind the "A" post and between two other vertical parts, and at the B post, disappears altogether in a void of important structural looking parts. I do what I normally do in situations like this: look at it for lots, make a cup of tea and look at the restoration bible from Mr Porter.
I did glean some useful info. The new rear part of the sill can be welded on top of the tabs for the old one. And I managed to remove ( or most of) the offending sill part.
The really annoying thing is though, the castle rail is still there. I cannot see for the life of me how its held in position. Its stuck like glue, even welded solid, but where ?
The Previous owner had the castle rail cut down the centre and left the inside bit there, just welded a new one onto it. No wonder it took so long to get it off.
I was amazed when I'd spent 3 weeks grinding the bead welds, removing underseal and being frightened to death of the grinding wheel only to find half of another one there. Only this time it looks a little more permanent.
After consulting all the text books and internet pages, still no sign of how to remove them.
I find this so annoying that pages and pages are written about this subject and not one explains the procedure or difficulties of removing sills.
They all say " remove sills. careful their sharp..................Thanks a lot mate
How ? where do you start ? whats the most critical bit? whats the trickiest?
Enough said. More when I've calmed down.
Monday, May 29, 2006
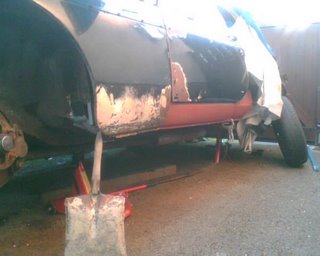
 As you can see I've been at it again.
The car that is. Although I've done lots otherwise but boring mostly.
Since a lovely bank holiday approached I hatched plans to remove the LH sill on the car.
Well "remove" is a fairly permanent word so I approached the job with some caution.
Its well said about MG sills that they are not a job for the beginner, need good welding skills and if done badly you may as well chuck the car away.
That's apart from the fact that the car can "sag" drastically in the middle if not supported correctly.
..........................Well just like me then !!!!!
( shot showing exuberance of grinding tool)
Left to my own devices I ground away the inner upper lip of the sill and peeled down the cover sill just like Mr Lindsay Porter says. So far so good.
I should have used a "Spot weld Drill" but I thought they were expensive last time I looked so I used the dreaded Grinder. I must admit this tool frightens the hell out of me.
Sure it looks cool to be grinding away with sparks flying everywhere, but one slip and that's a hand severed, a carotid vein obliterated or a facial scar the size of the cheddar gorge.
The inner sill was just about there through a thin veil of rust.
For those of you who don't know the sills are structurally important on an MG.
There are 3 main sills.
A flimsy outer sill between the door posts. Easily removed with trusty grinder.
A full length vertical sill underneath this which extends under & behind front and rear wings and acts as a Stiffener for:-
The castle rail. This is also full length and is on the underside of the sill assembly and also attached to the inside front wing rear arch and back wing arch front.
All three make up a strong box section each side of the car.
My problem is this
Sunday, May 14, 2006
No you can't
Money troubles..........pah............Depressing,morbid,tense,lifeless and monotonous.
Yes we have big money troubles but for once I don't give a toss and feel none of the above.
The troubles started when a sudden realization that our annual holiday had to be paid for in six week time. The holiday fund was -£50.
So wifey and I decide on major plan of cutbacks and 3 month plan of action. Her idea is restricting my wine and beer intake which she claims will pay for two holidays.
Slight exaggeration there since her chocolate and biscuit intake would feed a small country.
Anyways, its been tough, and still is, but we are coping..........Just.
The kids don't seem to understand " we ain't got any money to give you". They think all things come from an endless money pit. It's not until you start to count up every penny that you realize how much goes on "incidentals" & minor things.
Decided to strip an old door of the MG and take it to the restoration class for "work". It took most of Fri evening to remove the glass, winder mechanism, hinges and quarter light frames. Still, I can get there early Sat morning with a definite plan.
The hinge plates look a little worse for wear and have been " modified" at some stage. How much will have to wait till Sat morning vehicle restoration class.
Saturday dawns bright and very very wet. In fact an absolute downpour.
Me off early with my old toetectors and new secondhand lime green and blue overall.
Shaun the resto teach looks at the door and says " we have just perfect equipment for that job" great methinks. He says " look through the rain outside to the big yellow thing "
yes I say then what. " Throw the bloody thing in it, its a skip" ( dumpster to our colonial cousins).
Ten minutes later Shaun and I had decided on how to tackle the door.
I will add I got lots of sympathetic looks from everyone. I didn't have the heart to tell them its a scrap door and will only be used for practice. In fact I think I forgot to mention this to Shaun.
On top of the door is the "new" panel I made from sheet steel .
It involved "nibbling, bending, punching and joggling " It makes me feel good to just say those let alone do them. You can see where its going to fit. The bottom RH corner has at some time had a new panel welded directly on top of the rusty stuff. Its making it tricky to get the steel to align well. I wondered why there was a hole missing when i was taking all the glass mechanisms apart. The exposed nut was completely covered by the part of the panel I had ground away.
Looks like it combines all the problems and bodges I,m likely to come up against on the proper stuff ( Mine ) Still I looking forward to the practice.
Just to keep you interested here's a shot of the MG in its normal state.

Maybe next week we may have more wit and wisdom, if I can weather the financial storm.
Yes we have big money troubles but for once I don't give a toss and feel none of the above.
The troubles started when a sudden realization that our annual holiday had to be paid for in six week time. The holiday fund was -£50.
So wifey and I decide on major plan of cutbacks and 3 month plan of action. Her idea is restricting my wine and beer intake which she claims will pay for two holidays.
Slight exaggeration there since her chocolate and biscuit intake would feed a small country.
Anyways, its been tough, and still is, but we are coping..........Just.
The kids don't seem to understand " we ain't got any money to give you". They think all things come from an endless money pit. It's not until you start to count up every penny that you realize how much goes on "incidentals" & minor things.
Decided to strip an old door of the MG and take it to the restoration class for "work". It took most of Fri evening to remove the glass, winder mechanism, hinges and quarter light frames. Still, I can get there early Sat morning with a definite plan.
The hinge plates look a little worse for wear and have been " modified" at some stage. How much will have to wait till Sat morning vehicle restoration class.
Saturday dawns bright and very very wet. In fact an absolute downpour.
Me off early with my old toetectors and new secondhand lime green and blue overall.
Shaun the resto teach looks at the door and says " we have just perfect equipment for that job" great methinks. He says " look through the rain outside to the big yellow thing "
yes I say then what. " Throw the bloody thing in it, its a skip" ( dumpster to our colonial cousins).
Ten minutes later Shaun and I had decided on how to tackle the door.
I will add I got lots of sympathetic looks from everyone. I didn't have the heart to tell them its a scrap door and will only be used for practice. In fact I think I forgot to mention this to Shaun.
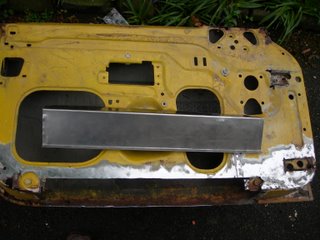
Here is the door after a couple of hours work.

On top of the door is the "new" panel I made from sheet steel .
It involved "nibbling, bending, punching and joggling " It makes me feel good to just say those let alone do them. You can see where its going to fit. The bottom RH corner has at some time had a new panel welded directly on top of the rusty stuff. Its making it tricky to get the steel to align well. I wondered why there was a hole missing when i was taking all the glass mechanisms apart. The exposed nut was completely covered by the part of the panel I had ground away.
Looks like it combines all the problems and bodges I,m likely to come up against on the proper stuff ( Mine ) Still I looking forward to the practice.
Just to keep you interested here's a shot of the MG in its normal state.

Maybe next week we may have more wit and wisdom, if I can weather the financial storm.
Wednesday, May 03, 2006
What's next then ??
The DIY is almost complete.
Only the wallpapering to do, 2nd coat of paint on woodwork and tile bath panel.
All in reverse order of course.
At least wifey is willing to help.......or hinder.
Trouble is she thinks she can paint. I have to sneakily follow her two days later and rub down all the runs and ensure I do the final coat.
Thank heavens she has no interest in the MG restoration.
Youngest daughter No 1 did help last week wire brushing the right front wing area of accumulated crud. I promised her first ride. She knows she will be at least 25 before its finished.
I had another fruitful session last weekend.
Removed some rear window trim. Examined more rust around said area.
Stored both front wings. fuel tank and both bumpers down by garden shed covered by an old woven polythene garden sack ( erratum.... new garden sack 3 years old, it split when i tried to drag the kids round the garden in it)
As I write this I can see in the distance the shed and my precious parts. The bumpers ( rubber... sorry ....Polyurethane ) are stored up against the wall covered by the old rubber floor mats and an old dustbin lid.
How I love summer.......the lawn is green, buds are sprout'n, birds are sing'n and sh***ng all over my bumpers.
How I am becoming a convert to Poly refuse sacks and sheets.
I started my restoration course at local college this week.
How I'm going to love this.
Firstly upon wandering up to a group of folks I picked the course leader to ask
" Is this where I'm supposed to be ? "
Yes he replied, the kettles over there, its always on get a brew when you feel like it. Bacon butties are ordered an will be eaten at 10.30. Wander round with me and the group then we'll get started.
What a chap...........a man after my own heart.( even if he looks like a rockabilly version of Al Bundy)
"What you all want to learn then ? " was his first question.
The usual hesitance from a group of strangers.... then I piped up "welding"
Me too ! yes me as well ! ( me anorl......best Derbyshire accent there )
OK says Shaun ( course tutor )
WELDING............. first minute.......... easy peasy
second minute..........crap, holes everywhere.
third minute........long strands of wire everywhere + birdpoo
( That's what Shaun called it)
time to let someone else have a go
same results but, different order and probably worse.
WELDING PART II first minute.......change the settings..... no description
second minute......NO PENETRATION....bad word
third minute.......change settings.......!!!!!!!!!
Butty time........its the same the world over and it takes me back to my apprenticeship days. Get your butty first. Sure enough two butties were missing.
Luckily not mine though.......remember I've done this before. I used to have to fetch them as a lad come rain or shine Saturday mornings so I was prepared for this likely possibility, thus get in quick.
Over butty had conversations with fellow restorers. One guy is restoring on old Mini
and converting from Auto to Manual gearbox.
Another has a 1960's Triumph. And Another a 40's Jaguar !!!!!!
He wants to learn how to make the curved wings and fiddly bits.
Methinks the local college is not up to this standard. If he can afford that car surely he can afford to pay someone to make them !!
WELDING....Part III..............Shaun shows us ( without a mask and closing his eyes) how easy it is. Its all in the wrist action. keep moving and set it up properly.
first attempt............crap, spatter and crackle
second attempt...........much better with gas on
third attempt.............getting clever,butt joining two pieces
fourth attempt............too clever. big holes everywhere
fifth attempt.............bird poo and wire everywhere
Guess welding is not so easy. I will admit that things got better when Shaun,seeing my enthusiasm gave me an "Auto helmet " to use.
I'm laughing like a drain as I type this. It must be the word " Auto helmet"
Sounds like a STD or kinky gay sex toy. My sense of humour is base and kind of juvenile mostly. Guffffawwwwwww.
Now I want one. Its the only way to weld.
As the title says now I have a little more skill to progress....but to what.
I still can't seem to make a plan on what to do next.
I'm sure welding panels will figure somewhere. I,m afraid to weld just yet though as I don't want to weld little rusty holes into big rusty ones and ruin £ 85 quids worth of panels.
Procrastinate............that's what I'll do next.
Job settled. good night and thank you.
Monday, April 17, 2006
Some progress at last
Well time to report some good news at long last.
The restoration has moved forward somewhat thanks largely to an early morning leap out of bed. The kids were up early ( 7 ish) on my first days hol (Good Fri)
so I made a hearty breakfast for us all and set off down to the bottom of the garden by clearing out the shed and unearthing around the shed of old dead leaves and unknown things.
I really hate clearing up the leaves as there's always lots of worms and slimy creatures scuttling away to darkness. The 10 kg bag of chicken manure pellets didn't
help either. It had a plastic bag over it and a half housebrick.
I know why now.
At some point the lid had broken and since it was to be left outside a bag placed over it, however water had got in.
Got in big time, and it was supporting a whole new life culture of maggots, worms and other things.......All swimming in 10 kg worth of the smelliest liquid Sh*t ever. ( very good for the garden though.....but not mine, sorry ours)
I had to get the wife to move it further away from the shed area so I could carry on working. Smells are not my strong point ! Sorry don't do foul smells.
So, all non relevant things banished to on side destined for the dump-it site
and the rest, well..................How the hell is it all going to fit back in the shed ?
It was like Dr Who's tardis. Could this stuff really all come from Inside the shed ?
More ruthless discarding and several re-arranges of inside and there it was.
Loads 'o' rooooom.
Still a strong smell of Sh*t though.
Then another Idea. Wrap the tub in a strong black refuse sack and tie up tight.
thereby stopping said foul smell ruining garden and scenic tranquil atmosphere.
Smell all gone ( tub will be magically inserted into wheelie bin next bin day)
A more than slight improvement actually that would allow at least 3 or 4 boxes and trim bits into the shed.
Yipeee !!! Action stations restoration.
removed Right wing in less than 15 minutes ( It took nearly four weeks for the Left)
Admittedly most of the work had been done in a fit of frustration at the spinning nuts of the left wing.
Removed fuel tank after wrestling with only one rounded nut which I had to drill out.
This was a bit scary as it was the nut nearest the fuel filler hose inside the boot.
Today up early and drained oil ( wifey did not see this, good job a some has been deposited on drive) the old cat litter tray came in useful for once.
Emptied water....sorry coolant system. Removed radiator and hoses.
Removed oil cooler and some pipes.
Only bad news is that I broke the top hose connection on the oil cooler matrix.
Too much brute force and a cheap aluminium housing.
I think I can grind, weld and hammer to my hearts content now !!!!!
............If only I knew what I was doing...................
Tuesday, April 11, 2006
Who turned off the light at the end of the tunnel ?
The title just reflects my frustrated mood of late.
After attempting six time in two days to set up the tile cutter to cut six tiles I finally abandoned the effort to the weekend.
I did feel much better for it though.
The present tile cutter is new and works like a dream. Well it just works like any tile cutter should do. They fit perfectly. Next job is to lift all loose tiles
( approx 50% of them) and stick back down. It looks like I'll have to have a day off work to complete this or do it one evening to stop little feet walking on them till their fully stuck.
How I came to get to this stage is like a de ja vue dream. Similar to the cheap tools I bought earlier on in the year.
The present tile cuter is on its last legs. Its not mine, its my mates which I've had on permanent loan for about seven months. Brother in Law borrowed it for his tiled floor and I'm afraid it just wore out. perhaps the 15mm thick tiles he was cutting had something to do with it ?
Anyway,I decided to buy another one. Did the usual trawl of B&Q, Do-it all, Wickes etc. Decided on a "cheaper" model from B&Q: £ 29.99 and made of "stainless steel with 150mm cutting disc"
Gawd ......what a mistake.
When assembling on kitchen worktop ( yes it was raining outside) the "stainless steel" tops rectangular hole where the blade pokes through was mis-aligned.
Mis-aligned is a kind phrase. The only way the blade didn't touch the "stainless steel" top was when it was tilted at 45 degrees using the unique selling feature of " even cuts tiles on the angle". It a moment of testing I accidentally started the motor, only to see sparks fly, Howling graunching noise and a team of people rush into kitchen to expecting to see six tons of girders there with me underneath.
Crap............
I got out the trusty angle grinder to try and modify/remove the offending mis-placed hole. Reassembled and.........Crap.
Took the thing back to B&Q and got a full refund. I don't know where it was made but i suspect made in C**** was somewhere cunningly hidden.
Exactly one week later I visited B&Q and there I spied a Plas****s tile cutter for the same price. Admittedly a little smaller. I bought it and its wonderful. It did the job, easily with no fuss. I got frostbite from cutting tiles outside in the howling wind with wet hands, but hey.......the job done, almost.
My next rant is how ironic life is.
A while ago i posted on the internet somewhere, may have been this blog, the probs with the spinning captive nuts inside the wings where they were inaccessible.
I received last week a very kind and lengthy reply on how to resolve this issue.
In fact i had already resolved it, but nevertheless, the tips were excellent but not applicable in my case as the cages were inaccessible.
I still have faith in good ole E-bay. I was watching a bodyshell hoping it might go cheap. Did not win but decided to contact the winner.
A fellow MG restorer and by the sounds of it a willing and understanding bloke.
The shell is about to go to the scrapper as he has all the parts he needs from it.
Bless him, he offered to cut off the parts i need ( LH rear top wing, gutter section ect) I,m sure he will come through. Especially if he reads these pages.
I'm going for the sympathy vote.
All I've done MG wise is re-tie the poly sheet countless times after wifey bought some clothes line especially for me. To replace the 60 meters of telephone cable the Sky installer insisted on leaving I've been using.
The Easter weekend signals some positive action though...if....big if... the weathers good I'll tidy shed, dispose of lots of crap and organise the removed items from the MG.......hopefully, and after the tiling is complete.
Monday, March 20, 2006
When enthusiasm flies
Yet more wet and cold weekends have halted the frenzied pace of restoration.
Last attempts saw the removal of lots. Hope I can remember where it goes back and where I've stored it.
Frenzied is a term I've heard lots of lately.
Wifeys attitude to plotting a new bathroom......Frenzied.
Kids obsession with MSN and chats with mates.........Frenzied
Wifeys cajoling of me to make a start on said bathroom.......Frenzied
My resistance to do anything remotely interesting of a weekend........Frenzied
My boss's attempts at getting the sales team to sell more..................Frenzied.
OK you get the picture, there's some element of frustration embedded in me at not having a garage in which to work or store the items removed so far.
I guess I'm feeling guilty too of not having started on bathroom.
Well I did actually start and that was the prelude to.......well, P***edofness.
Like all males of the species I know best when it comes to DIY.
So tiling the bathroom floor should be easy. After all I'd done the toilet a few months previously ( 800mm x 1.4 meters, with 300mm square tiles)= 15 tiles including 5 cut tiles)that took best part of 2 days due to the awkward shape of the toilet base.
Under the tiles was regular hardboard. nailed every 2 inches ( just to be sure)
So they stuck fine and only one had to be uplifted and re glued.
Shaving an extra half inch of the door bottom made the largest contribution to the buggeration factor. ( undo 9 screws that have not moved for 45 years) move door downstairs, set up workmate ( all day job to remove MG bits from shed so I can see workmate, rest of weekend doing MENSA puzzle on how to extract workmate)
So work started in earnest. Except that I forgot brother in law had the electric tile cutter of mine ( I mean mine in the biblical sense, as it belongs to mate Chris. I borrowed it 5 months ago and he's forgot )
B in L used machine to do his whole bathroom and floor so its had some use and he says in need to cool down every now and then.
Frenzied comes back to haunt me again. That must have been B in L 's
F*****ed attempts at cutting at least 55mm thick cast iron tiles on a hobbyist machine.
The first cut I made the machine lasted exactly 2 inches before it conked ( sorry, overloaded the thermal protection device)
This required a wait of approx 30 minutes, still I could get on with measuring and gluing.
Things got decidedly worse.
After gluing and leaving the floor 80% tiled, the following morning displayed the tiles loose and wobbling like a see-saw.
Crap cement. Heating left on and little feet walking on them did not help.
However, my expert opinion is that I did not listen. I thought I knew best.
I used regular hardboard under the tiles. I needed to use at least 12mm thick chipboard.
So last weekend was spent chiseling off the cement from the tiles, cutting chipboard and laying tiles properly, leaving cutting tiles till the end.
By the way the cutter cuts exactly half an inch now between 2 hours cool down.
Should finish by Christmas then. Unless I ask Chris what's happened to his cutter and he buys a new one for me to borrow.
With luck the weather will improve and the bathroom finished in time for spring.
I hope the solicitor pays out by then, but that stories for next time.
Subscribe to:
Posts (Atom)